AzamSharp
Global State Management for SwiftUI Apps Using Redux (Introduction)
State management is an essential part of any SwiftUI application. SwiftUI provides several built-in ways for managing state, which includes @State, @EnvironmentObject, @Binding and @StateObject.
@EnvironmentObject does manage global state, but it does not provide any structure. In this post, you will learn how to use Redux to organize the flow of your global state.
What is Global State?
Global state, represents the state that can be accessed and updated by any view/component. The main purpose of the global state is to streamline the communication between components. This means that instead of passing data up or down a complex hierarchy, views/components can simply read and update the data maintained by a global store.
Understanding Redux Flow
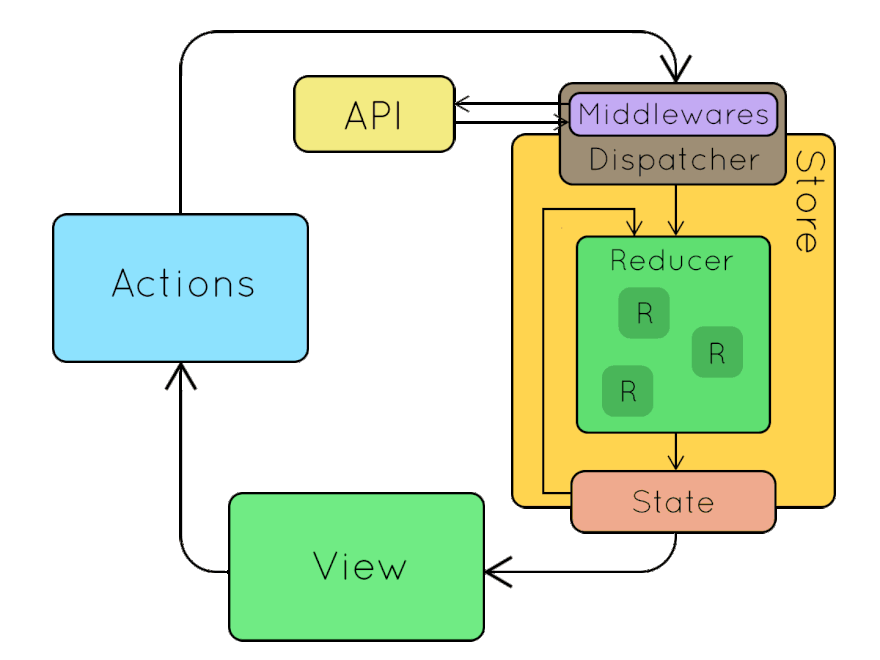
Redux flow depends on several different components working together. These components consists of the following:
Store: This is a redux store, which maintains the global state.
Reducer: Reducer is used to update the global state. Reducer is the only one who can update the global state. One application can consists of multiple reducers but in the end all reducers are combined together.
Action: Actions are dispatched from the store, which goes to the reducer and finally updates the global state.
There are other concepts including Action Types, Action Creators and Middleware, but for now we will start with a basic store.
Here is the basic Redux Flow Diagram to show different components in action.
Setting Up Store
We will start by creating the global store. The store depends on the reducer, so we must create a reducer instance, whose job is to update the store. There are several ways of creating a reducer, but in the most simplistic form, a reducer is just a function.
func reducer(state: State, action: Action) -> State {
    return state
}
The job of the reducer is to take in the current state and action and then return the new state. As, you can see our reducer simply returns the current state so needless to say it is kind of useless reducer. Don’t worry we will update the code shortly.
The state instance represents the global state. You can put anything you want in the state, but we are going to start with storing a simple counter value.
struct State {
    var counter = 0
}
Next, let’s move on to the Store. Store is responsible for dispatching actions which will reach the reducer, where reducer will finally update the global state. The developer working on the Redux app, will mainly interact with the store.
typealias Reducer = (State, Action) -> State

class Store: ObservableObject {

    var reducer: Reducer
    @Published var state: State

    init(reducer: @escaping Reducer, state: State = State()) {
        self.reducer = reducer
        self.state = state
    }

    func dispatch(action: Action) {
        self.state = reducer(state, action)
        print(self.state)
    }

}
As you can see in order to create a Store, we need to pass in a reducer. If the state is not passed then we will use a default instance of the state.
At present we don’t have any actions to dispatch. Let’s create a basic IncrementAction as shown below.
protocol Action { }
struct IncrementAction: Action { }
Once, we have actions created we can update the global state based on those actions. Each action can update a slice of the global state.
func reducer(state: State, action: Action) -> State {

    var state = state

    switch action {
        case _ as IncrementAction:
            state.counter += 1
        default:
            break
    }
    return state
}
As you can see the reducer function checks for a particular action and then only updates that part/slice of the global state. The state property in Store is marked with @Published, which means anytime you change the state it will notify all the listeners.
Finally, we have to make sure that we inject the store to our root view. This can be done in the YourAppNameApp.swift (Xcode 12) file or SceneDelegate.swift (Xcode 11).
import SwiftUI

let store = Store(reducer: reducer)

@main
struct HelloReduxApp: App {

    var body: some Scene {
        WindowGroup {
            ContentView().environmentObject(store)
        }
    }
}
In the above code, we have injected the global store in the root view, as an environment object. This means it will be available to the root view and all the children of the root view.
Views contained in a modal are not part of the hierarchy. This means, you will manually have to inject the store through environmentObject to those views.
Dispatching Actions and Updating Views
At this point we have configured our global store. The next step is to read values from global state and update the global state.
First, we create a store property inside ContentView and decorate it with @EnvironmentObject property wrapper. This allows us to access the store from right inside our view.
struct ContentView: View {
    @EnvironmentObject var store: Store
    ... code
}
Then, we read the property from the global store and display it in the Text view as shown.
struct ContentView: View {

    @EnvironmentObject var store: Store

    var body: some View {
        VStack {

            Text("\(store.state.counter)")
                .padding()

            Button("Increment") {
               // dispatch action
            }
        }
    }
}
If you run the app, you will see the value of 0 displayed in the Text view. This is because the global state is initialized with counter value = 0.
In order to update the global state, we need dispatch an action.
 Button("Increment") {
 store.dispatch(action: IncrementAction())
    }
Once, the button is pressed, an action will be dispatched. The action will reach the reducer, where it will finally update the global state.
As soon as the global state is updated, views listening to the changes will render again. This means if you have multiple views displaying data from the global state, they all will render again.
Conclusion
Redux is a very common pattern used extensively in web apps. It is exciting to see how Redux can be integrated with SwiftUI applications. In the next post, we will look at how to handle asynchronous requests in Redux.
References