AzamSharp
MV State Pattern - A Better Way of Building SwiftUI Apps
Update: Please check out the most updated article called Building Large-Scale Apps with SwiftUI: A Guide to Modular Architecture.
I started working with SwiftUI framework in 2019. Like most developers, I also jumped on the MVVM bandwagon. I wrote books on it, gave presentations and even created a lot of videos. I managed to get MVVM working with SwiftUI in almost all of my projects. But it was a constant battle. I always felt that I am fighting SwiftUI framework. Even for small and medium sized projects, I felt that I was writing too much code and adding unnecessary layers. In this post, I will introduce MV pattern. This is not something I invented. This is the same pattern Apple use in their code samples for their SwiftUI apps. Check out the references section at the end of this post.
I can understand that we should not take Apple’s advice in terms of architecture of the app. But after working with SwiftUI and MVVM for last 3 years, I find MV pattern to be much better and easier to use (at least for me personally). This does not mean that MVVM is useless in the world of SwiftUI. Sometimes, you need a view model to flatten the data or even perform validation for large views. What I am against is creating a separate view model per screen. More than often, it is completely unnecessary and needlessly adds complexity to the project. If MVVM is working for you then more power to you!
What is MV State Pattern?
First of all MV state pattern is not the official name for this pattern. Some people call it State Pattern and others call it Model View pattern. I will simply call it MV pattern or MV state pattern. In this post, I will cover how to write your SwiftUI applications using the MV pattern. You will see that when you use MV pattern in SwiftUI, things becomes simpler and easier to manage.
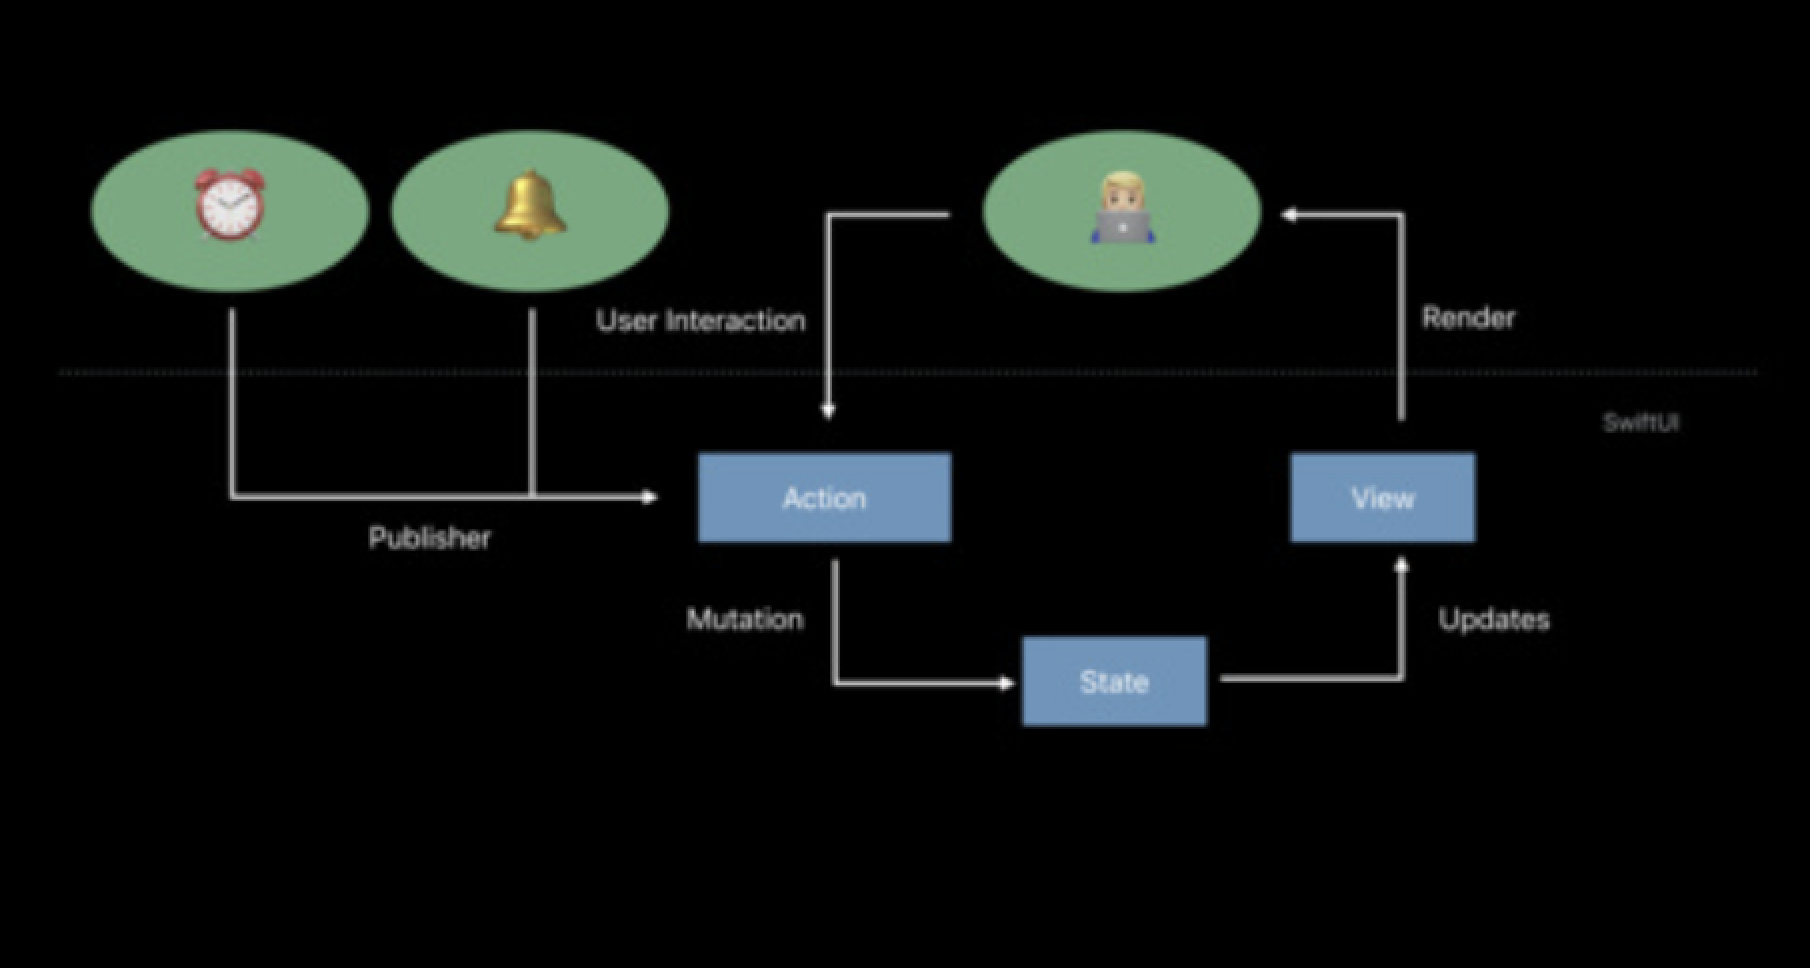
The basic idea of MV pattern is that the user will perform action which changes/mutates the state. This will cause the view to render again. This will be running in a constant loop. Anytime an action changes the state, a new version of view is created and rendered on the screen. This is shown in the following diagram.
Please note that Apple never explicitly called pattern, MVI patten.
The action triggered by the user will change the state. This state can reside in individual properties decorated by @State property wrappers, model objects and even view models. Keep reading, I will talk more about how to architect apps using MV in Aggregate Root section.
Although MVVM has become a default architecture for SwiftUI apps, it introduces a lot of unnecessary code that is not needed in majority of the cases. Unlike WPF (Windows Presentation Foundation), SwiftUI views has built-in binding. This means SwiftUI views are not only views but also view models. I wrote about it in my last article SwiftUI View is the View Model.
If you are interested in reading about my views on MVVM with SwiftUI then you can check out the articles in the reference section. This article is dedicated to explain the architecture of the MV state pattern.
The above diagram simply shows the flow of a normal SwiftUI app. The state carries the data from the model and gives it directly to the view. An action can be triggered by a tap of the button or even an external event. In the next section we are going to see how we can apply this pattern using Aggregate Root.
Aggregate Root
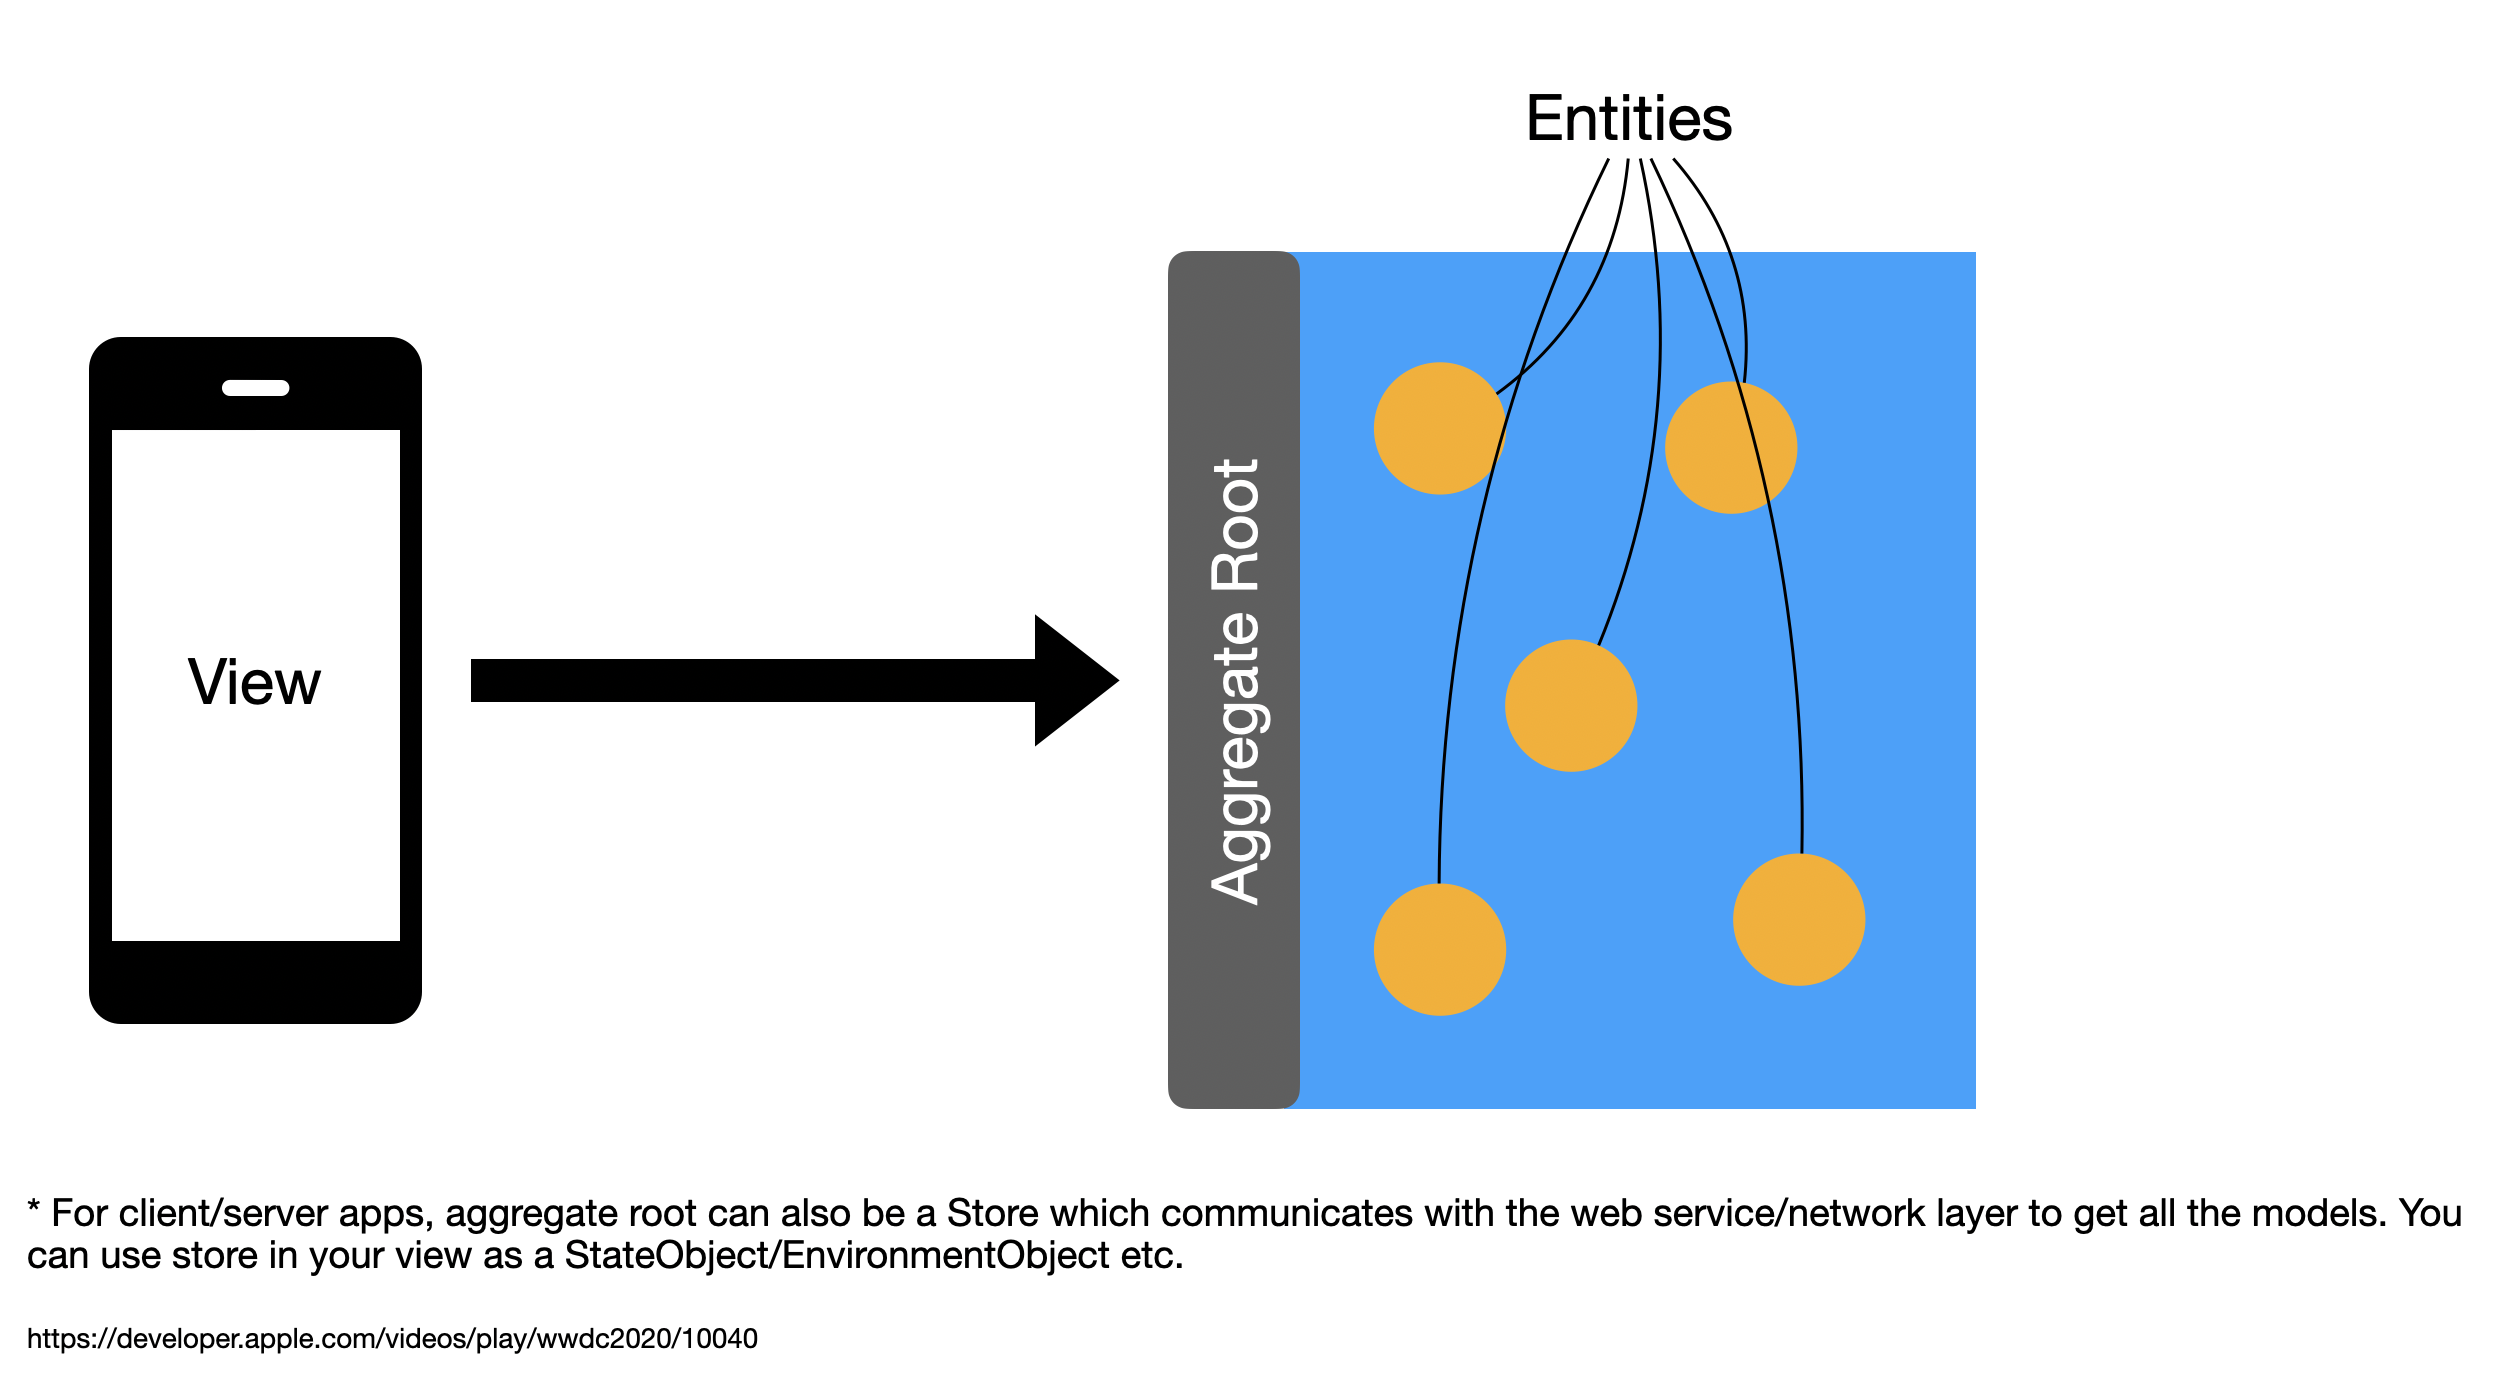
The main concept behind aggregate root is that one observable object is going to serve as a gateway to access model objects. All models will be value types implemented using struct data type in Swift. This gives your app a single place for all the logic. This can be explained from the following diagram.

The aggregate root model can also be injected as a global object using @EnvironmentObject in SwiftUI. In a client/server apps, your Store can also serve as an aggregate root. Store is simply an observable object, which communicates with external services (network layer) to get the data to the view.
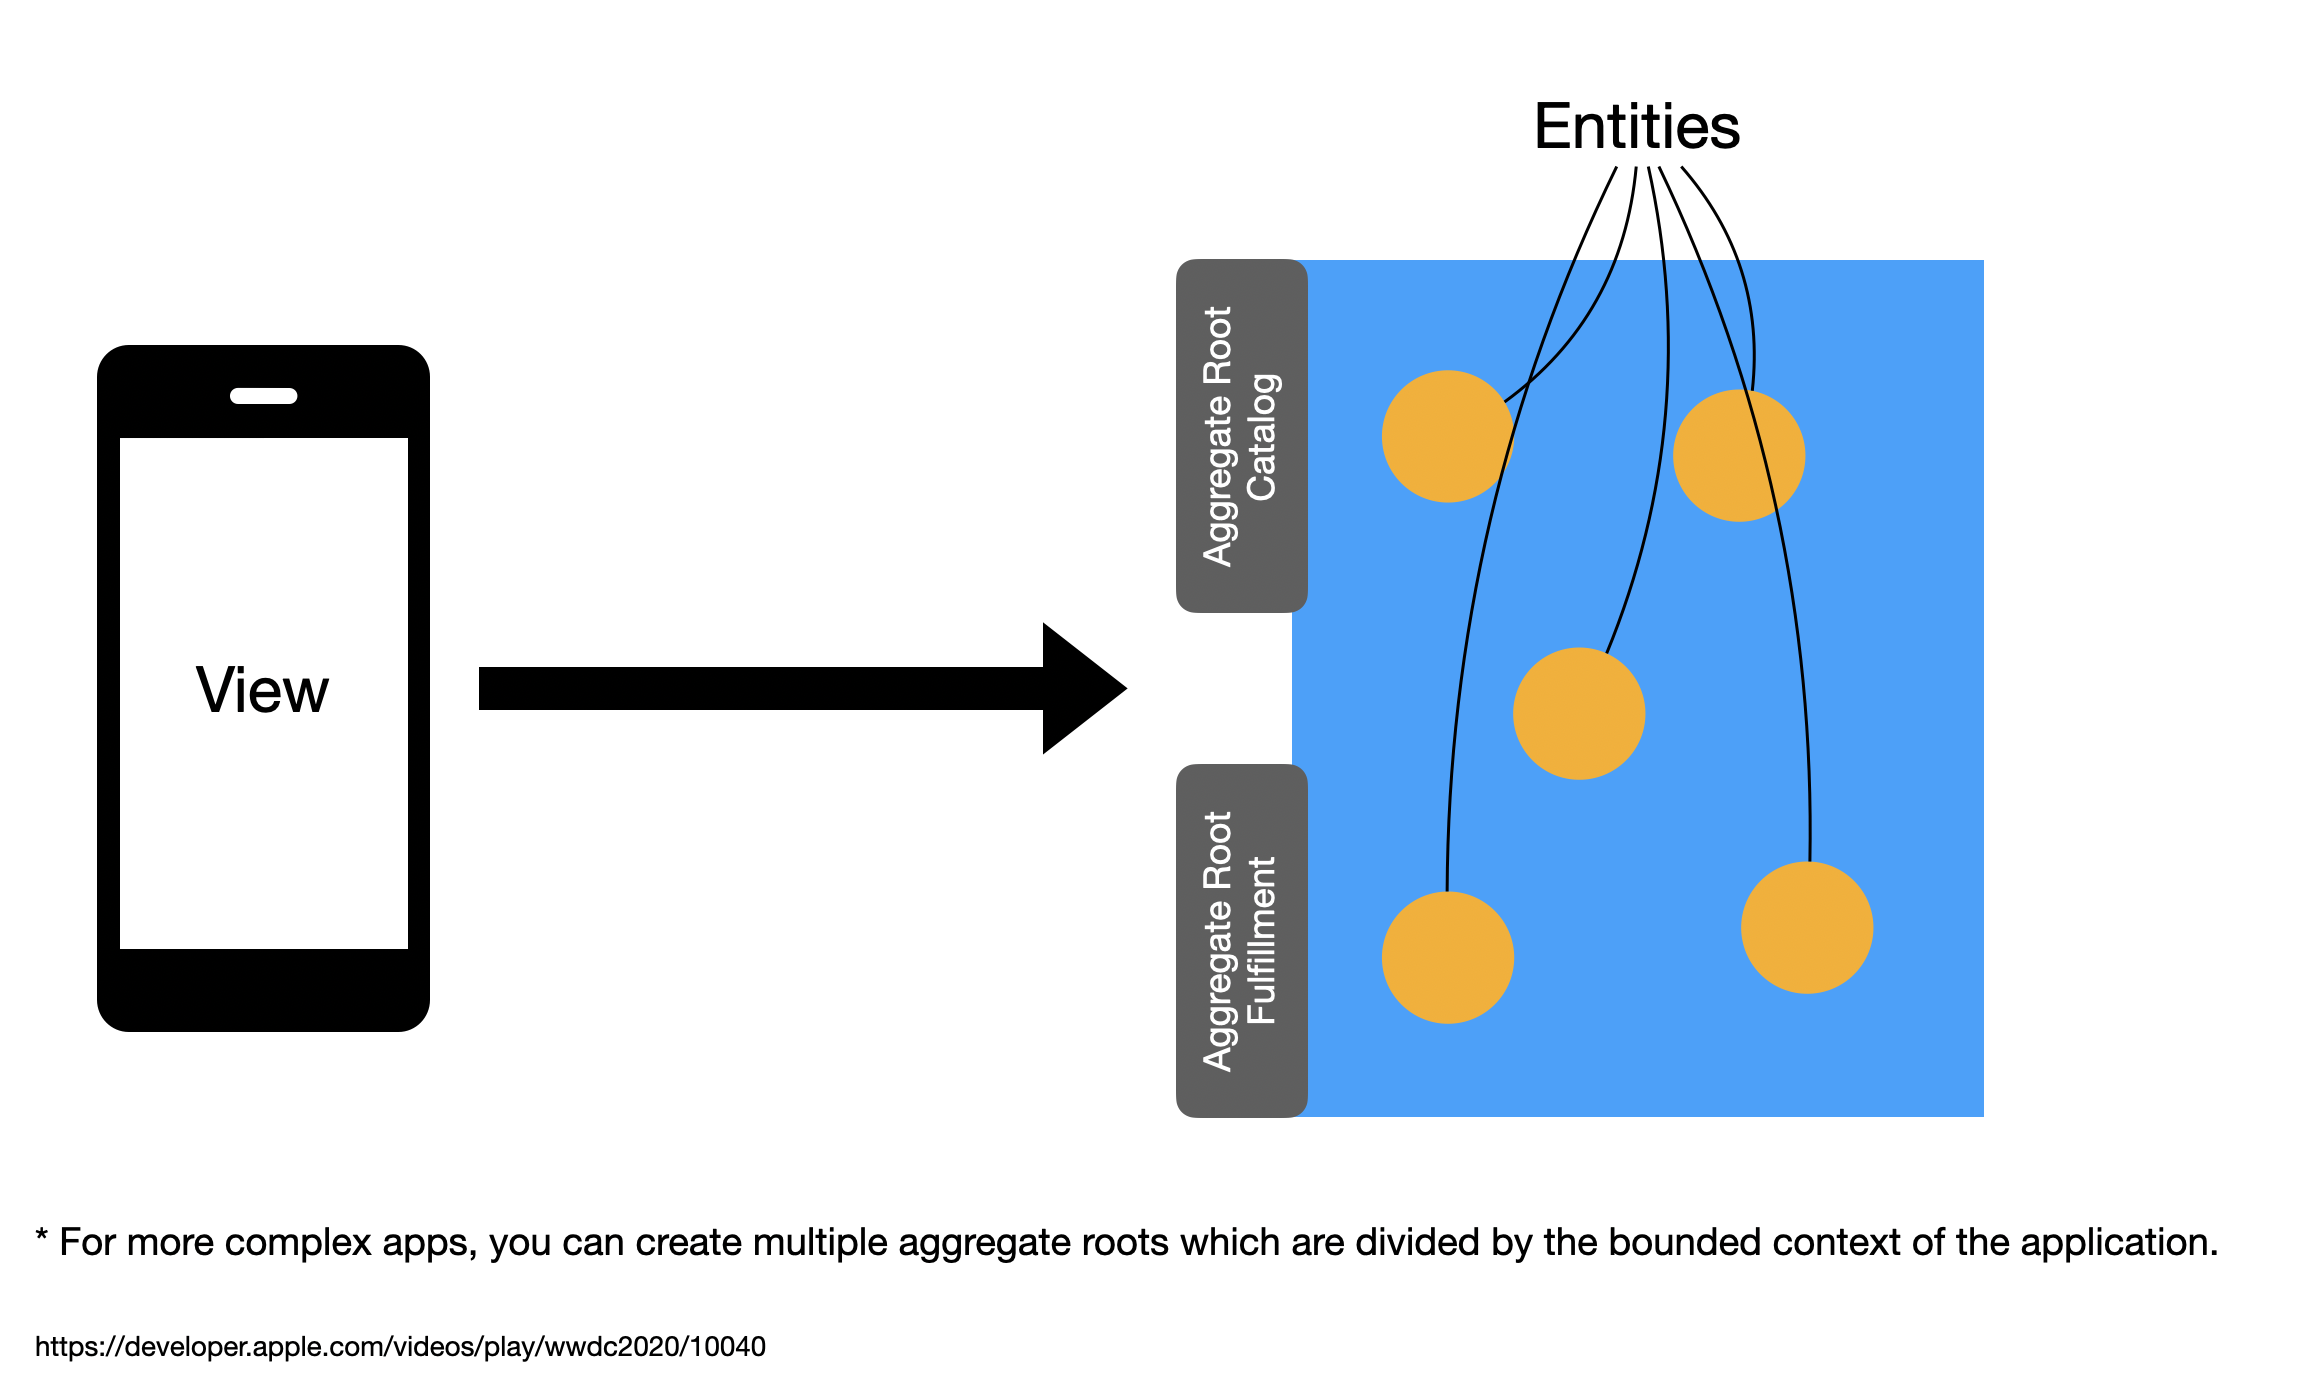
For more complicated apps, you can introduce multiple aggregate root objects based on the bounded context of the application. This is shown in the diagram below.

Keep in mind that it is not easy to divide your models and place them into their respective aggregate root objects. This requires extensive domain knowledge and you will greatly benefit from a domain expert.
Let’s take a look at how this will look in code. We will be consuming JSON from Fake Store API. We will start by implementing our Product model.
struct Product: Decodable, Identifiable {
    let id: Int
    let title: String
    let description: String
}
Next, we will implement a network layer.
class Webservice {

    static let shared = Webservice()

    private init() { }

    func fetchProducts() async throws -> [Product] {

        // The URL can be placed in a configuration so it can be changed between dev/test/prod
        let (data, response) = try await URLSession.shared.data(from: URL(string: "https://fakestoreapi.com/products")!)
        guard let httpResponse = response as? HTTPURLResponse,
              httpResponse.statusCode == 200
        else {
            throw NetworkError.badRequest
        }

        return try JSONDecoder().decode([Product].self, from: data)
    }

}
You can add a configuration option in your Webservice class so that it can switch between different environments.
And finally, we will implement our Aggregate Root. This will be called Store as shown below:
@MainActor
class Store: ObservableObject {

    @Published var products: [Product] = []

    func loadProducts() async throws {
        products = try await Webservice.shared.fetchProducts()
    }

    func addProduct(_ product: Product) {
        // code...
    }

    func loadCart() {
        // code...
    }

    func loadUsers() {
        // code...
    }

    func addProduct() {
        // code ...
    }

}
At first glance, you may feel that Store is just a view model with a different name. But Store is NOT a view model. Store is an aggregate root, which allows your app to get access to the model objects. We will NOT be creating separate view models per screen. We will use Store directly in our view and get the data we need. If you want the store to be accessible easily in all views then you can inject store instance as an @EnvironmentObject.
For larger apps you may want to divide your global state into multiple slices. You can read about it here.
Update (08/11/2022):
Depending on your app, you may not even need a Store layer. You can simply use the Webservice from right within your view (VM).
@MainActor
class Webservice: ObservableObject {

    @Published var products: [Product] = []

    func loadProducts() async throws {

        let (data, response) = try await URLSession.shared.data(from: URL(string: "https://fakestoreapi.com/products")!)
        guard let httpResponse = response as? HTTPURLResponse,
              httpResponse.statusCode == 200
        else {
            throw NetworkError.badRequest
        }

        products = try JSONDecoder().decode([Product].self, from: data)

    }

    func addProduct(_ product: Product) {
        // code...
    }

    func loadCart() {
        // code...
    }

    func loadUsers() {
        // code...
    }

    func addProduct() {
        // code ...
    }

}
If your app has multiple bounded context then your one single Webservice will be divided into multiple services catering to each bounded context. This means instead of a single Webservice class, you may have AccountService, UserService, ProductService etc.
Each app is different. If your architecture dictates that you must have a dedicated network layer then add it.
Next, we will inject the store into the environment object so it can be used throughout our application.
NOTE: For this app, you can simply inject the Webservice into the EnvironmentObject since our Store is not doing much. Only, inject into the EnvironmentObject if you plan to access the data in other views.
For this code you can also inject
import SwiftUI

@main
struct LearnApp: App {

    @StateObject private var store = Store()

    var body: some Scene {
        WindowGroup {
            ContentView().environmentObject(store)
        }
    }
}
Finally, we can use the store directly in our view.
struct ContentView: View {

    @EnvironmentObject private var store: Store

    private func populateProducts() async {
        do {
            try await store.loadProducts()
        } catch {
            print(error.localizedDescription)
        }
    }

    var body: some View {
        List(store.products) { product in
            Text(product.title)
        }.task {
            await populateProducts()
        }
    }
}
The view uses the Store to get the model objects and then directly binds it to the screen. There is no view model layer needed in between the view and the model. The view in SwiftUI is also a view model. As shown above this does not mean you can start putting URLSession in the view. You still need a network layer for performing requests as we implemented earlier.
When sharing the same environment object all the views using the environment object will render. This mostly includes child views and even views in the navigation stack. If this is started to cause issues then you may have to slice your global state. I covered that in my article here.
Core Data
In the last example we talked about client/server apps. But how does MV pattern works when we remove the server component. In this section, I will share snippets of code from my existing app (BudgetApp), which you can download from Budget App here.
Core Data provides several property wrappers, which allows easy access of data from right within your view (view model). This includes @FetchedRequest, @SectionedFetchRequest and even NSManagedObjectContext.
Please note that in SwiftUI, view is also the view model.
A @FetchRequest property wrapper is implemented as shown below.
struct ContentView: View {

    @Environment(\.managedObjectContext) private var viewContext
    @FetchRequest(entity: BudgetCategory.entity(), sortDescriptors: []) private var budgetResults: FetchedResults<BudgetCategory>

}
@FetchRequest accesses the managedObjectContext from the Environment. You can download the complete code to check out the implementation. @FetchRequest property wrapper not only fetches the records based on the request but also keep them current. This means if you add a new record then the @FetchRequest will make another call and fetch the latest records from the database.
If you were using MVVM pattern with Core Data then you may have to implement NSFetchedResultsController to get the same functionality. This requires a lot of work and you can check it out in my YouTube video.
Using @FetchRequest inside the view does come with its own set of challenges. The biggest problem is that now we cannot reuse the same request, since it is tied up inside the view. In some cases, you don’t care to reuse the same request because it is part of a particular view but in other cases you need to perform the same request but from a different view. In those cases, you can move the request to the corresponding model. This is shown in the implementation below.
@objc(BudgetCategory)
public class BudgetCategory: NSManagedObject {

    static var all: NSFetchRequest<BudgetCategory> {
        let request = BudgetCategory.fetchRequest()
        request.sortDescriptors = [NSSortDescriptor(key: "dateCreated", ascending: false)]
        return request
    }
BudgetCategory is Core Data model and we are adding a new static property called “all” to the model. The “all” property creates and returns the NSFetchRequest, which can be used in the view. This is shown below:
struct ContentView: View {

    @Environment(\.managedObjectContext) private var viewContext
    @FetchRequest(fetchRequest: BudgetCategory.all) var budgetCategoryResults
Persisting data also becomes easier since you have direct access to NSManagedObjectContext inside the view. This is shown in the implementation below:
struct BudgetDetailView: View {

    @Environment(\.managedObjectContext) private var viewContext
    let budgetCategory: BudgetCategory
    @State private var name: String = ""
    @State private var total: String = ""

    var isFormValid: Bool {

        guard let totalAsDouble = Double(total) else { return false }
        return !name.isEmpty && !total.isEmpty && totalAsDouble > 0
    }

    private func saveTransaction() {
        if isFormValid {
            do {

                let transaction = Transaction(context: viewContext)
                transaction.name = name
                transaction.total = Double(total)!

                budgetCategory.addToTransactions(transaction)
                try viewContext.save()

                name = ""
                total = ""
            } catch {
                print(error.localizedDescription)
            }
        }
    }
Please note that in SwiftUI, view is also the view model.
You might be wondering that what exactly is serving as an aggregate root when we are using Core Data in SwiftUI. When building Core Data apps in SwiftUI using the above techniques, NSManagedObjectContext is considered the aggregate. It is through the NSManagedObjectContext that you get access to the models and persist them.
Validation
Validating data entered by the user is mandatory in any iOS application. You may have heard the phrase garbage in, garbage out. If you let your users enter invalid data then it will reach all the way to your database. For validation, I will share some screenshots that I posted earlier on social media.
Simple Validation (No Error Messages)
This validation can be used for simple views that don’t require to show a validation error messages to the user. The validation works by disabling the button. If the form is valid, then the user is allowed to submit the form, otherwise they are not.

Validation with Error Messages

This validation can be used for forms that require to show validation messages to the user. The validate function performs the validation and stores the messages in an array. Later those messages are displayed on the screen.
Validation with Error Messages (Separate ViewState)

This validation can be used when you have a large form to validate and you do not want to put all that code in your view. For this scenario, we create a separate struct (BudgetInfo) to hold the state of the UI. You can think of BudgetInfo as a view model, which can validate itself.
I have put all the code in the same file for demonstration purposes. Please make sure to create separate files when necessary.
Validation with Property Wrappers
Another way to validate is to create property wrappers for each validation scenario. This means you will have property wrappers for @Required, @Email, @Min, @Max. I don’t have an example at hand but you can definitely check out the ValidatedPropertyKit.
Testing
One of the arguments of using MVVM with SwiftUI is that it allows developers to easily perform unit testing for their views. This is a valid argument, because having a separate layer of view model does allow easy testing. You can invoke actions on the view model and witness changes on the view model properties. This kind of in-memory UI testing may not possible without an extra layer of view model but you can still write UI Tests for your SwiftUI applications. You can either use built-in Xcode UI Test Project or a framework called ViewInspector.
Side Note
Kent Beck said it best “I get paid for code that works, not for tests, so my philosophy is to test as little as possible to reach a given level of confidence”.
Nowadays, I see developers religiously testing every single line of their code and aiming for that 100% code coverage. Developers are paid to write features/code, not unit tests. But I always witness in projects that test code is almost 3 times more as compared to the actual codebase.
Testing is definitely very important but only if you are writing meaningful tests. Consider a case, where we have to write a unit test for a following scenario.
A user should be able to add transaction to their existing budget
If this operation is part of your model then your test should create a user, add a budget for that user in the database. Then add a new transaction to that budget and then check if the transaction was added successfully or not.
Unfortunately, most developers will ignore the database part and run their test against a mocked object. In the end their test run fast and they are happy to see the test pass but what exactly did they test. They simply tested that their mock object work as expected. In this scenario a real test would hit the database and check if all the rules were met or not.
For the above scenario we are considering on device database like Sqlite being managed by Core Data or Realm.
I have worked with companies that have more than 2000+ tests. But if you looked closely you will find out the tests were not testing anything related to the business domain. They were actually testing the programming language. This is why it is extremely important to test the behaviors of your application instead of the implementation. When writing a test, ask yourself what business logic is being tested. If you cannot answer that question then stop writing the test.
I give more precedence to domain layer unit tests and full system end-to-end functional tests. Functional system tests will ensure that the system works with all the other layers of the application. You don’t have to write tests for your controller or view models. All of those layers will be tested during the end to end functional tests.
I will hopefully cover more about testing in future posts.
Conclusion
No one single architecture fits every single app. This means you should always look at your app and choose the best architecture according to your needs.
There are no silver bullets.
References
- I was wrong! MVVM is NOT a good choice for building SwiftUI applications
- SwiftUI View is also a View Model
- Fruta App
- Food Truck
- Is MVVM Right for SwiftUI?
- Validating Form in SwiftUI Using MV State Pattern
- Performing Network Operations Using MV State Pattern in SwiftUI
- Stop using MVVM for SwiftUI
- Why Most Unit Testing is Waste
- Is TDD dead?
- TDD, Where Did It All Go Wrong
- Slicing Global State
If you liked this article and want to support my work then check out my courses below:

