AzamSharp
Embracing Core Data in SwiftUI
Last year I was working on an app which was using the Core Data framework as a persistent medium to the SQLite store. I was reluctant to use any SwiftUI property wrappers for Core Data in my app, because I wanted to structure the app in several layers and those property wrappers were only available inside the View. The app worked but it was a pain to make sure that everything in Core Data was synced with SwiftUI views.
SwiftUI team has provided us with APIs to make sure that SwiftUI and Core Data works seamlessly together. In this post, we will be building a small budget app using SwiftUI and Core Data. We will start by discussing our original approach of implementing the app, where we did not use any helpers provided by the SwiftUI frame. Later, we will look into a much simpler implementation, which uses SwiftUI Core Data property wrappers.
The complete app is part of my course MV Design Pattern in iOS - Build SwiftUI Apps Apple’s Way
OLD WAY - Manually Calling Fetch or Implementing NSFetchedResultsController
I started with creating view models for each of my view. This included BudgetCategoryListViewModel, AddNewBudgetViewModel etc. Each view model that interacted with Core Data was passed CoreDataManager as a dependency. CoreDataManager contains all the code which is used to setup Core Data stack and also provide fetching and persistence capabilities. The implementation of BudgetCategoryListViewModel is shown below:
class BudgetCategoryListViewModel: ObservableObject {

    @Published var budgetCategories: [BudgetCategoryViewModel] = []
    let coreDM: CoreDataManager

    init(coreDM: CoreDataManager) {
        self.coreDM = coreDM
    }

      func getBudgetCategories() {

        do {
            let budgetCategories = try coreDM.getAllBudgetCategories()
            DispatchQueue.main.async {
                self.budgetCategories = budgetCategories.map(BudgetCategoryViewModel.init)
            }
            print(self.budgetCategories)
        } catch {
            print(error)
        }
    }

}
The main reason for adding a CoreDataManager as a dependency is that sometimes developers want to create different managers based on the environment. For Core Data I have seen developers creating in-memory databases and writing tests against it. I am not in favour of such approach. I personally don’t write tests against an in-memory database. Instead I would write tests against an actual database and then make sure that the database is destroyed after each test. Remember that the unit test is the isolation, not the thing under test.
The ContentView is also updated to take in BudgetCategoryListViewModel as a dependency.
struct ContentView: View {

    @StateObject var vm: BudgetCategoryListViewModel
    @State private var isPresented: Bool = false

    var body: some View {
        NavigationStack {
            List(vm.budgetCategories) { budgetCategory in
                Text(budgetCategory.title)
            }
            .toolbar {
                ToolbarItem(placement: .navigationBarTrailing) {
                    Button("Add New Budget Category") {
                        isPresented = true
                    }
                }
            }.sheet(isPresented: $isPresented) {
                AddNewBudgetCategoryView(vm: AddBudgetCategoryViewModel(coreDM: CoreDataManager.shared))
            }
        }.onAppear {
            vm.getBudgetCategories()
        }
    }
}
This means when creating ContentView, you need to pass in the view model dependency which itself takes in a Core Data dependency.
import SwiftUI

@main
struct BudgetMVVMApp: App {
    var body: some Scene {
        WindowGroup {
            let coreDM = CoreDataManager.shared
            ContentView(vm: BudgetCategoryListViewModel(coreDM: coreDM))
        }
    }
}
To add a new budget and fetch all budgets, we have implemented functions inside the CoreDataManager class as shown below:
class CoreDataManager {

    static let shared = CoreDataManager()
    private let persistentContainer: NSPersistentContainer

    private init() {
        persistentContainer = NSPersistentContainer(name: "BudgetModel")
        persistentContainer.loadPersistentStores { description, error in
            if let error {
                fatalError("Unable to load Core Data Model (\(error))")
            }
        }
    }

    var viewContext: NSManagedObjectContext {
        persistentContainer.viewContext
    }

    func getAllBudgetCategories() throws -> [BudgetCategory] {

        let request = BudgetCategory.fetchRequest()
        request.sortDescriptors = []
        return try viewContext.fetch(request)
    }

    func saveNewBudget(title: String, amount: Double) throws {
        let budgetCategory = BudgetCategory(context: viewContext)
        budgetCategory.title = title
        budgetCategory.amount = amount

        try viewContext.save()
    }

}
For the sake of simplicity, we have added these functions to the CoreDataManager. For larger apps you should create designated services or place them under their corresponding entities.
In order to add a new budget category, user opens the AddNewBudgetCategoryView as a modal and fills in all the required information. Once the budget category is added, the modal is dismissed. Unfortunately, the ContentView does not show the newly added budget category. There are several ways to resolve this issue. The quickest solution is to call getBudgetCategories on BudgetCategoryListViewModel, when the modal is dismissed. This is shown below:
 var body: some View {
        NavigationStack {
            List(vm.budgetCategories) { budgetCategory in
                Text(budgetCategory.title)
            }
            .toolbar {
                ToolbarItem(placement: .navigationBarTrailing) {
                    Button("Add New Budget Category") {
                        isPresented = true
                    }
                }
            }.sheet(isPresented: $isPresented, onDismiss: {
                // FETCHING BUDGET CATEGORIES AGAIN
                vm.getBudgetCategories()
            }) {
                AddNewBudgetCategoryView(vm: AddBudgetCategoryViewModel(coreDM: CoreDataManager.shared))
            }
        }.onAppear {
            vm.getBudgetCategories()
        }
There are several other ways to solve this problem. You can pass your budgetCategories as a @Binding to the AddNewOrderView and then insert an instance of BudgetCategoryViewModel, when Core Data successfully saves the item to the store. You can also store everything in an @EnvironmentObject and update it, but in that case you will need to pass @EnvironmentObject to the view model.
The above code will refresh the main view and display the newly inserted data. Although, it was not a lot of code but we still need to remember to call vm.getBudgetCategories on the dismiss of the model to get the newly added data.
Keep in mind that calling vm.getBudgetCategories on modal dismiss will fetch all the records again from the database. The SQL statements executed by Core Data are shown below:
ata: sql: BEGIN EXCLUSIVE
CoreData: sql: SELECT Z_MAX FROM Z_PRIMARYKEY WHERE Z_ENT = ?
CoreData: sql: UPDATE OR FAIL Z_PRIMARYKEY SET Z_MAX = ? WHERE Z_ENT = ? AND Z_MAX = ?
CoreData: sql: pragma auto_vacuum
CoreData: annotation: sql execution time: 0.0000s
CoreData: sql: pragma auto_vacuum=2
CoreData: annotation: sql execution time: 0.0001s
CoreData: sql: COMMIT
CoreData: sql: BEGIN EXCLUSIVE
CoreData: sql: INSERT INTO ZBUDGETCATEGORY(Z_PK, Z_ENT, Z_OPT, ZAMOUNT, ZTITLE) VALUES(?, ?, ?, ?, ?)
CoreData: sql: COMMIT
CoreData: sql: pragma page_count
CoreData: annotation: sql execution time: 0.0002s
CoreData: sql: pragma freelist_count
CoreData: annotation: sql execution time: 0.0002s
// FETCHING DATA AGAIN FROM THE SQLite DATABASE
CoreData: sql: SELECT 0, t0.Z_PK, t0.Z_OPT, t0.ZAMOUNT, t0.ZTITLE FROM ZBUDGETCATEGORY t0
You can read more about how to debug Core Data here.
For our small app, it may not pose any concern, but if you had tons of records then it can cause issues.
Another thing I noticed is regarding the Core Data integration with CloudKit. The CoreDataManager function getAllBudgetCategories will not be called if an entry is added, modified, deleted on the cloud. In order to get the updates from the cloud, you will need to conform to NSFetchedResultsControllerDelegate. The implementation is shown below:
@MainActor
class BudgetCategoryListViewModel: NSObject, ObservableObject {

    @Published var budgetCategories: [BudgetCategoryViewModel] = []
    private let fetchedResultsController: NSFetchedResultsController<BudgetCategory>
    let coreDM: CoreDataManager

    init(coreDM: CoreDataManager) {
        self.coreDM = coreDM
        let request = BudgetCategory.fetchRequest()
        request.sortDescriptors = []
        fetchedResultsController = NSFetchedResultsController(fetchRequest: request, managedObjectContext: coreDM.viewContext, sectionNameKeyPath: nil, cacheName: nil)
        super.init()
        fetchedResultsController.delegate = self

        do {
            try fetchedResultsController.performFetch()
            guard let budgetCategories = fetchedResultsController.fetchedObjects else {
                return
            }
            self.budgetCategories = budgetCategories.map(BudgetCategoryViewModel.init)
        } catch {

        }
    }

    extension BudgetCategoryListViewModel: NSFetchedResultsControllerDelegate {
    func controllerDidChangeContent(_ controller: NSFetchedResultsController<NSFetchRequestResult>) {
        guard let budgetCategories = controller.fetchedObjects as? [BudgetCategory] else {
            return
        }
        DispatchQueue.main.async {
            self.budgetCategories = budgetCategories.map(BudgetCategoryViewModel.init)
        }
    }
}
}
Now our BudgetCategoryListViewModel conforms to NSFetchedResultsControllerDelegate. This means that we will get updates for our BudgetCategory entity. This also means that if you modify a record on the Cloud then it will be synced with the local app instantly. We also removed getBudgetCategories function from BudgetCategoryListViewModel, since NSFetchedResultsController is going to call controllerDidChangeContent function when any changes in BudgetCategory are detected.
The word instantly is used loosely here. It usually takes couple of seconds to get updates from CloudKit and sync to the local database.
The bottom line is that If you do not use NSFetchedResultsController then you end up fetching all the items again from the database. If you do use NSFetchedResultsController then you have to write a lot of code as shown above.
NEW WAY - SwiftUI Property Wrappers for Core Data
In the previous section, you learned about using NSFetchedResultsController and structuring your code through the use of view models. Although it works, but it resulted in a lot of code even for a small simple application like this one. In the next few sections, we are going to use SwiftUI property wrappers that will help you easily access Core Data. You are going to see how @FetchRequest property wrapper has built-in capability of NSFetchResultsController and does not require all the boiler plate code we had to implement manually in the last section.
Setting Up the Core Data Stack
The first step in using Core Data is to setup the Core Data stack. This means you have a basic data model file ready, which can be loaded using APIs provided by Core Data. In the implementation below you can see the CoreDataManager, which is responsible for setting up the Core Data stack.
You can download the complete project here and check out the Core Data model file.
The implementation of CoreDataManager is shown below:
import Foundation
import CoreData

class CoreDataManager {

    static let shared = CoreDataManager()
    let persistentContainer: NSPersistentContainer

    init() {
        persistentContainer = NSPersistentContainer(name: "BudgetDataModel")
        persistentContainer.loadPersistentStores { description, error in
            if let error {
                fatalError("Unable to load Core Data Model (\(error))")
            }
        }
    }

}
Once, the Core Data stack has been initialized you can inject the NSManagedObjectContext in the @Environment of the app.
The implementation is shown below:
@main
struct BudgetApp: App {
    var body: some Scene {
        WindowGroup {
            ContentView().environment(\.managedObjectContext, CoreDataManager.shared.persistentContainer.viewContext)
        }
    }
}
This step is very important because the SwiftUI property wrappers like @FetchRequest, @SectionedFetchRequest will look for the NSManagedObjectContext inside the view’s environment using @Environment property wrapper. If they don’t find a value for
managedObjectContextkey then your code will not work as expected.
NSManagedObject also conforms to the ObservableObject protocol. This means they have the capability of publishing their changes to the view.
Now, you are ready to use Core Data inside your views.
A view in SwiftUI is also a view model. Anytime in this article we refer to a view we are talking about a SwiftUI view which is also a view model. Check out the articles discussed in resources section below to learn more about it.
Displaying Budget Categories
SwiftUI includes few property wrappers, which makes it super easy to retrieve information through Core Data and display it on the screen. One of those property wrappers is @FetchRequest. @FetchRequest allows you to perform a query from right within the view and then display the information on the screen.
@FetchRequest property wrapper is only available inside a view.
Here is a simple example that shows how to perform a request to fetch all budget categories from the database.
@FetchRequest(sortDescriptors: [SortDescriptor(\.title)]) private var budgetCategoriesResults: FetchedResults<BudgetCategory>
The FetchedResults represents a collection of results retrieved from the Core Data store. The main purpose of FetchedResults is to display the results in a view. FetchedResults also conforms to RandomAccessCollection protocol.
You can use FetchedResults directly in the view as shown below:
    @FetchRequest(sortDescriptors: [SortDescriptor(\.title)]) private var budgetCategoriesResults: FetchedResults<BudgetCategory>

    var body: some View {
        NavigationStack {
            List(budgetCategoryResults) { budgetCategory in


                    HStack {
                        Text(budgetCategory.title ?? "")
                        Spacer()
                        Text(budgetCategory.amount as NSNumber, formatter: NumberFormatter.currency)
                    }


            }
        }
    }
Once again view in SwiftUI is actually a view model. Check out the articles in the resources section.
As you can see with only few lines of code we were able to display the budget categories on the view.
@FetchRequest will only work if it can find the managedObjectContext in the @Environment. This was covered earlier in this post.
One of the main objections of using @FetchRequest inside a view is that by doing so, it makes it difficult to reuse the same request in other views. Although in this app we don’t plan to reuse the same request again but if we did, we can move it to a separate file. This is shown in the implementation below.
@objc(BudgetCategory)
public class BudgetCategory: NSManagedObject {

    static var all: NSFetchRequest<BudgetCategory> {
        let request = BudgetCategory.fetchRequest()
        request.sortDescriptors = [NSSortDescriptor(key: "title", ascending: true)]
        return request
    }
}
We used the “Category/Extension” option for “Codegen” in Xcode for the data model file. This puts all the properties in category or extension and give us control of the entity class. For BudgetCategory we have added the all function, which returns the NSFetchRequest<BudgetCategory>. Now, we can easily use this in any view we want as shown below.
@FetchRequest(fetchRequest: BudgetCategory.all) private var budgetCategoryResults: FetchedResults<BudgetCategory>
Adding Transactions for Budget Category
Each budget category will consists of a list of transactions. The relationship between a budget category and a transaction is one to many. This relationship is created in the Core Data model designer as shown below:
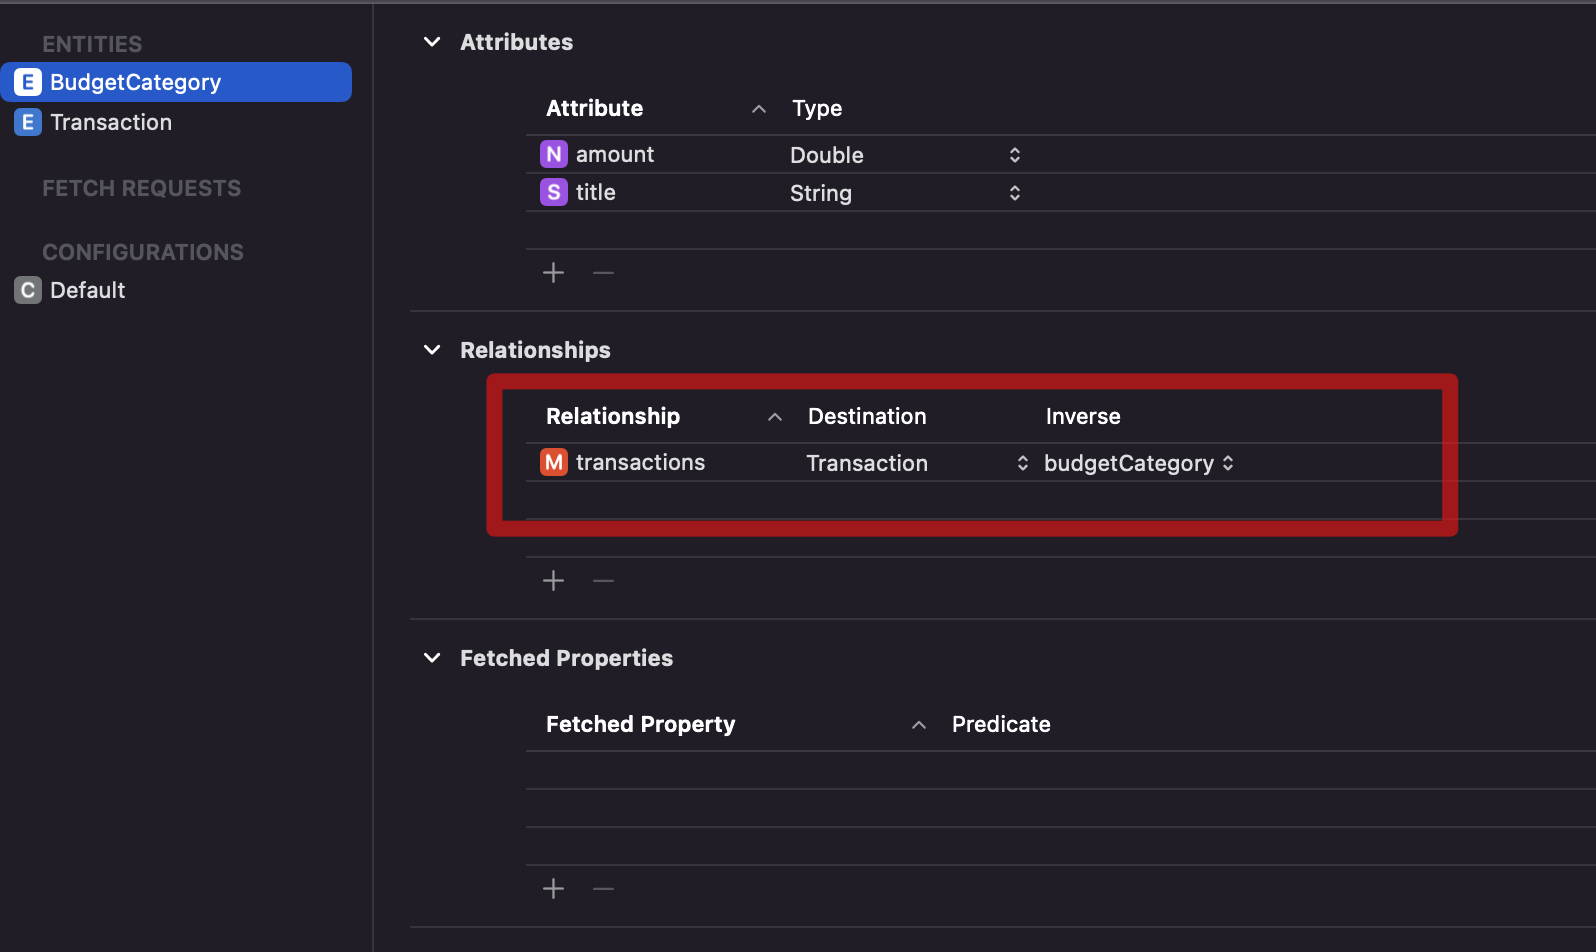
When a user selects a budget, we want to display all the transactions associated with that budget. We also want the user to add transactions to an existing budget.
Saving a Transaction
In order to save a transaction, we need to know the budget category. In our application, budget category is passed to the BudgetDetailView, where the transactions can be added and viewed. The BudgetDetailView requires that the budget category is passed as an argument. This is shown in the implementation below:
struct BudgetDetailView: View {

    @Environment(\.managedObjectContext) private var viewContext
    @ObservedObject var budgetCategory: BudgetCategory
}
One thing to note is the usage of @ObservedObject. The ObservedObject is going to make sure that the BudgetDetailView is reevaluated and rerendered (if necessary), when the budget category changes.
Once the user has entered the transaction details, they can press the save button to add the transaction to an existing budget category. The implementation of the saveTransaction is shown below:
 private func saveTransaction() {

        let transaction = Transaction(context: viewContext)
        transaction.title = title
        transaction.amount = Double(amount)!

        budgetCategory.addToTransactions(transaction)

        try? viewContext.save()
}
The
addToTransactionsmethod is added by Core Data automatically when you create a one-to-many relationship between BudgetCategory and Transaction.
Displaying Transactions
The next step is to display all the transactions associated with the budget category. Due to one-to-many relationship between budget category and transaction, there is already a transactions property on the budget object. Unfortunately, the transactions property is of NSSet type, which does not conform to RandomAccessCollection. This means we cannot use a List view to iterate through the transactions.
 List(budgetCategory.transactions) { transaction in
                Text(transaction.title)
 }

 Initializer 'init(_:rowContent:)' requires that 'NSSet?' conform to 'RandomAccessCollection'
We can solve this problem by converting our NSSet to an array and iterating over the array. In the code below we have added the transactionsArray function to our existing BudgetCategory class.
 var transactionsArray: [Transaction] {

        guard let transactions = transactions else { return [] }
        return transactions.compactMap { $0 as? Transaction }
    }
Now we can display transactions in our view.
  List(budgetCategory.transactionsArray) { transaction in
                Text(transaction.title ?? "")
    }
If you add a transaction, it will instantly show up on the screen. Although this works, we can refactor the displaying of transactions into a separate view called TransactionListView. This is implemented below:
struct TransactionListView: View {

    let transactions: [Transaction]

    var body: some View {
        List(transactions) { transaction in
            Text(transaction.title ?? "")
        }
    }
}
You can now use the TransactionListView inside your BudgetView as shown:
TransactionListView(transactions: budgetCategory.transactionsArray)
Unfortunately, you will notice that when the transaction is added, the list will not get updated with the new transaction.
TransactionListView is not rerendered again with the updated list of transactions because budgetCategory is a reference type. So, from SwiftUI point of view, the instance is still pointing to the same location in memory and hence does not needs to be rerendered.
One way to solve this problem is by passing a FetchRequest to the TransactionListView. The FetchRequest will be invoked when the BudgetDetailView is (r)evaluated. The request will get all the transactions based on the selected budget category and then display them on the screen. This is shown in the implementation below:
struct TransactionListView: View {

    @FetchRequest var transactions: FetchedResults<Transaction>

    init(request: NSFetchRequest<Transaction>) {
        _transactions = FetchRequest(fetchRequest: request)
    }

    var body: some View {
        List {
            ForEach(transactions) { transaction in
                HStack {
                    Text(transaction.title ?? "")
                    Spacer()
                    Text(transaction.amount as NSNumber, formatter: NumberFormatter.currency)
                }
            }
        }
    }
}
Inside the BudgetDetailView, we call the TransactionListView as shown below:
TransactionListView(request: budgetCategory.transactionsByCategoryRequest)
The implementation of transactionsByCategoryRequest is inside the BudgetCategory class is shown below:
 lazy var transactionsByCategoryRequest: NSFetchRequest<Transaction> = {
        let request = Transaction.fetchRequest()
        request.sortDescriptors = [NSSortDescriptor(key: "title", ascending: true)]
        request.predicate = NSPredicate(format: "budgetCategory = %@", self)
        return request
    }()
You can even expose this property as a static function as shown below:
 static func transactionsByCategoryRequest(_ category: BudgetCategory) -> NSFetchRequest<Transaction> {
        let request = Transaction.fetchRequest()
        request.sortDescriptors = [NSSortDescriptor(key: "title", ascending: true)]
        request.predicate = NSPredicate(format: "budgetCategory = %@", category)
        return request
    }
Now, when you add a transaction to an existing budget category, it will be reflected in the list of transactions.
Depending on your criteria, you can also add additional properties to your view to display the transactions total.
 // BudgetDetailView.swift
  var transactionsTotal: Double {
        budgetCategory.transactionsArray.reduce(0) { result, transaction in
            result + transaction.amount
        }
    }
If you think you will reuse the transactionsTotal on some other view then you can add it as a property on the BudgetCategory class.
 var transactionsTotal: Double {

        guard let transactions = transactions else {
            return 0.0
        }

        let transactionsArray: [Transaction] = transactions.toArray()
        return transactionsArray.reduce(0) { result, transaction in
            result + transaction.amount
        }
    }
Conclusion
Apple engineers have done a lot of work to make Core Data work seamlessly with SwiftUI framework. Property wrappers like @FetchRequest and @SectionedFetchRequest are optimized to work with SwiftUI framework and they are only available in the View (View is also a ViewModel in SwiftUI). For your next app try to use the available property wrappers in SwiftUI, you will be impressed at how much less code you have to write to achieve the same result.
I hope you enjoyed this article!
If you liked this article, then you may consider checking out my courses.
Source Code
Video Course
If you are interested in learning more about the MV Pattern in iOS then check out my brand new course.
MV Design Pattern in iOS - Build SwiftUI Apps Apple’s Way