AzamSharp
Deep Dive into Environment in SwiftUI
SwiftUI revolutionized app development with its declarative syntax and reactive data handling, making it easier to build dynamic and responsive user interfaces. At the heart of this framework lies the @Environment property wrapper and its related tools, which provide a seamless way to manage shared state across views. Whether you’re building a small utility app or architecting a large-scale application, understanding how to use these tools effectively is key to creating scalable, maintainable, and efficient applications.
This article dives deep into the various mechanisms SwiftUI offers for state management, from the classic @EnvironmentObject and ObservableObject protocols to the newer @Observable and @Bindable macros introduced in iOS 17. We’ll explore how to inject and access global state, how to optimize state propagation to minimize performance overhead, and how to use these features to simplify complex view hierarchies.
By the end of this article, you’ll have a thorough understanding of how to leverage SwiftUI’s environment tools to manage global state effectively, avoid common pitfalls, and create modular and testable components for your applications. Whether you’re new to SwiftUI or looking to refine your architecture skills, this guide has something for everyone. Let’s get started!
ObservableObject Protocol
Before the introduction of the Observation framework in iOS 17, SwiftUI developers primarily used the ObservableObject protocol to create new sources of truth for their applications.
The ObservableObject protocol is a fundamental feature in SwiftUI used to create and manage shared data that can be observed by SwiftUI views. By conforming to ObservableObject, a class becomes a source of truth that SwiftUI views can automatically monitor for changes, allowing the views to update their UI dynamically when the data changes.
One of the benefits of a class conforming to ObservableObject protocol is that the instance of the class can be placed in the environment object, making it available globally in the views. Globally is a loaded term since the availability of the environment object depends on where in the hierarchy the object was injected.
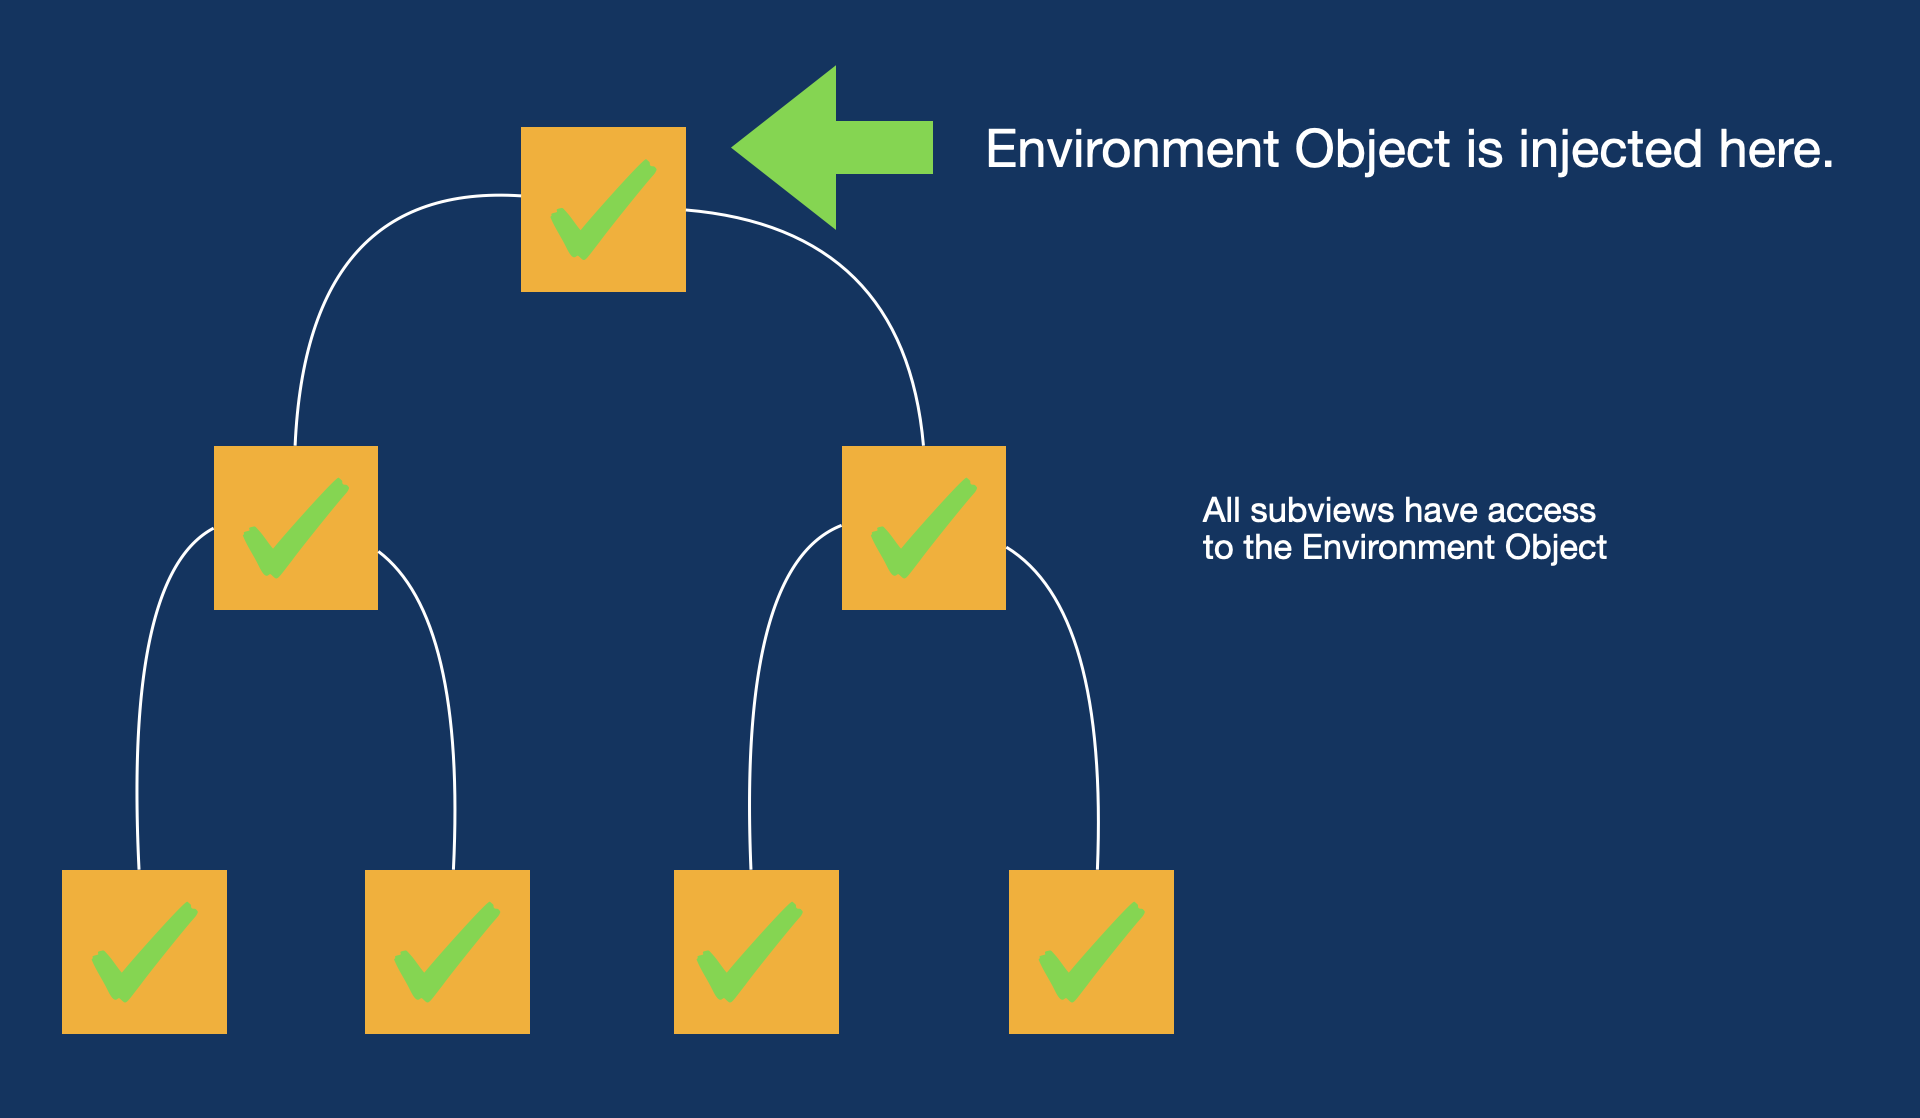
Take a look at the following hierarchy.

The root view has two children and each child has further two children. If we inject an environment object at the root of the application then it will be available to all the views, including the root view. This is shown in the following screenshot.

The environment object is injected at the root of the application, this means it is available in the root view and all the other views that are children of the root view.
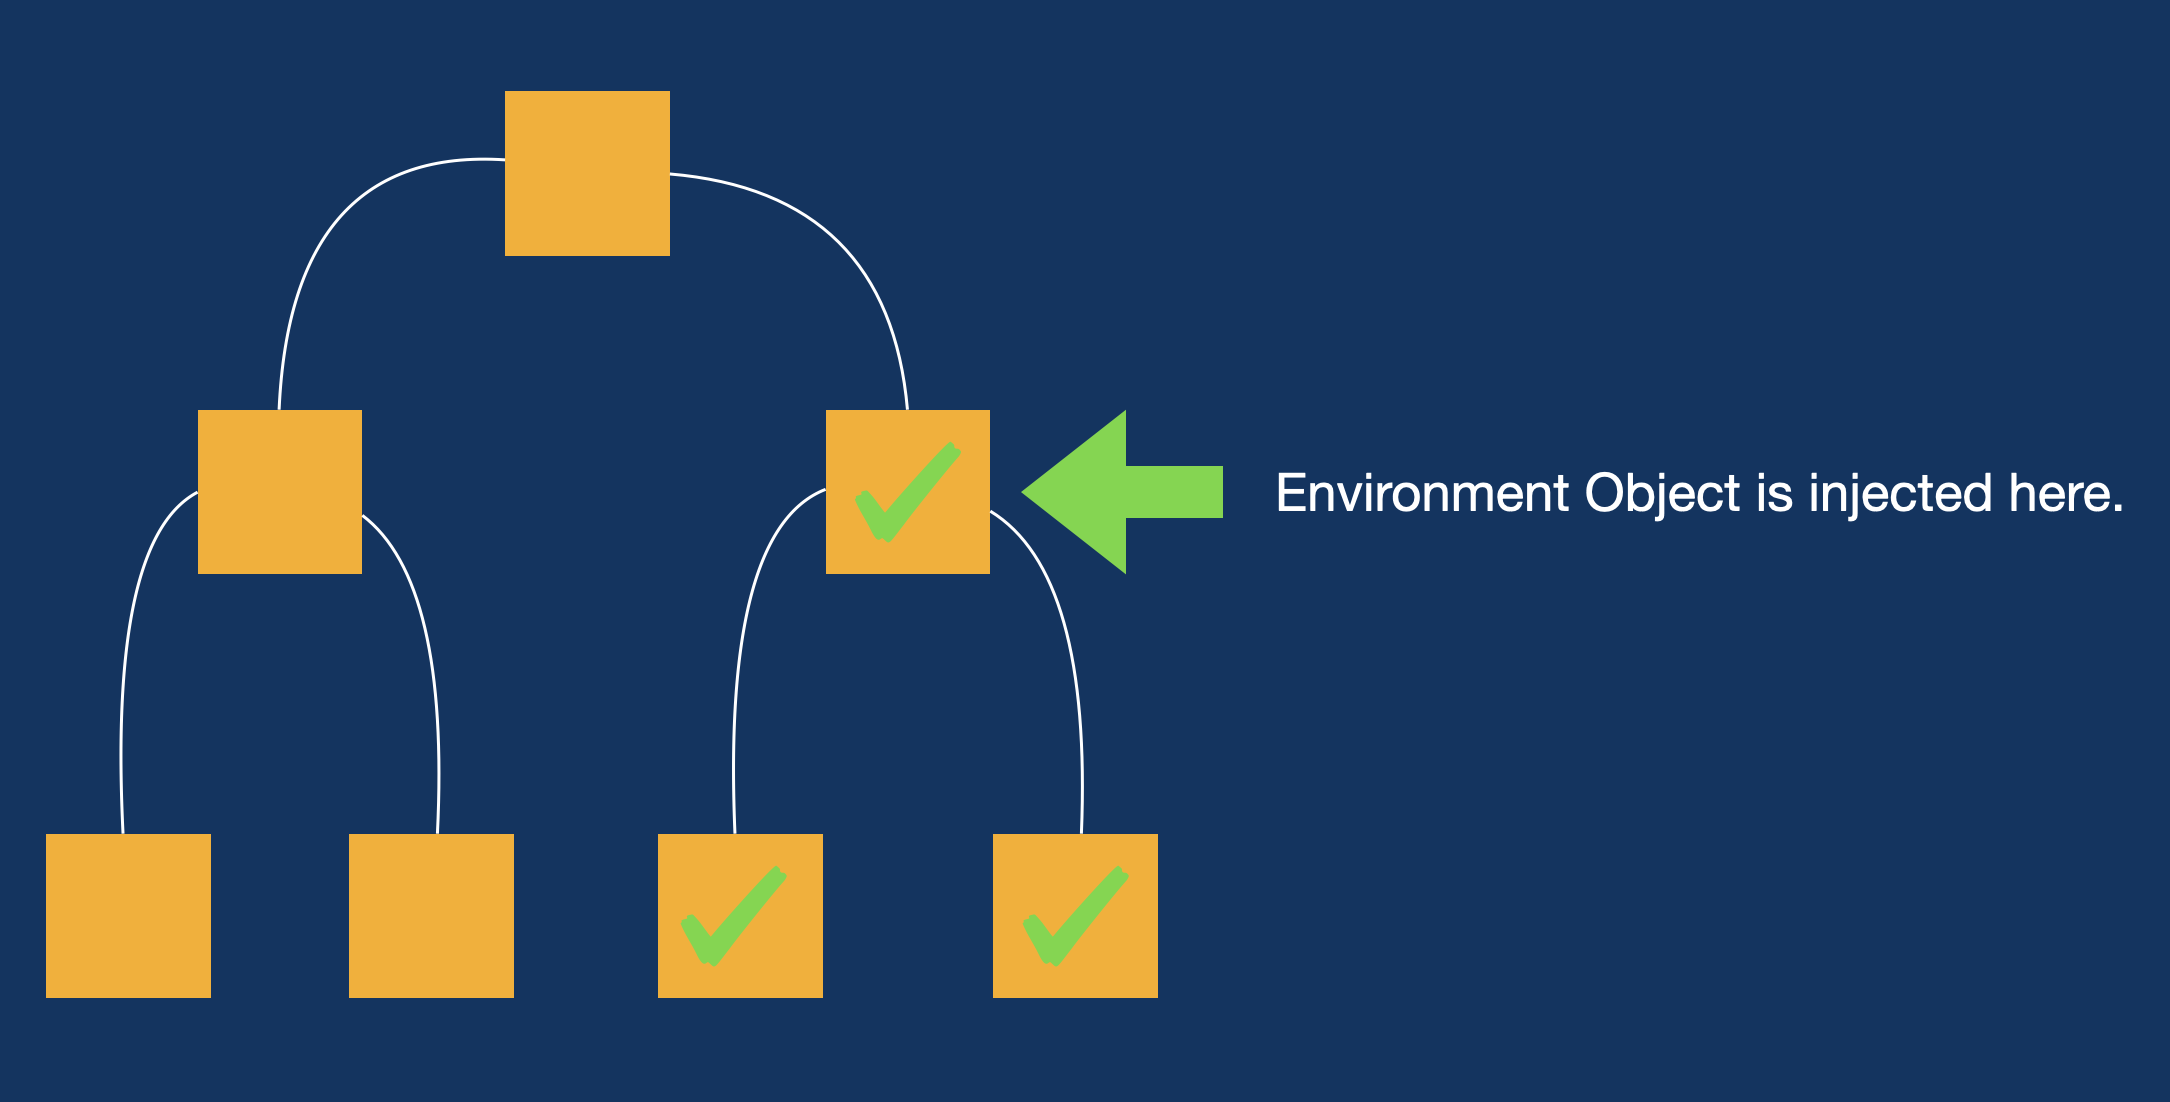
If environment object was injected in one of the child views then it will only be available to that child and all the children of that child view. This is shown in the following screenshot.

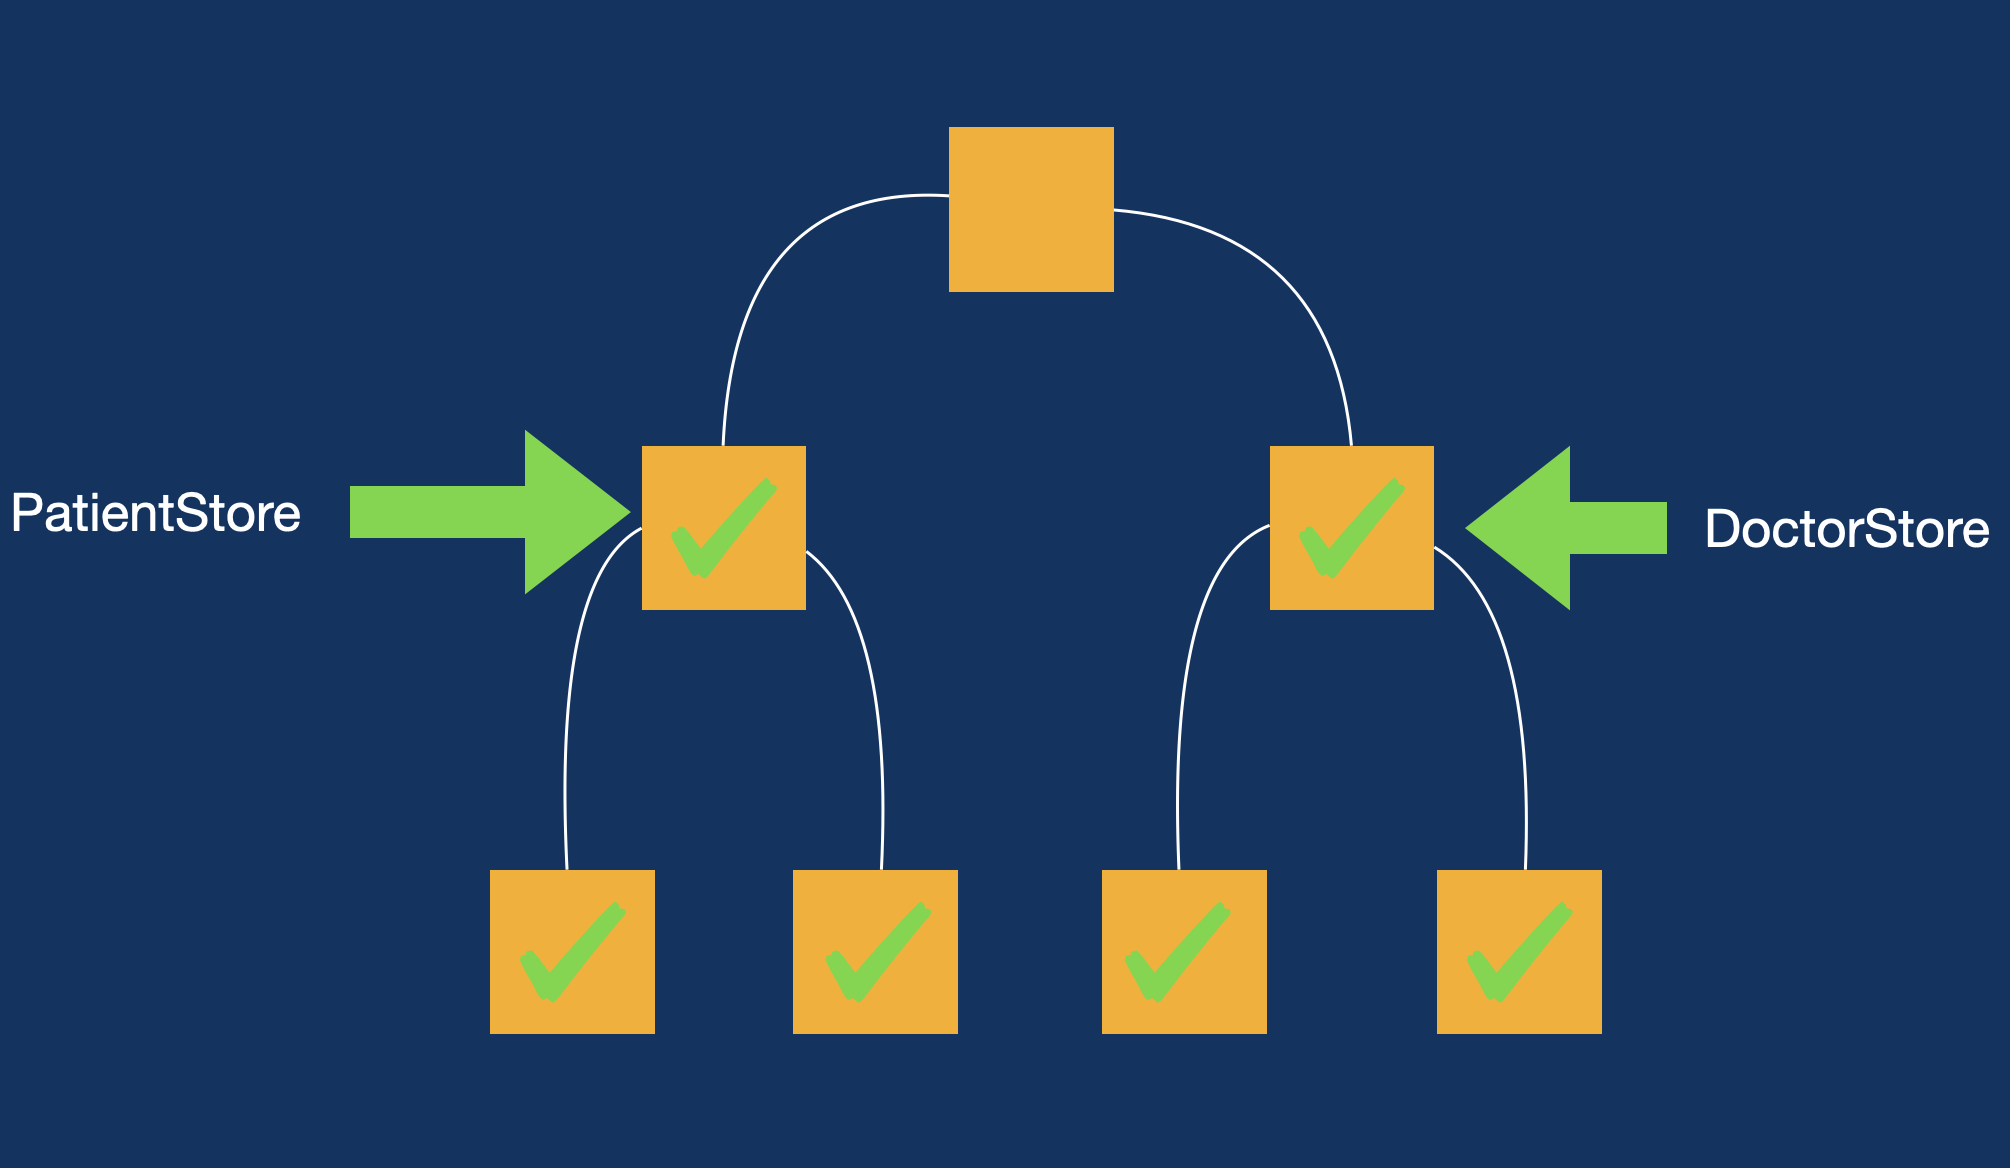
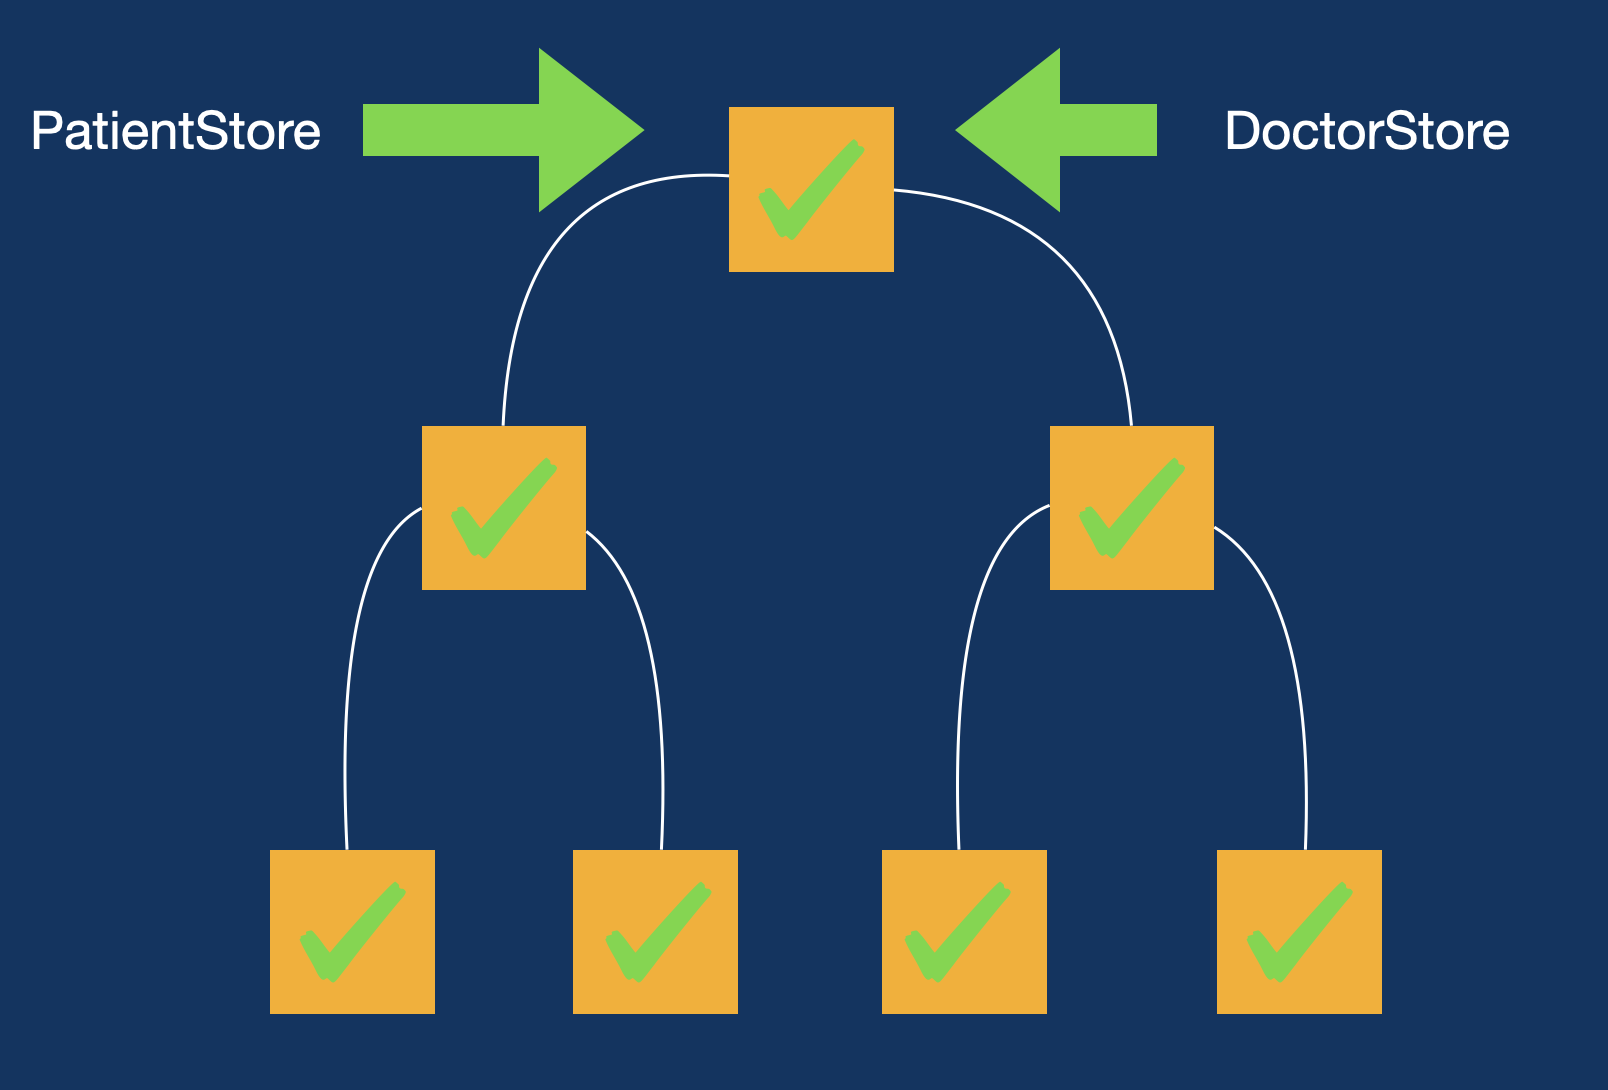
You are also not limited to a single environment object. Based on your needs you can inject multiple environment objects at different or even same points of your application. This is shown in the screenshot below:

Why would you choose to inject different environment objects at various points in your SwiftUI view hierarchy? Consider a scenario where you’re building a hospital app with multiple tabs such as Home, Patients, and Doctors.
In this case, each tab can have its own dedicated data store. For instance, the Patients tab could use a PatientStore, while the Doctors tab could use a DoctorStore. These stores manage data specific to their respective contexts and can be injected into their corresponding parts of the view hierarchy.
Both PatientStore and DoctorStore could rely on a shared service layer to fetch the necessary data, ensuring a clean separation of concerns and efficient data handling tailored to each feature in the app. This approach promotes modularity, encapsulates dependencies, and simplifies state management within a complex SwiftUI application.
However, a common practice among developers is to inject all environment objects at the root of the application. This makes them accessible from any part of the app’s view hierarchy.

Re-Evaluation (Diffing) vs Re-Rendering
One of the confusion regarding using environment objects is that developers believe that when using environment object, it will automatically re-render all the views that are dependent on it. In order to understand this we first must understand the difference between re-evaluation and re-rendering.
In SwiftUI, when the state changes, the framework triggers a process called re-evaluation for the affected views. During this process, SwiftUI determines which parts of the view hierarchy need to be updated.
Re-evaluation involves diffing, where SwiftUI compares the previous and current versions of the views to identify what has changed and what has remained the same. This efficient mechanism ensures that only the necessary views are updated, optimizing performance and minimizing the impact of state changes on the user interface. This declarative approach makes UI updates seamless and reactive to state changes in your application.
Take a look at the following code:
struct CounterView: View {

    @State private var count: Int = 0

    var body: some View {
        let _ = Self._printChanges()
        VStack {
            Text("\(count)")
            Button("Increment Counter") {
                count += 1
            }

            List(1...20, id: \.self) { index in
                Text("\(index)")
            }
        }
    }
}
When you press the button, the counter is incremented, and the view’s body is re-evaluated. Inside the body, the line let _ = Self._printChanges() is executed, which logs information about changes whenever the body is re-evaluated.
It’s important to understand that re-evaluation of the body does not mean all views within it are re-rendered. and usually the process of diffing is highly optimized and is performed very quickly.
In this example, only the Text("\(count)") view will be re-rendered because it directly depends on the count property. When count changes, SwiftUI uses its diffing mechanism to determine that this specific Text view needs updating, while other views in the hierarchy remain unchanged. This targeted update ensures efficient rendering and performance optimization.
Environment Object and View Rendering
Let’s explore a simple example of using an Environment Object (iOS 16 and earlier) to understand its behavior during view rendering. Below is the implementation of a Store class that conforms to the ObservableObject protocol. This class has a count property, and the ObservableObject conformance makes the Store class a source of truth, enabling SwiftUI views to observe and react to changes in its state.
@MainActor
class Store: ObservableObject {
    @Published var count: Int = 0
}
If we want to use Store as a shared global state, we can inject it into a specific view. Here’s how it’s done:
#Preview {
    ContentScreen()
        .environmentObject(Store())
}
This makes the Store instance accessible to the ContentScreen view and all its child views. By doing so, any view within this hierarchy can use the Store instance without needing to pass it explicitly as a parameter.
Although the EnvironmentObject is accessible to all views in the hierarchy, it’s important to avoid accessing it directly from leaf views or views intended for reusability. This practice can lead to tight coupling and makes the view less flexible and harder to reuse in different contexts.
Instead, a better approach is to pass only the data required by the view as parameters and expose actions via closures. This keeps the view lightweight, self-contained, and reusable in other parts of the application without dependency on the specific environment.
To use the Store within a view, we can retrieve it using the @EnvironmentObject property wrapper. Here’s an example:
struct ContentScreen: View {

    @EnvironmentObject private var store: Store

    var body: some View {

        let _ = Self._printChanges()

        VStack {
            Text("\(store.count)")
            Button("Increment") {
                store.count += 1
            }

        }
    }
}
When button is pressed, count property of Store is updated and displayed in a Text view.
Now, let’s take a look at an example of what will happen if you add subviews to the ContentScreen, which also accesses Store environment object.
We have added two new subviews inside the ContentScreen. The implementation is shown below:
struct NumberListView: View {

    @EnvironmentObject private var store: Store

    var body: some View {
        let _ = Self._printChanges()
        VStack {
            Text("NumberListView")
        }
    }
}

struct LightBulbView: View {

    @EnvironmentObject private var store: Store

    var body: some View {
        let _ = Self._printChanges()
        VStack {
            Text("LightBulbView")
        }
    }
}
One interesting thing to note about both the views is that even though they have a reference to the environment object, none of them utilize any properties of the Store class in their body.
The ContentScreen is updated to the following implementation:
struct ContentScreen: View {

    @EnvironmentObject private var store: Store

    var body: some View {

        let _ = Self._printChanges()

        VStack {
            Text("\(store.count)")
            Button("Increment") {
                store.count += 1
            }

            NumberListView()
            LightBulbView()

        }
    }
}
Now, if you run the app and tap on the Increment button then you will see the following output.
ContentScreen: _store changed.
NumberListView: _store changed.
LightBulbView: _store changed.
This means when you increment the number. All three views are getting re-evaluated and diffed.
Once again this does not mean that all three views are getting re-rendered. Only views that are changed will be re-rendered.
To address the issue, we can improve our implementation by passing only the specific dependencies needed by each subview. This ensures that each subview is independent and only depends on the data it requires. For instance:
NumberListView requires the count value.
LightBulbView requires the isOn state.
Here’s the updated implementation of these subviews:
struct NumberListView: View {

    let count: Int

    var body: some View {
        let _ = Self._printChanges() // Logs view re-evaluation
        VStack {
            Text("\(count)")
        }
    }
}

struct LightBulbView: View {

    let isOn: Bool

    var body: some View {
        let _ = Self._printChanges() // Logs view re-evaluation
        VStack {
            Text(isOn ? "ON" : "OFF")
        }
    }
}
The Store class is updated to include the isOn property, which tracks the on/off state:
@MainActor
class Store: ObservableObject {
    @Published var count: Int = 0
    @Published var isOn: Bool = false
}
The ContentScreen now passes only the required data to each subview:
struct ContentScreen: View {

    @EnvironmentObject private var store: Store

    var body: some View {
        let _ = Self._printChanges() // Logs view re-evaluation

        VStack {
            Text("\(store.count)")

            Button("Add Number") {
                store.count += 1
            }

            Toggle(isOn: $store.isOn) {
                EmptyView()
            }
            .fixedSize()

            // Passing only required data to subviews
            NumberListView(count: store.count)
            LightBulbView(isOn: store.isOn)
        }
    }
}
This updated implementation improves the design by decoupling subviews, ensuring they rely only on the data they require, such as NumberListView depending solely on count and LightBulbView on isOn. This makes the subviews more reusable and easier to test. Additionally, the explicit passing of dependencies reduces reliance on EnvironmentObject, avoiding tight coupling and improving clarity.
Performance is also enhanced, as SwiftUI efficiently re-evaluates and updates only the affected parts of the UI, ensuring that changes in store.count or store.isOn do not trigger unnecessary re-renders elsewhere in the view hierarchy. This approach results in cleaner, more maintainable, and performance-optimized code.
It’s important to understand that in SwiftUI, the natural flow of data is from parent views to child views. Typically, the parent view is indicated by a name ending with the suffix
Screen, while child views are represented with the suffixView. The key principle is to have the parent view handle data loading and then pass only the necessary data down to its child views. This approach ensures clarity, reduces unnecessary dependencies, and promotes reusable, modular components within the view hierarchy.
Environment Object and Navigation Stack
One of the powerful benefits of using EnvironmentObject in SwiftUI is that all screens within a NavigationStack automatically stay in sync with the shared data. This happens because all screens access the same global state, eliminating the need for manual updates.
In contrast, a common anti-pattern seen in the past is developers passing refresh flags between screens to ensure data synchronization after adding or updating an item. This approach not only adds unnecessary complexity but also indicates a misunderstanding of SwiftUI’s declarative nature. With EnvironmentObject, such workarounds become unnecessary, as SwiftUI handles state updates seamlessly, ensuring a clean and efficient implementation.
This means that if your EnvironmentObject contains state used across 20 different screens within a NavigationStack, all those screens will automatically stay in sync without any additional effort on your part. SwiftUI ensures that all screens in the stack share and react to the same global state.
The only adjustment you need to make is to inject the Store at the NavigationStack level, instead of at an individual screen level like ContentScreen. Here’s how you can do it:
NavigationStack {
    ContentScreen()
}
.environmentObject(Store())
By injecting the Store at the NavigationStack, it becomes available to all screens in the navigation hierarchy, ensuring seamless state management and reducing boilerplate code.
Keep in mind that the same diffing rules apply to screens inside the NavigationStack. This means that if you have 20 screens in the stack, and all of them use @EnvironmentObject, each screen will be re-evaluated during a state change, even if they don’t directly depend on or use any properties from the global state.
After re-evaluation, only the views that depend on the state change will get re-rendered.
Developers often worry about screens in a
NavigationStackbeing re-evaluated due to@EnvironmentObject. However, the more pertinent question to ask is: how many screens are typically in yourNavigationStackat any given time?
New @Observable Macro
In iOS 17, Apple introduced the Observation framework, offering a cleaner syntax and significant performance improvements. One key enhancement is that views that do not actively use the environment state properties are no longer re-evaluated, further optimizing SwiftUI’s rendering process. This improvement ensures that only views dependent on specific state changes are updated, reducing unnecessary computations and enhancing app performance.
In order to update our current code to use Observation framework, we will start with the Store.
@MainActor
@Observable
class Store {
    var count: Int = 0
    var isOn: Bool = false
}
We don’t need to conform to ObservableObject anymore. We can simply use the @Observable macro. Also, if you noticed the @Published keyword has been removed. Both stored properties count and isOn are automatically published properties.
The way Environment injection is implemented will shift from using the environmentObject view modifier to the environment modifier. The updated approach is demonstrated below:
NavigationStack {
    ContentScreen()
}
.environment(Store())
Accessing the environment within a view also requires an update. Instead of using @EnvironmentObject, you will now use the @Environment property wrapper to refer to the injected store type. The updated code snippet is as follows:
@Environment(Store.self) private var store
This updated approach simplifies how environment values are injected and accessed, offering more flexibility and better type safety.
struct ContentScreen: View {

    @Environment(Store.self) private var store

    var body: some View {

        let _ = Self._printChanges()

        VStack {
            Text("\(store.count)")
            Button("Add Number") {
                store.count += 1
            }
            Toggle(isOn: $store.isOn) {
                EmptyView()
            }.fixedSize()

            NumberListView(count: store.count)
            LightBulbView(isOn: store.isOn)

            NavigationLink("Detail Screen") {
                DetailScreen()
            }

        }
    }
}
Unfortunately, the above code will not compile and give you the following error
Cannot find '$store' in scope.
This error occurs because you cannot directly bind properties of an @Environment object to views. For example, using $store.isOn with a Toggle view will fail. This limitation arises from the fact that @Environment values are not automatically exposed as bindings.
To resolve this issue, you need to use the @Bindable property wrapper in your Store type. This allows you to bind the properties of the Store to views. Here’s how you can achieve this:
struct ContentScreen: View {

    @Environment(Store.self) private var store

    var body: some View {

        @Bindable var store = store

        VStack {
            Text("\(store.count)")
            Button("Add Number") {
                store.count += 1
            }
            Toggle(isOn: $store.isOn) {
                EmptyView()
            }.fixedSize()

            NumberListView(count: store.count)
            LightBulbView(isOn: store.isOn)

            NavigationLink("Detail Screen") {
                DetailScreen()
            }

        }
    }
}
By updating the Store type to use the @Bindable property wrapper, you can successfully bind the Toggle view to a property contained within the environment.
The @Bindable property wrapper enables properties in your environment object to be directly used as bindings within views. This makes it possible to connect UI components, like a Toggle, to the state managed by your environment object without additional boilerplate.
Environment Usages in Real World Apps
Using the @Environment to manage global state in iOS projects isn’t always necessary—much like Redux isn’t mandatory for every React project. However, it can be extremely helpful in specific scenarios. This is particularly true when you need to share state across screens or views that are deeply nested within the view hierarchy. By leveraging the @Environment, you can avoid cumbersome state-passing through multiple layers, making your app architecture more streamlined and maintainable.
Using multiple @Environment objects to manage global state in an app can be a powerful way to organize and encapsulate state. By structuring these objects based on their bounded context or scope, rather than per screen, you can achieve a clean separation of concerns and maintainability. Here’s a partial implementation of a CartStore that manages cart items for a user:
@MainActor
@Observable
class CartStore {

    let httpClient: HTTPClient
    var cart: Cart?

    init(httpClient: HTTPClient) {
        self.httpClient = httpClient
    }

    var total: Double {
        cart?.cartItems.reduce(0.0, { total, cartItem in
            total + (cartItem.product.price * Double(cartItem.quantity))
        }) ?? 0.0
    }

    func loadCart() async throws {

        let resource = Resource(url: Constants.Urls.loadCart, modelType: CartResponse.self)
        let response = try await httpClient.load(resource)

        if let cart = response.cart, response.success {
            self.cart = cart
        } else {
            throw CartError.operationFailed(response.message ?? "")
        }
    }
CartStore and other stores are then injected into the root of the application.
@main
struct HelloMarketClientApp: App {

    @State private var productStore = ProductStore(httpClient: HTTPClient())
    @State private var cartStore = CartStore(httpClient: HTTPClient())

    var body: some Scene {
        WindowGroup {
            HomeScreen()
            .environment(productStore)
            .environment(cartStore)
            .environment(\.authenticationController, AuthenticationController
        }
    }
}
This makes them available to all the views in the application. Below you can see the implementation of CartScreen, which uses CartStore.
struct CartScreen: View {

    @Environment(CartStore.self) private var cartStore
    @Environment(\.showMessage) private var showMessage

    var body: some View {
        List {
            if let cart = cartStore.cart {

                Button(action: {
                   // proceed to checkout
                }) {

                    Text("Proceed to checkout ^[(\(cartStore.itemsCount) Item](inflect: true))")
                        .bold()
                        .frame(maxWidth: .infinity)
                        .padding()
                        .background(Color.green)
                        .foregroundStyle(.white)
                        .cornerRadius(8)
                }

                CartItemListView(cartItems: cart.cartItems)

            } else {
                ContentUnavailableView("No items in the cart.", systemImage: "cart")
            }
        }

        .listStyle(.plain)
        .navigationTitle("Cart")

        .task {
            do {
                try await cartStore.loadCart()
            } catch {
                showMessage(error.localizedDescription)
            }
        }

    }
}
Since the cart state is centrally managed by CartStore, accessing the cart items in the checkout screen becomes seamless. By retrieving CartStore from the environment, the cartItems property is readily available for use. This eliminates the need to manually pass data between screens, simplifying the flow of information and reducing boilerplate code.
The above code is part of my open-source project, HelloMarket—a fully functional shopping cart application built using SwiftUI for the frontend, ExpressJS for the backend, and a Postgres database for data storage. If you’re interested in exploring the project, you can access the code repository here.
For a more guided experience, you can enroll in the course, where you’ll learn step-by-step how to create the application from scratch. The course covers everything from setting up the backend and database to implementing a SwiftUI interface, making it a great resource for developers looking to build scalable, modern applications.
Conclusion:
The @Environment and related tools in SwiftUI provide a robust mechanism for managing shared state in a clean and scalable manner. This deep dive has explored how to use @EnvironmentObject, @Environment, and the newer @Observable and @Bindable macros to achieve efficient and maintainable state management.
We’ve seen how injecting objects at different levels of the view hierarchy can accommodate various use cases, from global state shared across the app to context-specific state scoped to certain views. By carefully designing your environment objects based on bounded contexts and separating concerns, you can avoid common pitfalls like unnecessary re-evaluations or tightly coupled components.
The transition from @EnvironmentObject to the Observation framework in iOS 17 marks a significant improvement in SwiftUI’s architecture. With features like automatic property publication and better type safety, the framework ensures more precise and efficient updates, further simplifying the development process.
It’s essential to strike a balance when using environment objects—leveraging their power for deeply nested view hierarchies while avoiding overuse that could lead to unwieldy dependencies. By passing only the necessary data to subviews and utilizing SwiftUI’s diffing mechanism, you can optimize performance and maintain a clear data flow.
Ultimately, using @Environment effectively can lead to modular, testable, and maintainable SwiftUI applications. With these tools in your development toolkit, you can confidently architect AI systems or any complex application that requires shared state management, ensuring scalability and elegance in your design.