AzamSharp
The Ultimate Guide to the Foundation Models Framework
At WWDC 2025, Apple unveiled the Foundation Models framework, an on-device LLM (Large Language Model). Foundation Models allows developers to utilize powerful generative AI capabilities directly on Apple devices — enabling natural language understanding, content generation, summarization, and more — all while maintaining user privacy and performance by running entirely on-device.
In this article, we will walk through how to get started with Apple’s Foundation Models framework and explain the core concepts you need to understand in order to take full advantage of its powerful on-device AI capabilities.
Prefer to learn by watching? Check out the video course Getting Started with Foundation Models Framework for a hands-on, step-by-step walkthrough.
NOTE: This article is a work in progress and new sections will be added in the future.
The outline of this article is shown below:
- Requirements
- Getting Started
- Guided Generation
- Integrating Foundation Models with SwiftUI App
- Availability
- Tools
- Persisting Model Responses
- Performance
- Conclusion

Requirements
Let’s first start with the requirements. In order to use Foundation Models framework you need to satisfy number of requirements.
- macOS Tahoe for development purposes
- Xcode 26
- Apple Silicon
You can visit Apple Developer Portal to download all the needed tools, included the operating system.
It’s best not to install a beta operating system on your primary machine. If you have a spare Apple Silicon Mac or a secondary device, that’s the ideal place to explore and experiment with the new features safely.
Getting Started
The best way to get started with Foundation Models is by using the new #Playground macro in your SwiftUI application. The #Playground macro allows you to embed playgrounds directly alongside your SwiftUI views, making it an excellent way to quickly test and iterate on your code.
Below you can find, what I like to call is hello world of Foundation Models framework.
import Playgrounds
import FoundationModels

#Playground {
    let session = LanguageModelSession()
    let response = try await session.respond(to: "List all states in USA.")
    print(response.content)
}
We start by importing Playgrounds since we’re using the #Playground macro. Next, we import FoundationModels to enable communication with the on-device LLM.
Interaction with the model begins by creating an instance of LanguageModelSession. This session maintains state between requests, allowing it to retain the context of the conversation or prompts.
We then call the respond function on the session object and pass in a prompt. A prompt is a request or query from the user—essentially, a question being asked. In this case, we’re asking the model to list all the states of the USA.
Finally, we print the string response using the response.content property. The result is shown below:
Certainly! Here is a list of all 50 states in the United States:

1. Alabama
2. Alaska
3. Arizona
4. Arkansas
5. California
6. Colorado
7. Connecticut
8. Delaware
9. Florida
10. Georgia

// and so on...
It’s truly impressive how straightforward the Foundation Models API is to use. With just a few lines of code, we were able to send a prompt and receive a fully structured response—no complex setup required.
One limitation you may have noticed is that the user has to wait for the entire response to be generated before anything appears on screen. This adds noticeable latency and can make the interface feel slow or unresponsive. A much better approach is to stream the response, allowing content to appear incrementally as it’s generated.
In the example below, we use the streaming API to display each part of the response as soon as it becomes available:
#Playground {
    let session = LanguageModelSession()
    let stream = session.streamResponse(to: "Write a short story on a cat lost in the big city.")

    for try await partialResponse in stream {
        print(partialResponse)
    }
}
With streaming, the output begins to appear almost immediately, keeping the user engaged and reducing perceived wait time. Had we used a non-streaming approach, the user might have waited 20–30 seconds before seeing any content at all — a significant delay in modern UI expectations.
Guided Generation
In the previous section, you learned how to get a response from the Foundation Model. Those responses were returned as plain strings. But what if we wanted something more structured—something we could work with programmatically?
A common workaround is to ask the model to return JSON by including that instruction in the prompt. While this might work in simple cases, it quickly becomes unreliable. The model may not always return the exact same structure, and you’ll often need to clean up the response manually. For more complex or nested data, this approach becomes fragile and hard to maintain.
Thankfully, the Foundation Models framework solves this problem with a powerful feature called Guided Generation. Guided generation enables the model to return strongly typed, structured data, aligned with Swift types you define. This means you’ll consistently get predictable, well-formed responses—without messy string parsing.
To use guided generation, you begin by defining a Swift struct that represents the desired output. Here’s an example:
@Generable()
struct Recipe {
    @Guide(description: "The name of the recipe.")
    let name: String
    @Guide(description: "The description of the recipe.")
    let description: String
}
The struct is annotated with the @Generable macro, which tells the Foundation Models framework that this type should be used for guided generation. You can also annotate individual properties with the @Guide macro to provide additional context or constraints. These guides help the model generate more accurate and relevant values for each property.
With this setup in place, we can now use our custom type to receive structured, type-safe output directly from the model.
#Playground {

    let session = LanguageModelSession()
    let response = try await session.respond(to: "Suggest a tradional Pakistani recipe", generating: Recipe.self)

    // response.content is of type Recipe
    print(response.content)
    print(response.content.name) // name of the recipe
    print(response.content.description) // description of the recipe
}
In the code above, when the model generates a recipe, it uses our @Generable type to populate the result. Instead of receiving a plain string, we get a fully structured Recipe object that we can work with directly in Swift.
You can also add constraints to your @Generable models to guide how values are generated. In the example below, we’ve added a constraint to the new prepTimeMinutes property to limit its value to a specific range:
@Generable()
struct Recipe {
    @Guide(description: "The name of the recipe.")
    let name: String
    @Guide(description: "The description of the recipe.")
    let description: String
    @Guide(description: "The prep time in minutes.", .range(0...20))
    let prepTimeMinutes: Int
}
The .range constraint ensures that the generated value for prepTimeMinutes falls between 0 and 20. When the model generates the Recipe struct, it automatically assigns a random value within that range to the prepTimeMinutes property.
One of the most powerful aspects of guided generation is how seamlessly it supports hierarchical structures. For instance, suppose we not only want the recipe itself, but also a list of ingredients along with their quantities and units of measurement.
To represent this, we can define the following structure:
@Generable()
struct Recipe {
    @Guide(description: "The name of the recipe.")
    let name: String
    @Guide(description: "The description of the recipe.")
    let description: String
    @Guide(description: "The prep time in minutes.", .range(0...20))
    let prepTimeMinutes: Int
    @Guide(description: "List of ingredients for the recipe.")
    let ingredients: [Ingredient]
}

@Generable()
struct Ingredient {
    @Guide(description: "The name of the ingredient.")
    let name: String

    @Guide(description: "The quantity of the ingredient.")
    let quantity: Double

    @Guide(description: "The unit of measurement for the quantity (e.g., grams, tablespoons, cups).")
    let unit: Unit
}

@Generable()
enum Unit: String, Codable {
    case grams
    case kilograms
    case milliliters
    case liters
    case teaspoons
    case tablespoons
    case cups
    case pieces
    case cloves
    case slices
    case pinch
}
As you can see, the Recipe struct includes an array of Ingredient objects, and each Ingredient has a unit property of type Unit, which is defined as an enum. This structure allows for clear, type-safe modeling of nested data.
You can generate a model response using the following implementation:
#Playground {

    let session = LanguageModelSession()
    let response = try await session.respond(to: "Suggest a tradional Pakistani recipe", generating: Recipe.self)

    // response.content is of type Recipe
    print(response.content)
    print(response.content.name) // name of the recipe
    print(response.content.description) // description of the recipe
    print(response.content.prepTimeMinutes)

    for ingredient in response.content.ingredients {
        print(ingredient.name)
        print(ingredient.quantity)
        print(ingredient.unit)
    }
The output is shown below:
Recipe(
    name: "Chicken Biryani",
    description: "Chicken Biryani is a fragrant and flavorful rice dish, originating from the Indian subcontinent, especially popular in Pakistan. It's a perfect blend of spices, tender chicken pieces, and aromatic basmati rice.",
    prepTimeMinutes: 6,
    ingredients: [
        HelloFoundations.Ingredient(
            name: "Chicken",
            quantity: 500.0,
            unit: HelloFoundations.Unit.grams
        ),
        HelloFoundations.Ingredient(
            name: "Basmati Rice",
            quantity: 200.0,
            unit: HelloFoundations.Unit.grams
        ),
        HelloFoundations.Ingredient(
            name: "Onion",
            quantity: 2.0,
            unit: // (Missing in screenshot)
        )
    ]
)
As shown in the output above, guided generation handles hierarchical or nested data structures exceptionally well. This makes it easy to model complex relationships based on the needs of your application.
The structured nature of guided generation also simplifies integration with SwiftUI. For instance, to display a list of ingredients, you can iterate through the array and render each item using a dedicated IngredientView.
We’ll explore how to integrate Foundation Models with your SwiftUI app later in this article.
While the example above works well for small demos, it’s not ideal for real-world use. The reason is that the entire response must be generated before anything can be displayed to the user, which introduces unnecessary latency. Fortunately, we can solve this by streaming the response, allowing content to appear incrementally as it’s generated.
struct ContentView: View {

    let session: LanguageModelSession = LanguageModelSession()

    var body: some View {
        VStack {
            Button("Show Recipe") {
                Task {
                    let stream = session.streamResponse(to: "Suggest a tradional Pakistani recipes.", generating: Recipe.self)

                    for try await partialResponse in stream {
                        print(partialResponse.name ?? "")
                        print(partialResponse.description ?? "")
                    }
                }
            }
        }

    }
}
In the example above, we used a SwiftUI app instead of a Playground due to some limitations with streaming in Playgrounds.
One important detail to note is that partialResponse is of type Recipe.PartiallyGenerated. This type represents content that is still being built by the model. As the stream progresses, more data is incrementally added until the full Recipe—complete with ingredients and units—is fully constructed.
Guided Generation is one of the most powerful features of the Foundation Models framework. It brings structure, predictability, and type safety to AI-driven development. Instead of dealing with unpredictable strings or brittle JSON parsing, you work directly with native Swift types that the model can populate reliably—even for deeply nested or complex data.
Whether you’re building a recipe app, a form generator, or an AI assistant that requires structured responses, guided generation streamlines your development process and keeps your code clean, safe, and maintainable.
Integrating Foundation Models with SwiftUI App
Now that you have a basic understanding of the Foundation Models framework, let’s apply it to solve a real-world problem. Many households struggle with meal planning—often, you might have a selection of ingredients in your refrigerator or pantry but no idea what to cook. Imagine an app that suggests recipes based on the ingredients you have on hand.
This app uses slightly modified versions of the
RecipeandIngredientmodels from earlier examples. Check out the complete source code on the Foundation Models Framework Examples repository.
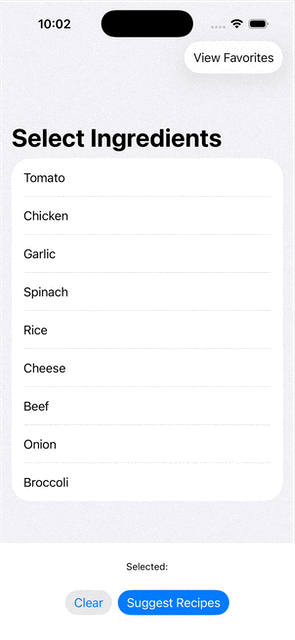
The app begins with a ContentView that displays a list of ingredients for the user to choose from. In this example, the ingredients are hardcoded, but they could easily be fetched dynamically from a server. Below is the implementation of ContentView:
struct ContentView: View {

    @State private var selectedIngredients: Set<Ingredient> = []
    @State private var showPresentRecipe: Bool = false
    @State private var navigateToIngredients: Set<Ingredient>? = nil

    var body: some View {
        VStack {
            IngredientSelectorView(selectedIngredients: $selectedIngredients)

            HStack {
                Button("Clear") {
                    selectedIngredients = []
                }.buttonStyle(.bordered)
                Button("Suggest Recipes") {
                    navigateToIngredients = selectedIngredients
                }.buttonStyle(.borderedProminent)
            }
        }
        .navigationDestination(item: $navigateToIngredients) { ingredients in
            RecipeListScreen(ingredients: ingredients)
        }
The IngredientSelectView is responsible for allowing users to choose ingredients. It uses @Binding to pass the selected ingredients back to the calling ContentView.
Once the ingredients are selected and the Suggest Recipes button is tapped, the app navigates to RecipeListScreen, passing along the selected ingredients. This screen is responsible for preparing and displaying the recommended recipes.
The core recipe generation happens inside the RecipeRecommender service. This service maintains an instance of LanguageModelSession and manages an array of generated Recipe objects. It uses the Foundation Models framework to generate recipes based on the provided ingredients, leveraging guided generation to return structured, Swift-native results.
@MainActor
@Observable
class RecipeRecommender {

    var recipes: [Recipe.PartiallyGenerated] = []
    let session: LanguageModelSession

    init() {

        self.session = LanguageModelSession {
                """
                You are a helpful recipe assistant that creates delicious and easy-to-follow recipes based on the provided ingredients.
                """
        }
    }

}
Notice that the recipes array is defined as an array of Recipe.PartiallyGenerated. This is intentional, as we are using response streaming— and when guided generation is used with streaming, it returns content incrementally in a partially generated form. As the stream progresses, more fields are filled in until the entire structure is complete.
We also pass instructions when initializing the LanguageModelSession. These instructions play a crucial role in defining the model’s behavior—they establish the model’s role, expectations, and response format. Unlike prompts, which are dynamic and user-provided, instructions are defined by the developer and sent to the model before the prompt.
It’s essential to guard against prompt injection attacks, where a user might try to override the system instructions via crafted input. One way to mitigate this is by clearly separating instructions from user input and not exposing instruction fields through user-editable interfaces. Instructions can be detailed and even include examples of expected input/output formats to improve consistency and quality of the generated results.
Next we implement the suggestRecipes function.
func suggestRecipes(ingredients: Set<Ingredient>) async throws {

        let prompt = "Suggest 3-5 recipes based on the following ingredient(s): \n \(ingredients.map(\.name).joined(separator: ", "))"

        let stream = session.streamResponse(to: prompt, generating: [Recipe].self)
        for try await partialResponse in stream {
            recipes = partialResponse
        }

    }
We pass the selected ingredients to the suggestRecipes function, where each ingredient’s name is used to construct a natural language prompt. In this case, we also specify that we’re looking for 3–5 recipes based on the provided ingredients to keep the results concise and relevant.
Next, we call the streamResponse function, which allows us to handle the model’s output incrementally as it streams in. This approach not only improves perceived performance but also enables us to display content as soon as it’s available—creating a more responsive and engaging user experience.
The RecipeListScreen relies on the RecipeRecommender service to generate recipe suggestions based on the selected ingredients. Below is the implementation of RecipeListScreen:
struct RecipeListScreen: View {

    let ingredients: Set<Ingredient>
    @State private var recipeRecommender: RecipeRecommender?

    var body: some View {

        Group {

            if let recipes = recipeRecommender?.recipes, !recipes.isEmpty {
                RecipeListView(recipes: recipes)
            } else {
                ProgressView("Preparing delicious recipes...")
            }

        }.task {
            do {
                recipeRecommender = RecipeRecommender()
                try await recipeRecommender?.suggestRecipes(ingredients: ingredients)
            } catch {
                print(error)
            }
        }
    }
}
The suggestRecipes function of RecipeRecommender is called as soon as the task closure is triggered. This ensures that recipe generation begins immediately when the user lands on the RecipeListScreen. Once the recipes are generated, they are displayed using the RecipeListView.
You can see the demo in action below:
The demo also showcases additional features such as saving recipes to favorites and invoking a custom tool. Don’t worry—we’ll cover those later in this article. You can explore the full source code in the Foundation Models Framework Examples repository.
One important thing to keep in mind when using guided generation is that all properties defined in your model will be generated, regardless of whether they are displayed in the user interface.
For example, consider a Recipe model that includes an additional property called steps, which contains detailed instructions on how to prepare the dish. Even if you’re not showing steps on the RecipeListScreen, the model will still generate that content in the background. This can increase response time and make the UI feel slower—especially for properties that require longer or more detailed output.
To optimize performance, consider tailoring your @Generable models to only include the fields necessary for the current context or screen.
Availability
Foundation Models are available on specific operating systems and devices. It is safe to assume that some of your users will not be able to utilize the power of on-device LLMs.
To run and develop apps using the Foundation Models framework, the following requirements must be met:
Supported Operating Systems
- macOS 26 (Tahoe) or later (required for development)
- iOS 26 or later (for iPhone deployment)
- iPadOS 26 or later (for iPad deployment)
- Xcode 26 or later is required to build and run apps that use the Foundation Models framework
Foundation Models provides the SystemLanguageModel API to help determine whether the current device is capable of running on-device language models. The availability can depend on several factors, such as:
- Incompatible hardware (e.g., unsupported device)
- Outdated operating system
- Apple Intelligence not being enabled by the user
You can use the .availability property to check for these conditions and update your UI accordingly. Here’s an example:
struct ParkDetailScreen: View {

    let park: Park
    private let model = SystemLanguageModel.default

    var body: some View {
        ScrollView {
            switch model.availability {
            case .available:
                TripPlanningView(park: park)
            case .unavailable(.appleIntelligenceNotEnabled):
                Text("This feature requires Apple Intelligence to be enabled in Settings.")
            case .unavailable(.modelNotReady):
                Text("The on-device model isn't ready yet. Please try again later.")
            case .unavailable(.deviceNotEligible):
                Text("Your device doesn’t support this feature.")
            default:
                Text(park.description)
            }
        }
        .padding()
        .navigationTitle(park.name)
    }
}
This approach ensures your app behaves gracefully on unsupported devices or configurations, while guiding the user with clear messaging.
By checking the model’s availability at runtime, you can provide a tailored user experience that gracefully handles unsupported scenarios. This not only avoids crashes or degraded functionality but also helps set the right expectations for users. As Apple continues to expand the reach of Foundation Models across devices and OS versions, implementing these availability checks ensures your app remains robust, future-ready, and user-friendly.
Tools
While prompts and guided generation are essential for working with Foundation Models, tools take things even further by allowing your app to extend what the model can do. Tools are custom Swift types and logic that the model can invoke dynamically during a conversation.
You define a tool, describe what it does, and the Foundation Models framework enables the model to call it when appropriate—almost like giving the model new abilities. This opens the door to rich, interactive apps where the model can trigger real actions, fetch external data, or interact with your UI based on natural language input. In this section, we’ll explore how to define, register, and handle tools to unlock the full potential of intelligent user experiences.
In our example, we’ll implement a custom RecipeTool that fetches delicious Pakistani rice dishes from a JSON API. To keep the interaction meaningful and relevant, we’ll configure the model to invoke this tool only when the user selects rice as one of the ingredients. This ensures that the tool is used contextually—enhancing both performance and the quality of the responses.
Creating a custom tool with the Foundation Models framework is straightforward. You simply need to conform to the Tool protocol and implement its required properties and methods. Below is the implementation of our RecipeTool, which will serve as an example of how to define and integrate a custom tool into your app.
struct RecipeTool: Tool {

    let httpClient: HTTPClient

    var name = "recipeTool"
    var description = "Fetches Pakistani rice recipes based on provided ingredients by calling a recipe API."

    @Generable
    struct Arguments {
        @Guide(description: "A list of ingredients to base the Pakistani rice recipe recommendations on.")
        let ingredients: [String]
    }

    nonisolated func call(arguments: Arguments) async throws -> ToolOutput {

        let recipes = try await httpClient.loadRecipes().prefix(3)
        let recipeDescriptions = recipes.map { recipe in
            "- \(recipe.name): \(recipe.description)"
        }.joined(separator: "\n\n")

        return ToolOutput(recipeDescriptions)
    }
}
One of the first things you’ll notice in the tool implementation is the dependency on HTTPClient. Since the tool needs to make a network request to fetch recipe data, we use HTTPClient to handle that operation.
To support testing or mocking, it’s a good idea to have
HTTPClientconform to a protocol likeHTTPClientProtocol.
The Arguments struct represents the input passed from the model to the tool. It’s annotated with the @Generable macro, which enables the Foundation Model to generate and pass structured data into the tool. In this case, we expect a list of ingredients. To provide better guidance for the model, we also use the @Guide macro to describe the expected input.
The heart of the tool is the call function. This is where the logic resides to make the HTTP request and retrieve the results. The data returned here becomes part of the model’s response and is ultimately shown to the user. The return type of call is ToolOutput, which can wrap either a simple string or a structured GeneratedContent—giving you full control over how results are presented.
In order to use this tool with your model, you first need to register the tool with LanguageModelSession. This is shown below:
@MainActor
@Observable
class RecipeRecommender {

    var recipes: [Recipe.PartiallyGenerated] = []
    private(set) var session: LanguageModelSession
    let httpClient: HTTPClient

    init(httpClient: HTTPClient) {
        self.httpClient = httpClient

        let recipeTool = RecipeTool(httpClient: httpClient)
        self.session = LanguageModelSession(tools: [recipeTool]) {
                """
                You are a helpful recipe assistant that creates delicious and easy-to-follow recipes based on the provided ingredients.
                """
                """
                When the ingredients include rice, you must always use recipeTool to fetch rice recipes. Here is an example of ingredients with rice:
                """
                [Ingredient(name: "Rice")]
                [Ingredient(name: "Rice"), Ingredient(name: "Onion")]
                [Ingredient(name: "Rice"), Ingredient(name: "Chicken")]

                """
                If rice is not one of the ingredients, you should generate the recipes yourself.
                """

        }
    }
We pass the recipeTool as an argument in the tools array when initializing the LanguageModelSession. Since this is an array, you can register multiple tools depending on your app’s needs.
Some useful tool ideas include a grocery finder to locate nearby stores that carry the ingredients, or a restaurant finder that maps local spots serving the recommended dishes. These tools can work together to create a seamless, intelligent user experience.
In addition to registering the tool, you’ll notice that we’ve also updated the session’s instructions. These instructions explicitly tell the model that if the ingredient list includes rice, it must use the recipeTool to fetch relevant rice-based recipes. To make the guidance even clearer, the instructions also include sample ingredient arrays containing rice—helping the model better understand when the tool should be invoked. Clear and specific instructions like these are key to getting reliable, context-aware behavior from the model.
While it’s possible to make your
@Generablemodels conform toCodable, we’ve chosen to create separate DTO (Data Transfer Object) types to represent the server’s response. This approach keeps the generable models focused on model interaction, while allowing the JSON structure from the API to remain flexible—without requiring changes to the generable types.
Now, when you run the app and select rice as one of the ingredients, there’s a high chance you’ll be served a Pakistani rice recipe—fetched dynamically using the recipeTool.
Persisting Model Responses
In many cases, generating and displaying responses from the model is only half the story. Just as important is the ability to persist those responses for later use. For example, in our recipe app, a user might want to save a favorite dish so they can revisit it later without generating it again.
In this section, we’ll explore how to store model responses locally using SwiftData, Apple’s on-device SQLite-powered persistence framework.
We’ll begin by creating a persistence model to store our data locally. Since @Generable models are value types (structs), and SwiftData requires models to be reference types (classes), we can’t reuse them directly. Instead, we’ll define a separate model class called RecipeModel that’s compatible with SwiftData. Here’s the implementation:
import Foundation
import SwiftData

@Model
class RecipeModel {
    var name: String
    var desc: String

    init(name: String, desc: String) {
        self.name = name
        self.desc = desc
    }
}
Next, we need to inject the model container into our app. While this can technically be done at any view level, it’s best practice to inject it at the root level. This ensures that the model context is available throughout the entire app, making it easier to read from and write to the database wherever needed.
@main
struct YummyApp: App {

    var body: some Scene {
        WindowGroup {
            NavigationStack {
                ContentView()
            }
            .modelContainer(for: RecipeModel.self)
        }
    }
}
With the model container in place, you’re now ready to use SwiftData in your app. To persist data, simply access the modelContext using @Environment(\.modelContext) and call the insert function to save your model to the store. It’s that straightforward—no boilerplate, no fuss.
Finally, you can display your favorite recipes by just querying the SQLite database using SwiftData @Query macro.
struct FavoriteRecipeListScreen: View {

    @Query private var recipeModels: [RecipeModel]

    var body: some View {

        if recipeModels.isEmpty {
            ContentUnavailableView("No Favorite Recipes",
                                       systemImage: "heart.slash",
                                       description: Text("You haven't added any recipes to your favorites yet."))
        } else {
            List(recipeModels) { recipeModel in
                VStack(alignment: .leading) {
                    Text(recipeModel.name)
                        .font(.headline)
                    Text(recipeModel.desc)
                }
            }.navigationTitle("Favorite Recipes")
        }
    }
}
If you are interested in reading more about SwiftData architecture then check out my article SwiftData Architecture - Patterns and Practices.
Performance
Performance plays a critical role in delivering a smooth and responsive user experience when working with the Foundation Models framework. While the API is designed to be developer-friendly, it’s important to understand how certain design choices—like how you define your @Generable types or when you initialize model sessions—can significantly impact speed and responsiveness. In this section, we’ll cover key strategies to help you optimize performance and avoid common pitfalls that can lead to sluggish UI or delayed model responses.
-
During guided generation, the model populates all properties of a
@Generabletype—regardless of whether they’re used in the UI. In our recipe example, if you add astepsproperty to represent cooking instructions, the model will still generate those steps—even if they’re not displayed on screen. This can lead to noticeable delays, as the model spends time generating unused content. To avoid this, be intentional when designing@Generabletypes: include only the properties you actually plan to display. Otherwise, your UI may feel slow or unresponsive, even though the delay is happening behind the scenes. -
Just like preheating an oven ensures even baking and optimal texture, warming up your model can improve performance. The
LanguageModelSessionprovides aprewarmfunction that eagerly loads the resources needed for the session into memory. You should callprewarmwhen you’re confident the user will engage with LLM features. The right time to do this depends on your app’s flow. In our case, since the app relies entirely on the Foundation Models framework, we callprewarmat launch to ensure everything is ready when the user starts interacting.
The following tips are submitted by Klayton Bailey:
- The current combined input and output token limit is 4096
- Tip: The order of generable properties matters. Put properties last when they depend on other properties (e.g., summaries).
- Tip: The models likely work best in English. Instructions may produce the best results when written in English. Write prompts in the user’s preferred language.
- Various patterns for composing calls to and from other frameworks
- Patterns for pre-prompting LanguageModelSession to infuse memory, such as for attempting to restore session state
GitHub Repository
You can download the complete code using the repository. https://github.com/azamsharpschool/FoundationModels-Examples
Conclusion
The Foundation Models framework opens up a new era of on-device intelligence for Apple developers. With features like natural language prompts, guided generation, custom tools, and seamless SwiftUI integration, you now have the power to build smart, privacy-respecting apps that feel truly conversational—without relying on the cloud.
In this guide, we walked through how to get started, stream responses, structure output with @Generable, extend capabilities using tools, persist data with SwiftData, and optimize performance for real-world use. Whether you’re building recipe apps, productivity tools, or AI-powered assistants, the Foundation Models framework gives you a powerful, flexible foundation to build on.
This article is a living resource and will continue to evolve as Apple adds more capabilities to the framework. If you want a deeper, hands-on experience, check out my course Getting Started with Foundation Models Framework and start building smarter iOS apps today.
The future of on-device AI is here—and it’s running on your Mac.