AzamSharp
Building a Custom Data Store in SwiftData
SwiftData uses SQLite behind the scenes to persist your models, and for most applications that is more than enough. But one of the most interesting features introduced in SwiftData is the ability to create your own custom data store. This means you are not limited to SQLite. You can persist your data in JSON, text files, cloud services, Firebase, REST APIs, or even completely custom formats.
At first, creating a custom store can feel intimidating because SwiftData hides a lot of complexity behind simple APIs like @Query, ModelContext, insert, and save. But once you understand how SwiftData communicates with a store, the architecture starts to make a lot more sense. The key idea is that SwiftData does not directly persist your model objects. Instead, it converts those objects into lightweight snapshots and sends those snapshots to the underlying store.
In this chapter, we are going to build a custom JSON based store for SwiftData. Our store will persist records to a JSON file while still allowing us to use all the familiar SwiftData APIs in our SwiftUI views. This means we will continue using @Query, ModelContext, insert, delete, and save, but instead of SQLite, the data will now be backed by a JSON document.
Along the way, you will learn how SwiftData internally communicates with a custom store, how snapshots work, how identifiers are managed, and how records are fetched and persisted. Once you understand these concepts, building other custom stores becomes much easier. A JSON store is only the beginning. The same architecture can be extended to text files, remote APIs, Firebase, or even your own database engine.
Several concepts and APIs demonstrated in this chapter are inspired by Apple’s WWDC 2024 session Create a custom data store in SwiftData. This chapter expands on those ideas by explaining the underlying architecture, snapshots, identifiers, and the flow between SwiftData and a custom persistence layer.

Why Build a Custom Store?
Most applications should continue using SQLite through SwiftData’s default store. SQLite is fast, battle tested, and gives you features like indexing, constraints, and efficient queries out of the box. But there are situations where a custom store can make sense.
For example, you may want to:
- Persist data in a portable JSON format
- Sync records directly with a REST API or cloud service
- Integrate with an existing legacy persistence layer
- Store data in a human readable format for debugging
- Experiment with alternative storage engines
- Learn how SwiftData works internally
In many cases, building a custom store is less about replacing SQLite and more about understanding the architecture underneath SwiftData. Once you understand how snapshots and stores work together, you gain a much deeper understanding of the framework itself. Understanding the Architecture
Before implementing a custom data store, it is important to understand the overall architecture and flow of data inside SwiftData. When building regular SwiftData applications, we usually interact with high level APIs like @Query, ModelContext, insert, delete, and save. These APIs make SwiftData feel very simple and approachable, but behind the scenes SwiftData is doing a tremendous amount of work for us.
A custom store sits underneath SwiftData and acts as the persistence layer. Your SwiftUI views still work with normal model objects, but the store itself never directly saves those live model objects. Instead, SwiftData converts the models into lightweight representations called snapshots and passes those snapshots to the custom store.
At a high level, the save flow looks like this:
SwiftUI View
    ↓
@Query / ModelContext
    ↓
SwiftData
    ↓
Live Model Objects
    ↓
Snapshots
    ↓
Custom Data Store
    ↓
JSON File
When data is loaded, the process works in reverse:
JSON File
    ↓
Custom Data Store
    ↓
Snapshots
    ↓
SwiftData
    ↓
Live Model Objects
    ↓
SwiftUI View
This separation of responsibilities is extremely important to understand. SwiftData is responsible for managing live model objects, observation tracking, change tracking, identity management, relationships, and integration with SwiftUI. The custom store only cares about persistence. Its responsibility is simply to save snapshots and return snapshots.
The snapshots sit right in the middle of this architecture. They act as the bridge between SwiftData’s live object system and your storage format. Once you understand that snapshots are the currency exchanged between SwiftData and the store, the rest of the custom store implementation becomes much easier to follow.
Model
Models are reference types that define the data you want to persist to the underlying store. In SwiftData, models are decorated with the @Model macro and contain the properties that should be stored in the database. Models can also reference other models through relationships including one to one, one to many, and many to many relationships.
At first glance, a SwiftData model may look like a simple Swift class. For example, the Book model below looks pretty lightweight and straightforward.
But behind the scenes, the @Model macro transforms this class into something much more sophisticated. SwiftData injects additional functionality for observation tracking, identity management, relationship handling, change tracking, persistence integration, and communication with the ModelContext.
This means the actual runtime representation of a model object is far more complicated than what you see in your source code.
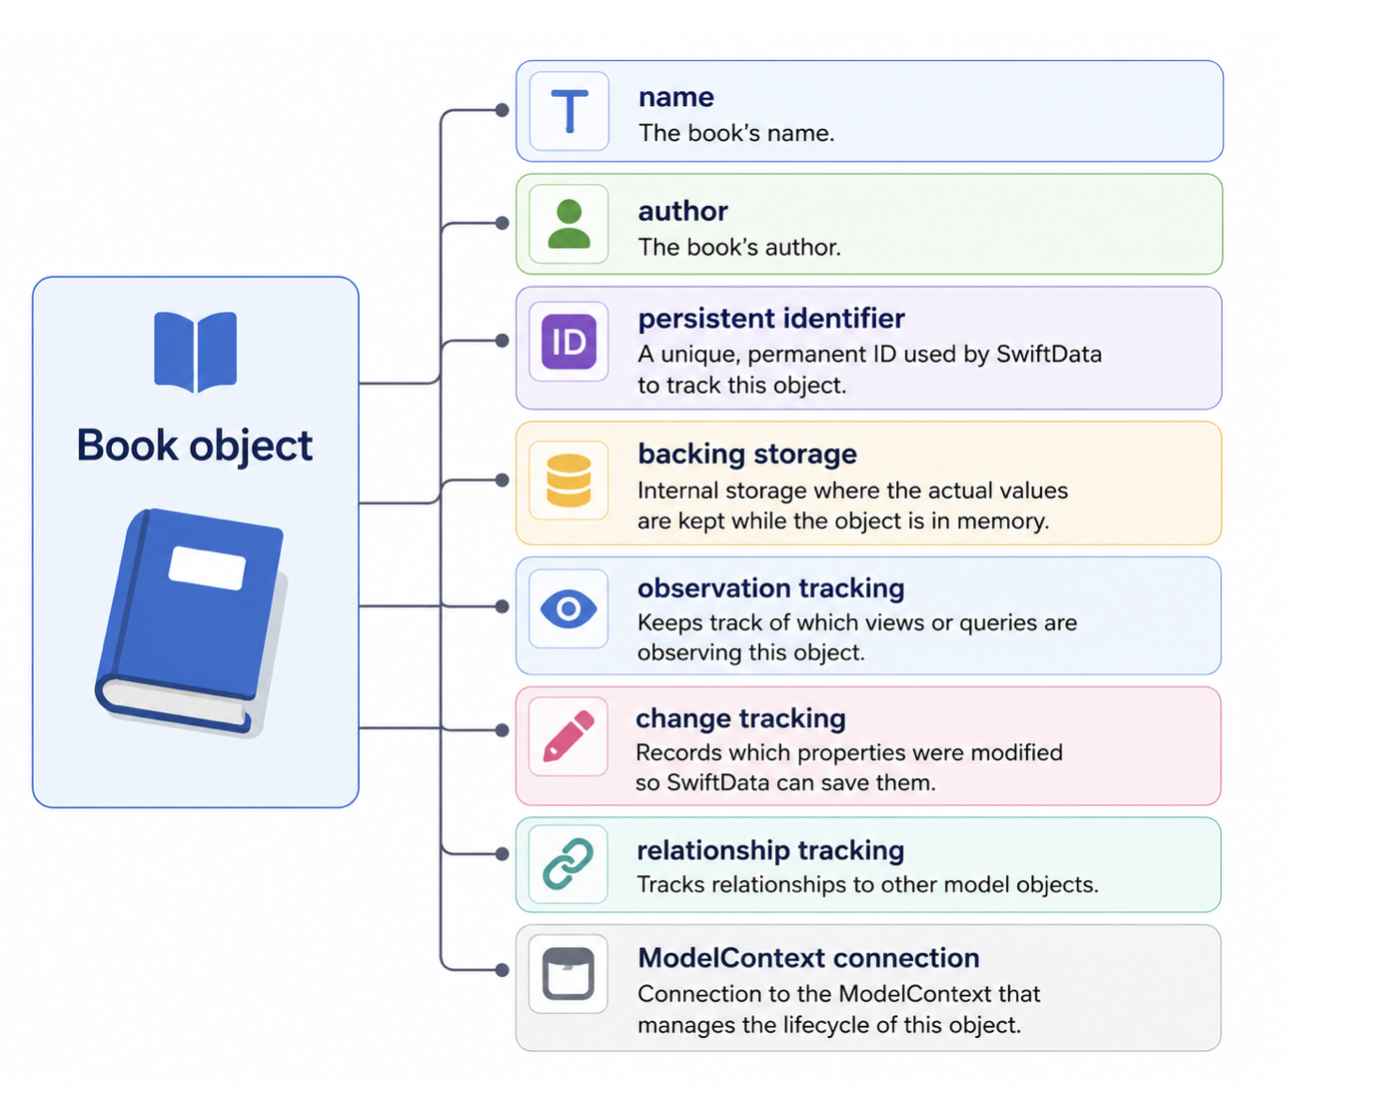
As you can see from the diagram above, the Book object contains a lot of additional machinery managed by SwiftData. This is one of the reasons SwiftData does not directly persist the live model object itself. Instead, SwiftData converts the model into a much lighter representation called a snapshot.
Snapshot
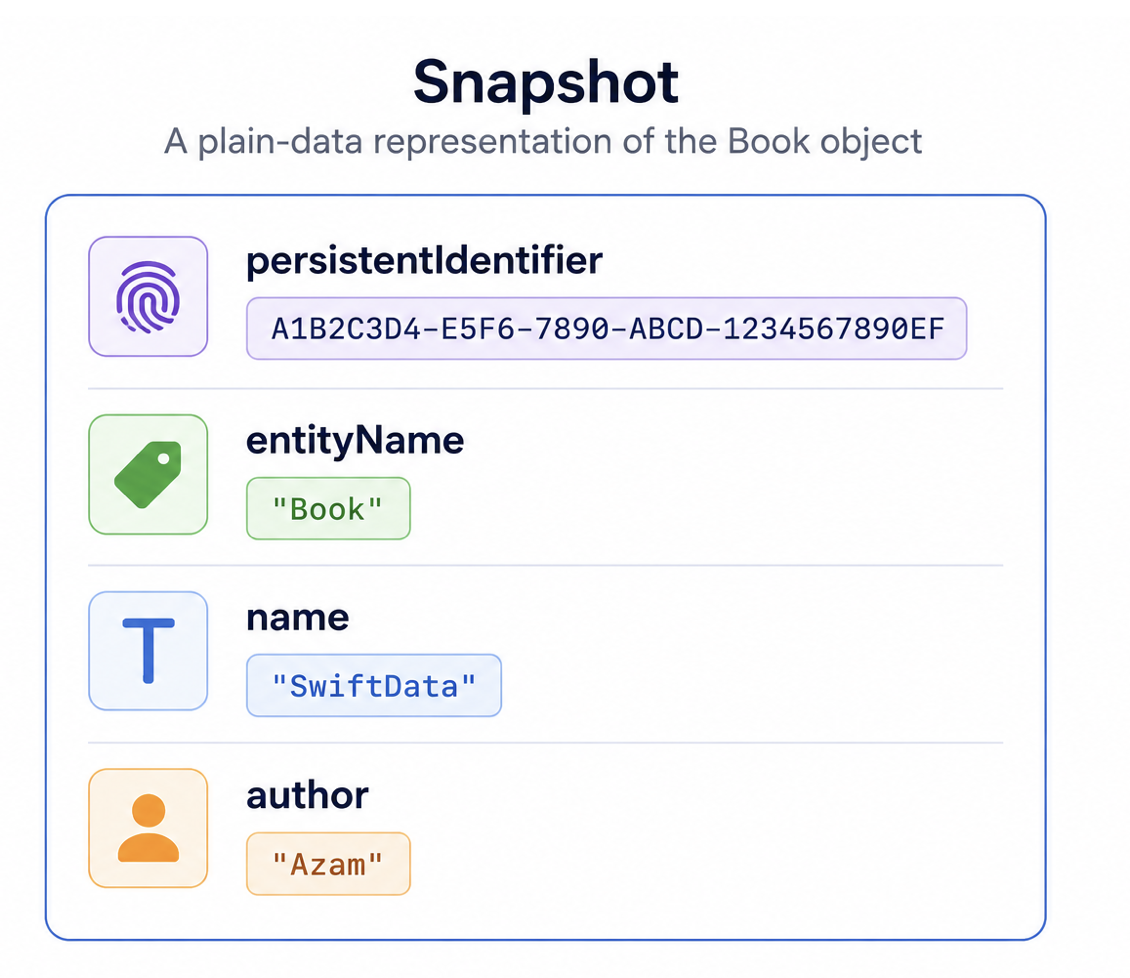
A snapshot is a lightweight representation of a model’s data that SwiftData persists to the underlying store. Unlike a live model object, a snapshot does not contain observation tracking, change tracking, relationship management infrastructure, or a connection to the ModelContext. Its only responsibility is to represent the model’s data in a format that can be saved and later reconstructed.
When a model is saved, SwiftData converts the live object into a snapshot and passes that snapshot to the custom store. When data is fetched, the process works in reverse. The store returns snapshots, and SwiftData rebuilds live model objects from those snapshots.
This is an extremely important concept to understand because your custom store never directly works with live model objects. The store only deals with snapshots.
SwiftData provides a built in snapshot type called DefaultSnapshot. This snapshot already contains the values and metadata required to persist and restore your models, which means in many cases you do not need to create your own snapshot implementation.
For most custom stores, DefaultSnapshot is more than enough. In our JSON store implementation, we will use DefaultSnapshot to serialize and deserialize model data.
There are situations, however, where you may want to create your own custom snapshot type. For example, if you want to store records in a specialized format like comma separated values inside a text file, then a custom snapshot may give you more control over serialization and reconstruction of data. This is because instantiating a DefaultSnapshot from a format that is not serializable is quite cumbersome.
You can think of snapshots as the transport format exchanged between SwiftData and the persistence layer. SwiftData converts live models into snapshots before saving, and converts snapshots back into live models when fetching data.
The image below shows one possible example of a snapshot persisted in the database.
Data Store Configuration
By default, SwiftData uses ModelConfiguration, which sets up SwiftData to persist data using a SQLite database. For most applications, this is exactly what you want. SQLite is fast, reliable, and deeply integrated into SwiftData.
But since we are building a custom JSON store, we need to provide our own configuration object.
A data store configuration tells SwiftData how the store should be initialized. This includes information such as the name of the store, the schema it supports, and where the underlying data should be persisted. In our case, the most important value is the file URL because that determines where the JSON document will be stored on disk.
You can think of the configuration as the setup object for the store. The store itself is responsible for reading and writing snapshots, but the configuration provides the information the store needs in order to do its job properly.
Data Store
Out of all the different components involved in building a custom SwiftData store, the DataStore itself is the most important piece. This is the layer that SwiftData communicates with whenever records need to be fetched or persisted.
To create a custom store, you must conform to the DataStore protocol. This protocol defines the functionality SwiftData expects from your persistence layer. Although the protocol contains several requirements, the two most important functions you will implement are fetch and save.
The fetch function is called whenever SwiftData needs to retrieve records from the store. This usually happens when you use APIs like @Query or manually perform a fetch using the ModelContext.
The save function is called whenever the ModelContext is saved. SwiftData collects all pending inserts, updates, and deletes from the context, converts them into snapshots, and sends those snapshots to your custom store for persistence.
You can think of the DataStore as the bridge between SwiftData and your actual storage mechanism. Whether your data is stored in JSON, text files, Firebase, REST APIs, or some completely custom format, the DataStore is responsible for reading snapshots from that source and writing snapshots back to it.
Implementation
There are several pieces involved in setting up a custom data store in SwiftData. Now that we understand the high level architecture, we can start putting everything together one piece at a time.
We will begin with the model, because the model defines the shape of the data we want to persist. After that, we will create a custom configuration, implement the actual JSON store, add support for reading and writing snapshots, and finally register the store with our application.
By the end of this implementation, our SwiftUI views will continue to use the same familiar SwiftData APIs, but the underlying data will be persisted to a JSON file instead of the default SQLite store.
Creating the Model
For this example, we will store records of type Book. A book will have two properties: name and author.
@Model
class Book {
    var name: String
    init(name: String, author: String) {
        self.name = name
        self.author = author
    }
}
We are intentionally starting with a very simple model so we can focus on how the custom store works. Once the basic flow is clear, you can extend this example by adding more models and relationships.
For example, later you could add a Review model and create a one to many relationship between Book and Review, where one book can have many reviews.
Creating the Configuration
SwiftData provides the DataStoreConfiguration protocol, which allows you to create custom configurations for your own stores. Since we are building a JSON based store, we need to create a configuration that tells SwiftData how our store should be initialized.
One of the required pieces is the type of store associated with the configuration. This is provided through the typealias Store. Apart from the store type, our configuration also contains a few additional properties:
- name uniquely identifies the store.
- schema represents the models managed by the store.
- fileURL specifies where the JSON file will be persisted on disk.
In our case, the schema will contain the Book model, and the fileURL will point to the JSON file where the snapshots are stored.
The implementation of JSONStoreConfiguration is shown below:
final class JSONStoreConfiguration: DataStoreConfiguration {

    typealias Store = JSONStore

    var name: String
    var schema: Schema?
    var fileURL: URL

    init(name: String, schema: Schema? = nil, fileURL: URL) {
        self.name = name
        self.schema = schema
        self.fileURL = fileURL
    }

    static func == (
        lhs: JSONStoreConfiguration,
        rhs: JSONStoreConfiguration
    ) -> Bool {
        lhs.name == rhs.name
    }

    func hash(into hasher: inout Hasher) {
        hasher.combine(name)
    }

}
The Equatable and Hashable implementations are required because SwiftData needs a way to uniquely identify and compare configurations internally. In our implementation, we simply use the store name for equality and hashing.
Creating the JSON Store
Now we come to the most important part of the implementation: creating the actual custom store. All custom stores in SwiftData must conform to the DataStore protocol. This protocol defines the contract between SwiftData and your persistence layer.
In our case, the persistence layer is a JSON file. SwiftData does not really care whether the data is stored in SQLite, JSON, text, Firebase, or a remote API. It only cares that your store knows how to fetch and save snapshots.
Here is the initial implementation of our custom JSONStore:
final class JSONStore: DataStore {


    typealias Configuration = JSONStoreConfiguration
    typealias Snapshot = DefaultSnapshot

    var configuration: JSONStoreConfiguration
    var name: String
    var schema: Schema
    var identifier: String
    init(
        _ configuration: JSONStoreConfiguration,
        migrationPlan: (any SchemaMigrationPlan.Type)?
    ) throws {

        self.configuration = configuration
        self.name = configuration.name
        self.schema = configuration.schema!
        self.identifier = configuration.fileURL.lastPathComponent
    }
}
The first thing we do is set the Configuration type alias to JSONStoreConfiguration. This tells SwiftData that our store should be created using the custom configuration we implemented earlier.
Next, we set the Snapshot type alias to DefaultSnapshot. DefaultSnapshot is provided by SwiftData and already contains the values and metadata needed to persist and reconstruct model data. This means we do not have to create our own snapshot type for this example.
The store also contains a few properties required by the DataStore protocol. The configuration property gives the store access to the custom configuration object, including the location of the JSON file. The name property stores the name of the store. The schema property describes the models managed by this store.
The identifier property uniquely identifies this store instance. In this implementation, we use the JSON file name as the identifier.
The initializer is called by SwiftData when the store is created. SwiftData passes in the configuration object and an optional migration plan. Inside the initializer, we simply copy the values from the configuration into local properties so they can be used later by the fetch and save operations. At this point, the store does not actually read or write anything yet. We have only created the foundation. The next step is to implement the functions that allow our store to read snapshots from the JSON file and write snapshots back to it.
Reading JSON
When you use the @Query macro in a view, or manually call a fetch operation on the ModelContext, SwiftData eventually calls the fetch function on your custom store. This is one of the most important functions in the implementation because it is responsible for reading records from the persistent store and returning them back to SwiftData. Let’s look at the implementation of the fetch function.
func fetch<T>(
    _ request: DataStoreFetchRequest<T>
) throws -> DataStoreFetchResult<T, DefaultSnapshot> where T: PersistentModel {
    let snapshots = try getSnapshots()
    let fetchedSnapshots = snapshots.values.filter {
        $0.persistentIdentifier.entityName == "\(T.self)"
    }
    return DataStoreFetchResult(
        descriptor: request.descriptor,
        fetchedSnapshots: fetchedSnapshots
    )
}
The heart of this function is the call to getSnapshots. This is our own helper function, and its job is to read the JSON file from disk and decode the stored data into snapshots.
Once we have all the snapshots, we filter them by entity name. This is important because a store may contain snapshots for more than one model type. In our case, we only want to return the snapshots that match the type SwiftData is currently asking for.
let fetchedSnapshots = snapshots.values.filter {
    $0.persistentIdentifier.entityName == "\(T.self)"
}
After filtering, we return the snapshots inside a DataStoreFetchResult.
return DataStoreFetchResult(
    descriptor: request.descriptor,
    fetchedSnapshots: fetchedSnapshots
)
At this point, our job as the custom store is done. We do not manually convert snapshots back into Book objects. SwiftData handles that part. The store returns snapshots, and SwiftData uses those snapshots to recreate the live model objects that are eventually displayed in the UI. Now let’s look at the implementation of getSnapshots.
private func getSnapshots() throws -> [PersistentIdentifier: DefaultSnapshot] {

    let fileURL = configuration.fileURL
    guard FileManager.default.fileExists(
        atPath: fileURL.path(percentEncoded: false)
    ) else {
        return [:]
    }
    let data = try Data(contentsOf: fileURL)
    let snapshots = try JSONDecoder().decode(
        [DefaultSnapshot].self,
        from: data
    )
    var result: [PersistentIdentifier: DefaultSnapshot] = [:]
    for snapshot in snapshots {
        result[snapshot.persistentIdentifier] = snapshot
    }
    return result
}
Inside getSnapshots, we first check if the JSON file exists. If the file does not exist yet, we simply return an empty dictionary. This can happen the first time the app runs, before any records have been saved. If the file exists, we read its contents into a Data object and decode that data into an array of DefaultSnapshot objects.
let snapshots = try JSONDecoder().decode(
    [DefaultSnapshot].self,
    from: data
)
For our implementation, DefaultSnapshot is enough because SwiftData already knows how to encode and decode the model values and metadata it needs. If you needed a very specialized storage format, you could create your own custom snapshot type, but for a JSON store this built in snapshot works well.
After decoding the snapshots, we convert the array into a dictionary keyed by PersistentIdentifier.
var result: [PersistentIdentifier: DefaultSnapshot] = [:]

for snapshot in snapshots {
    result[snapshot.persistentIdentifier] = snapshot
}
The reason we use a dictionary is performance and convenience. A PersistentIdentifier uniquely identifies each stored model. By using it as the dictionary key, we can quickly find, update, or delete a snapshot without looping through the entire collection every time.
This becomes especially useful inside the save function, where we need to apply inserts, updates, and deletes. With a dictionary, updating a snapshot is as simple as assigning a new value for a key, and deleting a snapshot is as simple as setting the value to nil.
Next, let’s look at how books are saved into the JSON file.
Writing JSON
The next mandatory function that requires implementation in the DataStore protocol is the save function. As the name suggests, save function is used to persist your data to the store. Here is the implementing of the save function.
 func save(_ request: DataStoreSaveChangesRequest<DefaultSnapshot>) throws -> DataStoreSaveChangesResult<DefaultSnapshot> {
        print("save fired")
        var storedSnapshots = try getSnapshots()
        var remappedIdentifiers: [
                 PersistentIdentifier: PersistentIdentifier
        ] = [:]

        for snapshot in request.inserted {
            let permanentIdentifier = try PersistentIdentifier.identifier(for: identifier, entityName: snapshot.persistentIdentifier.entityName, primaryKey: UUID())
            let permanentSnapshot = snapshot.copy(persistentIdentifier: permanentIdentifier, remappedIdentifiers: remappedIdentifiers)
            storedSnapshots[permanentIdentifier] = permanentSnapshot
            remappedIdentifiers[snapshot.persistentIdentifier] = permanentIdentifier
        }
        for snapshot in request.deleted {
            storedSnapshots[snapshot.persistentIdentifier] = nil
        }
        for snapshot in request.updated {
            storedSnapshots[snapshot.persistentIdentifier] = snapshot
        }

        // write snapshots
        try persistSnapshots(storedSnapshots)

        return DataStoreSaveChangesResult(for: identifier, remappedIdentifiers: remappedIdentifiers)
    }
The first thing we do is fetch all the existing snapshots from the persistent store. The main reason for this is that JSON files are not databases. You cannot partially update a JSON document by simply appending a new object at the end of the file. If you do that, the JSON structure will no longer be valid.
Instead, the common approach for file based storage is:
Read entire file
↓
Modify collection in memory
↓
Write entire collection back to disk
This is exactly what the save function is doing. We load all the existing snapshots into memory, apply inserts, updates, and deletes, and then persist the complete collection again.
It is also important to understand that SwiftData is not sending you the complete database through the request object. The request only contains the pending changes for the current transaction. These changes are available through:
request.inserted
request.updated
request.deleted
When you call modelContext.save(), SwiftData packages all pending changes in the context and sends them to your custom store.
Next, we iterate through the snapshots in the request.inserted collection. Newly inserted objects initially receive temporary identifiers. These temporary identifiers only exist while the object lives inside the context. Once the object is persisted, SwiftData expects your store to generate a permanent identifier.
You can think of the permanent identifier as the primary key for the record. In our implementation, we generate a UUID based identifier and create a new snapshot using that permanent identifier.
Finally, we update the in memory collection with inserts, updates, and deletes before writing the entire collection back to disk.
  private func persistSnapshots(_ snapshots: [PersistentIdentifier: DefaultSnapshot]) throws {

        let encoder = JSONEncoder()
        encoder.dateEncodingStrategy = .iso8601
        encoder.outputFormatting = [
            .prettyPrinted,
            .sortedKeys
        ]
        let data = try encoder.encode(Array(snapshots.values))
        try data.write(to: configuration.fileURL, options: .atomic)
    }
The persistSnapshots helper is responsible for writing the updated collection back to disk. Since our JSON file stores an array of snapshots, we first convert the dictionary values into an array.
Array(snapshots.values)
Then we encode that array using JSONEncoder and write the resulting data to the configured file URL.
This completes the save cycle. The save function prepares the final set of snapshots, and persistSnapshots writes those snapshots to the JSON file. At the very end of the function we return a DataStoreSaveChangesResult.
return DataStoreSaveChangesResult(for: identifier, remappedIdentifiers: remappedIdentifiers)
This object tells SwiftData that the save operation completed successfully. It also provides SwiftData with the mapping between temporary identifiers and permanent identifiers.
Remember that newly inserted models initially receive temporary identifiers when they are added to the ModelContext. During the save process, your custom store generates permanent identifiers for those objects. SwiftData now needs a way to understand which temporary identifier maps to which permanent identifier.
That is exactly what the remappedIdentifiers dictionary contains.
[
   temporaryIdentifier: permanentIdentifier
]
Once SwiftData receives this mapping, it updates the objects inside the context to use their permanent identifiers instead of the temporary ones. Without returning this information, SwiftData would not know how to reconcile the newly persisted objects with the in memory objects already managed by the context.
Registering JSONStore
The final step is registering our custom JSONStore with the application. This setup should happen as early as possible in the app lifecycle, which makes the App file the perfect place for it.
@main
struct CustomDataStoreApp: App {
    let container: ModelContainer
    init() {
        do {
            let fileURL = URL.documentsDirectory.appending(
                path: "books.json",
                directoryHint: .notDirectory
            )

            let configuration = JSONStoreConfiguration(
                name: "JSONStore",
                fileURL: fileURL
            )

            self.container = try ModelContainer(
                for: Book.self,
                configurations: configuration
            )
        } catch {
            fatalError("Unable to create model container: \(error.localizedDescription)")
        }
    }
    var body: some Scene {
        WindowGroup {
            ContentView()
                .modelContainer(container)
        }
    }
}
The first thing we do is create the location where the JSON file will be stored.
let fileURL = URL.documentsDirectory.appending(
    path: "books.json",
    directoryHint: .notDirectory
)
In this example, the file will be named books.json and stored inside the app’s documents directory.
Next, we create an instance of JSONStoreConfiguration.
let configuration = JSONStoreConfiguration(
    name: "JSONStore",
    fileURL: fileURL
)
This configuration tells SwiftData which custom store to use and where the underlying JSON file should be persisted.
Finally, we create the ModelContainer and pass in the configuration.
self.container = try ModelContainer(
    for: Book.self,
    configurations: configuration
)
This is the line where everything comes together. At this point, SwiftData now knows that the Book model should use our custom JSONStore instead of the default SQLite backed store.
One of the best parts about this architecture is that nothing changes in the SwiftUI views. You still use @Query, ModelContext, insert, delete, and save exactly the same way you normally would. The only difference is that behind the scenes, SwiftData is now reading from and writing to a JSON file instead of SQLite.
Usage
One of the nicest things about custom stores in SwiftData is that your SwiftUI views do not need to change at all. Once the underlying store has been registered with the ModelContainer, the rest of the application continues to use the same familiar SwiftData APIs.
Here is our ContentView using the custom JSON store.
struct ContentView: View {
@Query private var books: [Book]
@Environment(\.modelContext) private var context
    var body: some View {
        List {
            Button("Save") {
                let book = Book(name: “SwiftUI Architecture", author: “Mohammad Azam")
                context.insert(book)
             }
            ForEach(books) { book in
                Text(book.name)
            }
        }
    }
}
As you can see, the code inside the view looks exactly like a normal SwiftData application. We are still using @Query to retrieve books and ModelContext to insert new records.
The difference is happening entirely behind the scenes. When the @Query macro executes, SwiftData eventually calls the fetch function on our JSONStore. Our store reads the snapshots from the JSON file and returns them back to SwiftData.
When we insert a book and save the context:
try? context.save()
SwiftData converts the live model object into a snapshot and calls the save function on our custom store. The store then writes the snapshots to the JSON file.
This is one of the biggest advantages of SwiftData’s architecture. Your views remain completely unaware of how persistence is implemented. Whether the data is stored in SQLite, JSON, Firebase, or a remote API, the UI layer can continue using the same high level SwiftData APIs.
Relationships and Constraints
Our current implementation also supports relationships. This means you can add another model, such as Review, and create a one to many relationship between Book and Review. Since SwiftData converts the object graph into snapshots, the related data can also be persisted to the JSON file. For example, one Book can have many Review objects. When the book and its related reviews are saved, SwiftData includes the necessary relationship information in the snapshots, and our custom store persists those snapshots just like any other data.
Constraints, however, are a different story.
If you decorate the name property on Book with a #Unique constraint, that constraint will not automatically be enforced by our custom JSON store. Unlike SQLite, our JSON file does not have a database engine behind it that can validate uniqueness, indexes, or other rules for us.
That means constraint enforcement becomes the responsibility of the custom store.
If you want book names to be unique, you need to manually check the existing snapshots before allowing an insert or update. One simple approach is to define the constraints your store should enforce, then validate incoming changes against the existing data before writing everything back to disk.
For example, before inserting or updating a Book, you could inspect the stored snapshots and make sure no other book already has the same name. If a duplicate is found, the store should throw an error and prevent the save from completing.
This is one of the tradeoffs of building a custom store. You get a lot of flexibility, but you also take on responsibilities that a real database normally handles for you. SQLite gives you constraint enforcement, indexing, efficient queries, and transactions out of the box. With a JSON store, you need to decide which of those behaviors matter for your app and implement them yourself.
Source Code
Support
If you enjoyed this chapter and would like to continue learning more about SwiftUI, SwiftData, architecture, and full stack Swift development, make sure to check out the resources available on AzamSharp School.
AzamSharp School includes books, video courses, workshops, and practical tutorials focused on building real world applications using SwiftUI and modern Apple frameworks. Topics include SwiftUI architecture, SwiftData, testing, server side Swift, machine learning, and much more.
You can also find additional articles, videos, and source code examples at AzamSharp School.
Conclusion
Building a custom SwiftData store may seem complicated at first, but once you understand the role of snapshots, identifiers, and the DataStore protocol, the overall architecture becomes much easier to reason about. SwiftData handles the difficult parts like observation, change tracking, relationships, and rebuilding live model objects, while your custom store focuses only on persistence.
In this chapter, we implemented a JSON based store that integrates directly with SwiftData. Even though the underlying persistence mechanism changed completely, the code inside our SwiftUI views remained exactly the same. We were still able to use @Query, ModelContext, insert, delete, and save without any changes to the user interface layer.
The most important lesson from this chapter is understanding the separation of responsibilities. SwiftData manages live model objects while the custom store works with snapshots. Those snapshots act as the bridge between your application and the persistence layer. Once you understand this flow, it opens the door to building many different kinds of stores.
Although our implementation uses JSON, the same concepts can be extended much further. You can create stores backed by plain text files, cloud services, Firebase, REST APIs, or even proprietary storage engines. The custom store API gives you a tremendous amount of flexibility while still allowing you to take advantage of SwiftData’s high level APIs and SwiftUI integration.
Most applications should continue using SQLite because it is optimized, battle tested, and gives you features like indexing, constraints, and efficient querying out of the box. But understanding how custom stores work gives you a much deeper appreciation of SwiftData’s architecture and also allows you to build solutions for scenarios where SQLite may not be the right fit.