AzamSharp
I was wrong! MVVM is NOT a good choice for building SwiftUI applications
UPDATE
I wrote an updated version of this article called SwiftUI Architecture - A Complete Guide to MV Pattern Approach. I recommend that you read that article for more up to date information.
SwiftUI was introduced at WWDC 2019 and it completely changed how we build our apps for Apple platform. SwiftUI provided a declarative framework, which allowed developers to quickly and easily build user interface as compared to its predecessor UIKit or AppKit. Somewhere along the lines we adopted MVVM (Model View ViewModel) design pattern as the default pattern when building SwitUI applications. In this post, I will cover my experience of using MVVM pattern with SwiftUI framework and how it worked against the SwiftUI framework, making things more complicated.
Note
Before I begin, I want to point out that I was the biggest advocate of the MVVM design pattern. I have written books on SwiftUI and MVVM, I created video courses, YouTube videos and even wrote dozens of articles explaining the benefits of using MVVM pattern for SwiftUI applications. If you are a developer and you jumped on the MVVM bandwagon then I was the driver.
React and Flutter
SwiftUI is not the first declarative framework. React and Flutter existed before SwiftUI. When implementing solutions in React or Flutter, you will rarely hear the term MVVM. React mainly uses context API or Redux for providing data to its components (views in SwiftUI). Flutter uses Block, Provider, Redux and few more. Even in Apple’s own documentation, they never mentioned the word MVVM or even the term View Model. We as a community (myself included) just thought that MVVM might be a good design pattern to use when building SwiftUI applications. It turns out that if you use MVVM with SwiftUI then you will constantly be working against the SwiftUI framework, instead of working with it.
View is the View Model
Long time ago when I was working as a .NET developer, we worked on a WPF (Windows Presentation Foundation) application. We implemented MVVM pattern for our app, where the user interface created in XAML can perform two-way binding between the interface elements and our custom view model. In SwiftUI, binding is available directly in the view using the @State and @Binding features. In other words, View in SwiftUI acts as both a view and also a view model. We don’t need to add another extra layer of custom View Model.
UI Validation
One of the most common uses of adding a view model is to perform user interface validation. The view model is populated by the view, either using binding or passing the values to the view model function. Later view model validates the user input and then notifies the user of error messages, through the use of @Published properties. In React, all this validation happens right within the view. When the validation is successful, network service is called and the validated input is sent to the server for further processing.
For more complicated validation scenarios, you can make a validation engine which can perform validation. Hopefully, in the future version of SwiftUI we will have the ability to decorate our @State properties with additional validation properties wrappers.
Layers
All problems can be solved by adding another layer of indirection, except the problem of having too many layers.
The main idea behind the view model is to provide an extra layer between the model and the user interface. The view model can trigger the API/Service and fetch all the records and then pass it down to the view, where it can be displayed. Below you can see the diagram of the MVVM flow in a client server application.
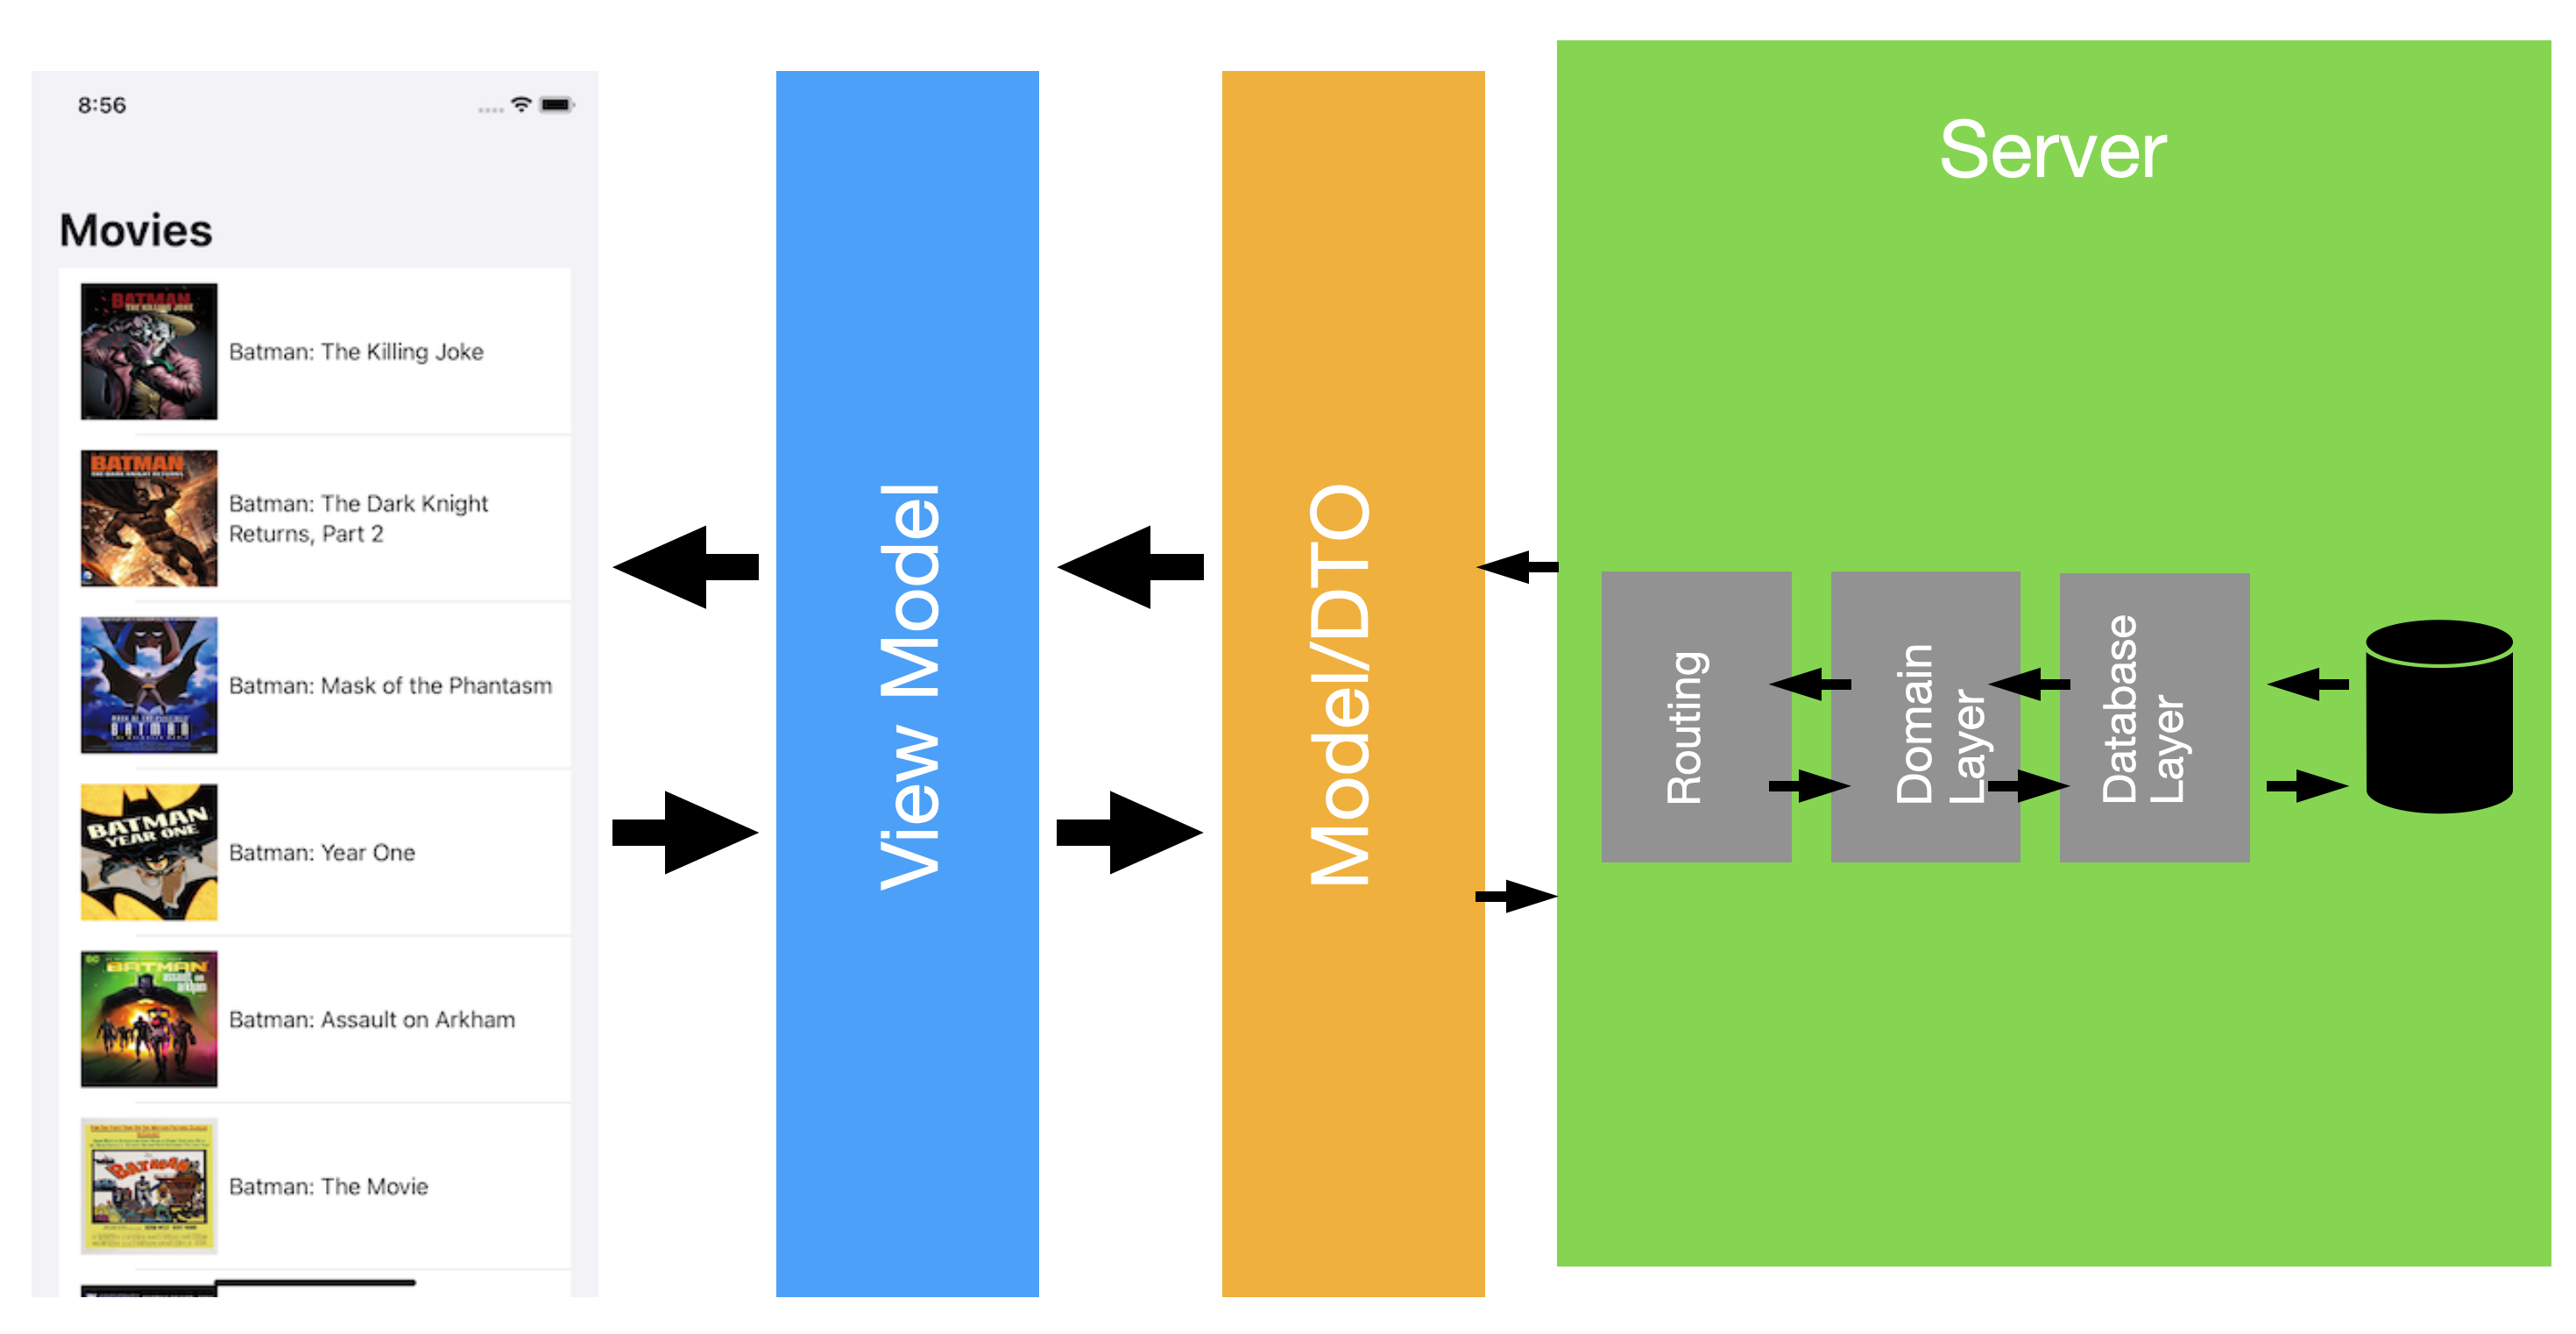
The View Model does not have the code to perform network request. View Model communicates with an APIService/Webservice to make a call, which returns the Model/DTO objects, which are later populated in a
@Publishedproperty of the View Model.
One very important thing to note in this diagram is the use of word model or DTO but not domain model. In most cases, client (SwiftUI App) does not have a domain model. The main logic of the application resides on the server, hence the domain logic/layer is on the server not on the client. Applications with no server component can use Model in their app as domain models. This means View will search as a View but also as a View Model. Model will serve as a domain model.
Here is a typical code flow for consuming an API in a SwiftUI application using the MVVM principles.
The Webservice is responsible for making the actual request to the server and getting the results.
class Webservice {

    func fetchAllProducts() async throws -> [Product] {
        let (data, _) = try await URLSession.shared.data(from: URL(string: "https://fakestoreapi.com/products")!)
        return try JSONDecoder().decode([Product].self, from: data)
    }

}
The view model calls the Webservice and populates an array of ProductViewModel. ProductViewModel simply, exposes the data already contained in the model/DTO object. The implementation is shown below:
@MainActor
class ProductListViewModel: ObservableObject {

    @Published var products: [ProductViewModel] = []

    func getProducts() async {

        do {
            let products = try await Webservice().fetchAllProducts()
            self.products = products.map(ProductViewModel.init)
        } catch {
            print(error.localizedDescription)
        }

    }

}

struct ProductViewModel: Identifiable {
    private var product: Product

    init(product: Product) {
        self.product = product
    }

    var id: Int {
        product.id
    }

    var title: String {
        product.title
    }

    var price: Double {
        product.price
    }

    var description: String {
        product.description
    }
}
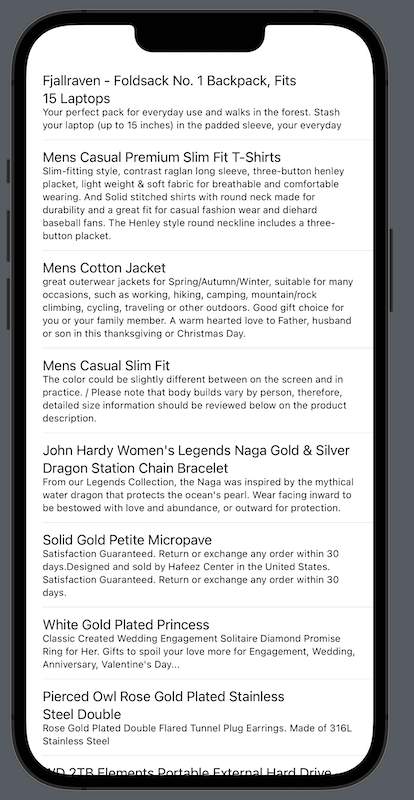
Finally, ContentView uses the ProductListViewModel to displays the data on the screen. The code is shown below:
struct ContentView: View {

    @StateObject private var vm: ProductListViewModel = ProductListViewModel()

    var body: some View {
        List(vm.products) { product in
            VStack(alignment: .leading) {
                Text(product.title)
                Text(product.description)
                    .font(.caption)
                // display price and other information
            }
        }
        .listStyle(.plain)
        .task {
            await vm.getProducts()
        }
    }
}
Great! We can see the products displayed on the screen. At this point the main question is that what is the purpose of the view model. You might say that view model is providing an extra layer between the View and the Domain Model. That statement is WRONG! The View Model is not providing a layer/separation between the view and the Domain Model. The view model is providing separation between the view and the Model/DTO. But there is no reason for such separation. A DTO/Model (Not Domain Model) can be given directly to the View. A DTO is simply an object representing the results received from the server. It does not contain any business logic.
Let’s update our Webservice to support these changes.
@MainActor
class Webservice: ObservableObject {

    @Published var products: [Product] = []

    func fetchAllProducts() async throws {
        let (data, _) = try await URLSession.shared.data(from: URL(string: "https://fakestoreapi.com/products")!)
        self.products = try JSONDecoder().decode([Product].self, from: data)
    }

}
Now, the webservice is responsible for keeping the state of the products. Webservice is also marked with ObservableObject, which means that the changes to the Webservice @Published properties can be observed.
We no longer need the view model. The view has been updated to call Webservice directly. This is shown below:
struct ContentView: View {

    @StateObject private var service = Webservice()

    var body: some View {
        List(service.products, id: \.id) { product in
            VStack(alignment: .leading) {
                Text(product.title)
                Text(product.description)
                    .font(.caption)
                // display price and other information
            }
        }
        .listStyle(.plain)
        .task {
            do {
                try await service.fetchAllProducts()
            } catch {
                print(error.localizedDescription)
            }
        }
    }
}
The result is exactly the same. All the products will get displayed successfully.
The main confusion stems from the idea that view is directly consuming the domain model. The reality is that the data sent from the server to the client is not the domain model but simply a DTO objects, which in our case is based on the JSON returned from the server.
Global State:
One of the built in features of SwiftUI is the concept of Global tate. Global state contains the data available to all views. When the data changes then those views (who are interested in global state) automatically gets re-rendered. This is similar to the Redux pattern in React.
Unlike React, which requires a lot of work to setup to use global state, global state is easily accessible in SwiftUI applications using @EnvironmentObject property wrapper.
The @EnvironmentObject is only available inside the views. If you want to access @EnvironmentObject inside a view model then you will have to pass it through the construction (dependency injection). Let’s take a look at implementation below:
class AppState: ObservableObject {
    @Published var counter: Int = 0
}
In the above code, we have created the global state called AppState. AppState consists of a single property counter.
Next, we implement the CounterViewModel which will be responsible for providing the updated counter value to the view.
class CounterViewModel: ObservableObject {

    var appState: AppState

    init(appState: AppState) {
        self.appState = appState
    }

    var counter: Int {
        appState.counter
    }

    func increment() {
        objectWillChange.send()
        appState.counter += 1
    }

}
Finally, we will inject the AppState as an environment object and also as a dependency to the CounterViewModel.
@main
struct LearnApp: App {

    var appState = AppState()

    let webservice = Webservice()
    let counterService = CounterService()

    var body: some Scene {
        WindowGroup {

            ContentView(counterVM: CounterViewModel(appState: appState))
             .environmentObject(appState)
        }
    }
}
I do realize that I am injecting the same appState both in the
CounterViewModeland as an environment object. The CounterViewModel can update the global state as well as change it. The environment object will allow other views to read the value from the@EnvironmentObjectand get the updated state.
Now, if you run the app and press on the increment button then it will successfully increment the global state counter.
As you can see sharing global state when using view models can become hard and the complexity goes up, if you are dealing with multiple view models and they also wants to access the global environment object. On the bright side, if we remove the view models from the equation then things get very simple.
We implement CounterService class, which maintains the counter state. This is implemented below:
class CounterService: ObservableObject {

    @Published var counter: Int = 0

    func increment() {
        counter += 1
    }

}
We inject it into the root view as shown below:
ContentView().environmentObject(CounterService())
And finally, we can access it from inside the ContentView.
struct ContentView: View {

    @EnvironmentObject private var counterService: CounterService

    var body: some View {
        VStack {
            Text("\(counterService.counter)")
            Button("Increment") {
                counterService.increment()
            }
        }

    }
}
We simply removed the view model from the equation and allowed the SwiftUI view to directly access the value of the counter from the CounterService, which maintains the global state of the counter.
In WWDC 2019 talk Data Flow Through SwiftUI Apple talked about single source of truth. Single source of truth basically means that the data should flow from one direction. @EnvironmentObject in SwiftUI allow us to make apps with un-directional flow. Let’s take the same example of products API and see how we can store list of products in the global state without using the MVVM pattern.
We will start with the same Webservice as shown below:
class Webservice: ObservableObject {

    @Published var products: [Product] = []

    func fetchAllProducts() async throws {
        let (data, _) = try await URLSession.shared.data(from: URL(string: "https://fakestoreapi.com/products")!)

        Task { @MainActor in
            self.products = try JSONDecoder().decode([Product].self, from: data)
        }

    }

}
The ```Webservice`` will host list of products. Now, we can add Webservice in the environment object. This is shown below:
@main
struct LearnApp: App {

    let webservice = Webservice()

    var body: some Scene {
        WindowGroup {
            ContentView().environmentObject(webservice)
        }
    }
}
Now finally we can use it in the view.
struct ContentView: View {

    @EnvironmentObject private var webservice: Webservice

    var body: some View {
        VStack {
            List(webservice.products, id: \.id) { product in
                Text(product.title)
            }.task {
                try? await webservice.fetchAllProducts()
            }
        }

    }
}
Much simpler than using view models and injecting environment objects into the view models.
When using @EnvironmentObjects, one of the biggest complain is that since it is a global state, if the state gets updated then a lot of views will be needlessly rendered. You can easily avoid that by slicing the global state into smaller pieces. Let’s say you want to manage the products in the global state but you also want to put a counter in the global state. You don’t want to render the counter view if the products gets updated. The solution is to simply divide the state into multiple slices. This is shown below:
Below, you can see the code for Webservice which manages the products.
class Webservice: ObservableObject {

    @Published var products: [Product] = []

    func fetchAllProducts() async throws {
        let (data, _) = try await URLSession.shared.data(from: URL(string: "https://fakestoreapi.com/products")!)

        Task { @MainActor in
            self.products = try JSONDecoder().decode([Product].self, from: data)
        }

    }
}
And for the counter, we have created another slice as shown below:
class CounterService: ObservableObject {

    @Published var counter: Int = 0

    func increment() {
        counter += 1
    }
}
Finally, we inject both of them as an environment object to the root view.
@main
struct LearnApp: App {

    let webservice = Webservice()
    let counterService = CounterService()

    var body: some Scene {
        WindowGroup {

            ContentView()
                .environmentObject(webservice)
                .environmentObject(counterService)
        }
    }
}
That’s it! Now when the counter gets updated only CounterView will get rendered and when the products get updated then only the ContentView will get rendered. I wrote an article about slicing the global environment state. You can read it here.
Slicing Global State in SwiftUI Using Multiple EnvironmentObjects
One thing I have noticed with every SwiftUI project is that sooner or later you always need a global state with a uni-directional flow. This was one of the biggest pain points when using MVVM design pattern with SwiftUI. Managing global state using view models can get very tricky.
Business Logic
One of the most common reasons developers use the MVVM pattern with SwiftUI is because they don’t want their view to directly access the domain layer. But as I mentioned earlier, when using client/server application your domain layer will exist on the server side. The client (SwiftUI) will only be responsible for using the server endpoints to perform CRUD operations. For applications that do not have a server component, the business logic will exist on the client side. In those cases you can create local domain services, which controls the logic of your models. I will cover that in future post.
Core Data
SwiftUI consists of @FetchRequest and @SectionedFetchRequest property wrapper for working with Core Data. @FetchRequest property wrapper not only fetches data from the persistent storage but also makes sure that the user interface is up to date by rendering it when the data changes.
One main complain about using @FetchRequest is that we are exposing our domain objects to the view. The objects you retrieve using Core Data are not domain objects, they are data model objects. They do not have any business logic in them.
If your application is not server based then you can introduce local domain services that can act and perform logical operations on those objects. This means the objects will still remain data model objects but the main logic and rules will reside in local domain services.
Going back to the @FetchRequest property wrapper. If you try to use MVVM pattern with Core Data then you will need to implement @FetchRequest feature by yourself. This means you will end up implementing NSFetchedResultsController, which requires a lot of code. If you decide to not use @FetchRequest and also do not implement NSFetchedResultsController then you will be responsible for manually calling the functions to retrieve the updated data and display it on the screen. You will be moving away from the reactive programming paradigm to imperative programming.
You can check out my YouTube video in which I demonstrate how to use MVVM pattern and implement NSFetchedResultsController.
Core Data MVVM in SwiftUI App Using NSFetchedResultsController
Compare the above video with the following approach, where I used the @FetchRequest property wrapper.
Implementing @FetchRequest in SwiftUI
I may write a separate article in which I will discuss how to design apps that don’t have a server component but still consists of business logic.
Realm
Recently, I was working on some sponsored videos for Realm. Realm is a framework that allows local persistence and also cloud sync services using object oriented database and provides much better API as compared to Core Data.
Realm has also implemented special property wrappers to work seamlessly with SwiftUI. It allows the user interface to always stay in-sync with the data and even provides easy methods to perform create, update and delete operations.
If I had used MVVM pattern when working with Realm then I may have not taken advantage of all the available features. In short, I would be fighting the framework every step of the way.
Unit Testing
When writing tests, our main focus should be testing the application domain. This is the heart of the application. Domain layer consists of all the rules and logic that powers the application. In a client/server application, domain layer mostly exists on the server. So this means you will be writing unit tests for the code that is hosted on the server.
Next, you will be implementing your UI tests and then finally the integration tests. Even if you were using MVVM design pattern, you don’t have to write tests for the the view models because view models don’t contain any logic.
Please don’t write tests just for the sake if writing tests. Write good tests and make sure your domain is well tested with high code coverage.
What about Redux?
Redux pattern is commonly used in React applications. The basic idea of Redux is to provide a uni-directional data flow using single source of truth. Configuring Redux in React takes an effort. Apart from install the independent redux and react-redux package, you also need to setup reducer, middlewares (async operations), action creators, action types, multiple reducers etc.
Although you can implement Redux pattern in SwiftUI, I believe it is already available in the form of @EnvironmentObject. The only thing you need to configure is a single source of truth. I demonstrated that in the code above, where we fetch products from the API and stored it in the global state. Instead of implementing Redux pattern in SwiftUI from scratch, you can use TCA Architecture (The Composable Architecture). I personally have not used TCA Architecture but I have only heard good things about it.
Resources
This post is based on my personal experiences with working with SwiftUI. I also read some interesting articles, which highlights the same problems. You can find the list below:
- Stop using MVVM for SwiftUI
- Implementing useless MVVM with SwiftUI
- Data Flow Through SwiftUI
- Slicing Global State in SwiftUI Using Multiple EnvironmentObjects
- Retrieving Content from a Server - Meme Creator
Conclusion
SwiftUI is designed in such a way that the view also serves as the view model. @State and @Binding allows for two-way binding and @EnvironmentObject provides global state. SwiftUI is a really powerful framework but only if you use it in a way, it was designed to be used. SwiftUI does not need MVVM pattern, actually MVVM acts as an anti-pattern when building SwiftUI applications.
Next time when building a SwiftUI app, try to surrender to the framework instead of fighting it. Your productivity will increase and you will not hit brick walls.
If you like this article and want to support my work then check out my video courses below.