AzamSharp
The Ultimate Guide to Building SwiftData Applications
- Update (09/24/2023): Code samples updated for Xcode 15
- Update (09/24/2023): Added new section “Persisting and Filtering by Enums”
- Update (09/24/2023): Added new section “Transformable Types”
- Update (10/03/2023): Add new section “SwiftData Syncing Using CloudKit”
- Update (01/14/2024): Added new section “Saving Binary Data”
- Update (01/16/2024): Added new section “Common Issues in SwiftData”
SwiftData made its debut at WWDC 2023 as a replacement for the Core Data framework. Serving as a wrapper on top of Core Data, SwiftData enables on-device persistence and seamless syncing to the cloud.
One of the key benefits of utilizing SwiftData lies in its effortless integration with the SwiftUI framework. This article is structured into several sections, each delving into different aspects of the SwiftData framework. First, we will explore the foundational concepts of SwiftData, followed by an examination of its architectural design, relationship management, migration capabilities, and more. By navigating through these sections, you will gain a comprehensive understanding of SwiftData’s features and functionalities, empowering them to leverage its full potential in your iOS development endeavors.
If you are interested in a video course on SwiftData then check out SwiftData Bootcamp - A Comprehensive Guide to Building Data-Driven Applications
The outline of this article is shown below:
- Enable Core Data Debugging
- Getting Started with SwiftData
- Relationships
- Querying Data
- Dynamic Predicates
- Persisting and Filtering by Enums
- Transformable Types
- Saving Binary Data
- Xcode Previews
- Migrations
- Architecture
- SwiftData Syncing Using CloudKit
- Testing
- SwiftData with UIKit
- Common Issues in SwiftData
- Resources
- Conclusion
Enable Core Data Debugging
As I mentioned earlier, SwiftData uses Core Data behind the scenes. This means all the debugging techniques for Core Data should also work for SwiftData applications. One of the most common and easy to use debugging techniques is through the use of flags in launch arguments. There are several different launch arguments available, but for starting out you can use the following:
-com.apple.CoreData.SQLDebug 1
This flag will output the path of the database as well as the SQL queries executed against the database. This aspect holds tremendous value, particularly when aiming to minimize excessive database queries and optimize code. It provides an opportunity to refactor and enhance code quality, leading to improved overall performance and efficiency.
If you want to learn more then check out this detailed article.
Getting Started with SwiftData
SwiftData offers the convenience of declaring the schema directly in code, distinguishing itself from Core Data’s requirement of a separate mapping file for schema creation. By utilizing the @Model attribute, SwiftData enables developers to indicate persistence and establish a definitive source of truth. This approach simplifies the development process, allowing for a more streamlined and cohesive schema definition within the codebase.
Currently, there is no available tool to visualize the relationships between different SwiftData models in a graphical manner. It would be beneficial for developers if Apple could introduce a dedicated tool in the future to provide this visual representation. Such a tool would greatly enhance the understanding and analysis of complex relationships within the SwiftData models, facilitating easier navigation and comprehension of the data structure.
Below you can see the implementation of the Budget model:
import SwiftData

@Model
final class Budget {

    var name: String
    var limit: Double

    init(name: String, limit: Double) {
        self.name = name
        self.limit = limit
    }
}
The Budget class looks like a normal class, except that it is decorated with @Model macro. The @Model macro will generate the required code, which will allow the Budget class to be persisted to the persisted store. By default SwiftData uses SQLite database but it can be configured to persist data in XML, binary and even in-memory databases.
Keep in mind that the @Model macro can only be applied to classes. If you apply it to a type struct then you will be greeted with errors. This means your models must be a reference type and not value types.
SwiftData automatically handles the identification aspect of the model, eliminating the need for explicitly defining an
idproperty or conforming to theIdentifiableprotocol.
To persist Budget to the database you will need to configure the model container. This can be done in the App file as shown below:
@main
struct SpendSmartARPApp: App {

    var body: some Scene {
        WindowGroup {
            NavigationStack {
                BudgetListScreen()
            }
        }
        .modelContainer(for: Budget.self)
    }
}
Now you can persist the budget to the database by using the modelContext through the Environment in your view as shown below:
struct BudgetListScreen: View {

    @Environment(\.modelContext) private var context

    @State private var name: String = ""
    @State private var limit: Double?

    func saveBudget() {
        // saveBudget is fired only after the data has been successfully validated
        let budget = Budget(name: name, limit: limit!)
        context.insert(budget)
    }
One thing to notice is that we are not explicitly calling the save function on the context. The insert function will add the model to the context and then internally call save. SwiftData autosaves the model context. The autosave events are triggered based on the UI related events and user input as mentioned in this WWDC video.
Not all apps require autosave feature. If you are not interested in autosave then you can turn it off at the model container level as shown below:
 var body: some Scene {
        WindowGroup {
            NavigationStack {
                BudgetListScreen()
            }
        }
        .modelContainer(for: Budget.self, isAutosaveEnabled: false)

    }
Relationships
There is a saying in object oriented programming, “No object is an island”. Relations are an integral part of a relational database. From database perspective, these relationships are handled by joining multiple tables together. In SwiftData these relationships are defined programmatically in code, implemented in the model.
There are two relationships we have to define.
- A budget can have many transactions.
- Each transaction can belong to a single budget.
We have modified the Budget class to support a list of transactions. This means one budget can have many transactions. This relationship is created using the @Relationship macro. The cascade option indicates that when the budget is deleted then all the transactions associated with the budget will also be deleted.
@Model
final class Budget {

    var name: String
    var limit: Double

    @Relationship(deleteRule: .cascade)
    var transactions: [Transaction] = []

    init(name: String, limit: Double) {
        self.name = name
        self.limit = limit
    }
If you are planning to use iCloud and CloudKit to sync your SwiftData records then you need to make sure that the relationships you define in SwiftData are optional with a default value. This means the above relationship will be written as
@Relationship(.cascade)
    var transactions: [Transaction]? = []
The other side of the relationship is from the transaction point of view. A transaction can belong to a budget. This relationship is shown below:
@Model
final class Transaction {
    var note: String
    var amount: Double
    var date: Date
    var hasReceipt: Bool = false

    @Relationship(inverse: \Budget.transactions)
    var budget: Budget?

    init(note: String, amount: Double, date: Date, hasReceipt: Bool = false) {
        self.note = note
        self.amount = amount
        self.date = date
        self.hasReceipt = hasReceipt
    }
}
The
@Relationshipmacro on the Transaction class is not required. SwiftData implicitly discovers inverse relationships between models. Also make sure to set budget property as optional or else it will give you runtime error.
Another thing to keep in mind is that the relationships created in SwiftData only exists in the object graph and they are not the same as relationships between database tables. This means if you open the database using applications like Base or BeeKeeper, you will not find any foreign key constraints listed under the relationships section. SwiftData is a framework, which can persist an object graph to different stores, but it is NOT an ORM.
It is also important to note that you don’t have to pass all the models used in your app to the model container in the SpendSmartARPApp struct. Depending on the relationships between the models you only need to pass the parent model and all the child relationships are automatically inferred.
In the example below, we are only passing Budget type to the modelContainer modifier. This is because Budget contains reference to Transaction class and modelContainer can infer those relationships based on the budget class.
@main
struct SpendSmartARPApp: App {

    var body: some Scene {
        WindowGroup {
            NavigationStack {
                BudgetListScreen()
            }
        }
        // passing Transaction.self is not needed in the modelContainer below
        .modelContainer(for: Budget.self)
    }
}
Now that we have setup the relationship between budget and transaction, the next step is to add a transaction to a particular budget. There are several different ways of adding a transaction to a budget. It all depends on the requirements of your user interface. Below you can find the implementation where we create a brand new transaction and then assign it to the budget property. The budget was passed to the view through the view’s constructor.
struct BudgetDetailScreen: View {

    @Environment(\.modelContext) private var context

    let budget: Budget

    private func saveTransaction() {
        // this function is fired after the validation of the form is successful
        let transaction = Transaction(note: note, amount: amount!, date: date, hasReceipt: hasReceipt)
        transaction.budget = budget
    }

    var body: some View {
 TransactionListView(transactions: budget.transactions)
    }
You don’t need to call save or insert function since the model budget is already part of the context. This will automatically update both sides of the relationship. It means transaction.budget will have a budget and a new transaction will be added to budget.transactions automatically.
Unfortunately, this does not re-render TransactionListView. Even though the transactions in budget instance are updated, it still does not trigger an update on the view. I believe it may be because the update was caused internally and not through the mechanism that invoke the observation behavior.
The correct way of adding a transaction to an existing budget which also re-renders the view is by adding it through the budget.transactions property as shown below:
  private func saveTransaction() {
        let transaction = Transaction(note: note, amount: amount!, date: date, hasReceipt: hasReceipt)
        // This will also re-render the TransactionListView
        budget.transactions.append(transaction)
    }

      var body: some View {
 TransactionListView(transactions: budget.transactions)
    }
You can also add designated methods on budget class to perform add transaction or remove transaction operations. This allows you to run business logic prior to adding or removing transactions to a budget.
 func addTransaction(_ transaction: Transaction) {
        // add business domain rules here
        self.transactions.append(transaction)
    }
If you plan to use the above approach, you can also make your transactions property private(set) so that it cannot be altered from outside the budget class.
 @Relationship(deleteRule: .cascade)
    private(set) var transactions: [Transaction] = []
SwiftData relations are not limited to one-to-one or one-to-many but you can also construct many-to-many relationships, also known as siblings relationship. In the code below, we have defined two models Recipe and Ingredient. The relationship between Recipe and Ingredient is many to many.
- One recipe can have many ingredients
- One ingredient can belong to many recipes
@Model
final class Recipe {
    let name: String

    init(name: String) {
        self.name = name
    }

    @Relationship
    var ingredients: [Ingredient] = []
}

@Model
final class Ingredient {

    let name: String

    @Relationship(inverse: \Recipe.ingredients)
    var recipes: [Recipe] = []

    init(name: String) {
        self.name = name
    }
}
When adding a new recipe with ingredients you must make sure that recipe has already been persisted. Take a look at the following code, which will result in an error:
   Button("Save") {

                let recipe = Recipe(name: recipeName)
                let ingredients = ingredientNames.components(separatedBy: ",")
                    .map { $0.trimmingCharacters(in: .whitespaces) }

                ingredients.forEach { name in
                    let ingredient = Ingredient(name: name)
                    recipe.ingredients.append(ingredient)
                }
                context.insert(recipe)
            }
After creating the recipe instance, we loop though the ingredient names and append them to the recipe through the ingredients property. But since recipe is not yet added to the context, this will cause an exception. The fix is to add the recipe to the context right after the recipe instance is created. This is shown in the implementation below:
  Button("Save") {

                let recipe = Recipe(name: recipeName)

                // recipe is inserted into the context
                context.insert(recipe)

                let ingredients = ingredientNames.components(separatedBy: ",")
                    .map { $0.trimmingCharacters(in: .whitespaces) }


                ingredients.forEach { name in
                    let ingredient = Ingredient(name: name)
                    recipe.ingredients.append(ingredient)
                }
            }
Now, when you run the code it will not have any exceptions. Behind the scenes, this operation is performed by at least 3 tables. One table for recipes, one for ingredients and one will be a pivot table used for the relationships between recipes and ingredients.
We have not provided the .cascade option for the relationships, because we don’t want to delete all the ingredients when a recipe is deleted and vice versa. If you delete an ingredient from recipe.ingredients array then it will be simply be removed from the array. Same goes for removing a recipe from ingredients.recipes array.
Querying Data
Once the data has been persisted, the next step is to display it on the screen. SwiftData uses the @Query property wrapper for fetching data from the database. In the code below we fetch all the budgets and then display it in the list.
struct BudgetListScreen: View {

    @Environment(\.modelContext) private var context
    @Query private var budgets: [Budget]

    var body: some View {
        Form {

            Section("Budgets") {
                List(budgets) { budget in
                        HStack {
                            Text(budget.name)
                            Spacer()
                            Text(budget.limit, format: .currency(code: "USD"))
                        }
                }
            }
        }
    }
}
The
@Queryproperty wrapper may remind you of@FetchRequestproperty wrapper in Core Data. They do share a lot of common characteristics.
The @Query property wrapper also supports other arguments like filter, sort, order and animation. Here is the @Query implementation which supports sorting and ordering.
@Query(sort: \Budget.name, order: .forward) private var budgets: [Budget]
The budgets array will be sorted based on name property of the Budget type and organized in ascending order (.forward) parameter.
You can also provide the filter option using predicates. Predicates are implemented using the freestanding macros in Swift. Here is a simple Query using a predicate to only return budgets with over $100 limit.
@Query(filter: #Predicate { $0.limit > 100 }) private var budgets: [Budget]
Depending on your criteria, you can add multiple conditions in the predicate. One example is shown below:
@Query(filter: #Predicate { $0.limit > 100 && $0.name.contains("Vac") }) private var budgets: [Budget]
Predicates are not always implemented using static/fixed values. You can also make dynamic predicates. This means predicate will be based on a parameter passed to it. This can be useful in scenarios where you are trying to execute a query based on the model passed from the previous view.
The following code snippet demonstrates the initialization of a view with the note parameter. This parameter plays a crucial role in initializing the Query object and enabling the creation of dynamic queries.
@Query private var transactions: [Transaction]

    init(note: String) {
        _transactions = Query(filter: #Predicate { $0.note.contains(note) })
}
Unfortunately, the dynamic queries does not work in all scenarios. Maybe it is just the current limitation of SwiftData framework, which will be fixed in the future release. Here is an example, which will cause compile time errors.
In the code below, we are trying to get all the transactions based on the budget’s name. Unfortunately, this will result in an error.
struct BudgetDetailScreen: View {

    @Environment(\.modelContext) private var context

    let budget: Budget

    @Query private var transactions: [Transaction]

    init(budget: Budget) {
        self.budget = budget
        // Missing argument label 'lhs:' in call
        // Initializer 'init(_:)' requires that 'Budget' conform to 'Decodable'
        // Initializer 'init(_:)' requires that 'Budget' conform to 'Encodable'
        _transactions = Query(filter: #Predicate { $0.budget!.name.contains(budget.name) })
    }
This might be related to a bug in SwiftData. Keep in mind that at the time of this writing SwiftData is still not officially released.
As you learned earlier, queries are implemented using the @Query property wrapper. The @Query property wrapper is only available inside the view. But that does not mean that queries cannot be constructed outside of the view. In the implementation below, we have created a FetchDescriptor inside the Budget class itself, which is later injected into the @Query.
@Model
final class Budget {

    var name: String
    var limit: Double

    // other code ....

    static var all: FetchDescriptor<Budget> {
        FetchDescriptor(sortBy: [SortDescriptor(\Budget.name, order: .reverse)])
    }

}
Now inside the view you can use the all function of the Budget class.
struct BudgetListScreen: View {
    @Query(Budget.all) private var allBudgets: [Budget]
}
This allows you to move the creation of the query in the model itself instead of the view, allowing you to use the same query in other parts of the application. My recommendation is to start out having the query in the view. If your query is getting complicated and needs to be reused in other views then think about moving it to the model class.
If you find yourself using the same query in multiple views, it indicates that you are retrieving and presenting the identical data. In such situations, it is advisable to concentrate on constructing smaller views that encapsulate that particular behavior instead of focusing on to move the
@Queryout of the view.
At the time of this writing there is also no way to dynamically change the predicate attached with the query. This means you will have to create a new instance of the query and provide the new predicate. In Core Data with @FetchRequest you were allowed to substitute the predicate with a new one. Maybe this is just a current limitation and will be addressed in the future versions of SwiftData framework.
Dynamic Predicates
When you initialize a query inside the view initializer then you cannot dynamically change the predicates based on that query. There might be situations when you want to perform a query against the database based on a user interface event. The trick is to provide access to the predicate as a private local state and compose your views in a way that they take predicate as a dependency. The implementation is shown below:
struct BudgetDetailScreen: View {

    @Query private var transactions: [Transaction]
    @Environment(\.modelContext) private var context

    @Bindable var budgetCategory: BudgetCategory

    @State private var paymentType: PaymentType = .debit
    @State private var predicate: Predicate<Transaction> = .true

    // other code ...
Now, based on the user interface events we can update paymentType and predicate.
 Button("Debit") {
    paymentType = .debit
    predicate = #Predicate<Transaction> { $0.paymentTypeId == paymentType.rawValue }
}

Button("Credit") {
    paymentType = .credit
    predicate = #Predicate<Transaction> { $0.paymentTypeId == paymentType.rawValue }
}
Buttons are just used as an example. Use view components that fit your needs.
Once the predicate is updated, we can pass the predicate to a child view which can display all the transactions using the predicate.
TransactionListView(predicate: predicate)
The implementation of TransactionListView is shown below:
struct TransactionListView: View {

    @Query private var transactions: [Transaction]

    init(predicate: Predicate<Transaction>) {
        _transactions = Query(filter: predicate)
    }

    var body: some View {
        List(transactions) { transaction in
            Text(transaction.title)
        }
    }
}
That’s it! Now, the predicate will be updated dynamically and TransactionListView will be recalculated and rendered (if necessary).
Visit the original source here.
Persisting and Filtering by Enums
Persisting enums works the same way as any other primitive type. The raw value of the enum is persisted to the database. Consider a scenario, where you want to persist the genre enum associated with each Movie model. The implementation of Movie model is shown below:
enum Genre: Int, Codable {
    case action = 1
    case kids
    case horror
}

@Model
class Movie {
    var name: String
    var genre: Genre

    init(name: String, genre: Genre) {
        self.name = name
        self.genre = genre
    }
}
There are couple of important things to note about how Genre enum is declared. First we are making sure that there is a raw value associated with the genre cases. In our example we used an Int but you can use any raw value like string etc. If you don’t use raw values for your enum then each case will be used to construct a new column in the database. The result is shown below:
CREATE TABLE ZMOVIE ( Z_PK INTEGER PRIMARY KEY, Z_ENT INTEGER, Z_OPT INTEGER, ZACTION VARCHAR, ZKIDS VARCHAR, ZHORROR VARCHAR, ZNAME VARCHAR )
You probably don’t want to store each enum case as a separate column in the database. Fortunately, we provided Int as the raw value of our enum. This produced the following table in the database.
CREATE TABLE ZMOVIE ( Z_PK INTEGER PRIMARY KEY, Z_ENT INTEGER, Z_OPT INTEGER, ZGENRE INTEGER, ZNAME VARCHAR )
This is much better as instead of having separate columns for each enum case, we have a single column storing the raw value of the enum. Also, keep in mind that we deliberately assigned our first enum case a value of 1. This will make sure that we are not storing 0 in the table. Each case after the first one will be assigned the next increment value i.e 2, 3, 4 etc.
The second important thing to note here is that Genre enum conforms to Codable. Codable allows the types to be serialized and deserialized. When storing SwiftData model with enum properties, the raw values of each enum is stored in the table. In the implementation below we have persisted Movie model to the database and also fetched it using @Query modifier to be displayed on the screen.
struct ContentView: View {

    @Environment(\.modelContext) private var context
    @Query private var movies: [Movie]

    var body: some View {
        VStack {

            List(movies) { movie in
                HStack {
                    Text(movie.name)
                    Spacer()
                    Text(movie.genre.title)
                }
            }

            Button("Save Movie") {
                let movie = Movie(name: "Batman", genre: .action)
                context.insert(movie)
            }
        }
        .padding()
    }
}
Nice and simple!
Now let’s see how we can perform filtering using enums. The following code can be part of a nested view, where you pass genre to the initializer. This allows you to dynamically change the predicate of the query.
 init(selectedGenre: Genre) {
        _movies = Query(filter: #Predicate<Movie> { $0.genre == selectedGenre })
    }
Unfortunately, the above code will not filter the items. This may be a bug in SwiftData and hopefully, it will be resolved in the future update. If the above code does not work then how can we perform filter based on enum. The only approach I found that works is to replace the enum struct with its raw value. This requires an update to the Movie model as shown below:
@Model
class Movie {
    var name: String
    var genreId: Int

    var genre: Genre {
        Genre(rawValue: genreId)!
    }

    init(name: String, genre: Genre) {
        self.name = name
        self.genreId = genre.rawValue
    }
}
We have replaced Genre enum with genreId. The initializer for the Movie struct remain the same but we extract out the rawValue from the passed genre and assigned it to the genreId property. Now we can update our predicate to perform the filter based on genreId.
    init(selectedGenre: Genre) {
        _movies = Query(filter: #Predicate<Movie> { $0.genreId == selectedGenre.rawValue })
    }
The above predicate will filter movies based on the selected genre.
Predicate only works on persisted properties and not computed properties. The reason is that behind the scenes, predicate needs to generate SQL based on the database columns. Since computed properties are not persisted, they cannot be used in the Predicate.
As mentioned earlier, Apple may change how predicates work with enums but at this time the solution to persist and use their raw value does the trick.
Transformable Types
SwiftData is not only capable of storing primitive types like (Int, String, Boolean etc) but also complex types. If you want to store a custom type in the database then you can use transformable types. Transformable types in SwiftData allow you to store non-standard data types, such as custom classes or objects, dictionaries, arrays, or any other complex data structure, as attributes in your SwiftData properties. SwiftData uses a process called “value transformation” to convert these custom data types into a format that can be stored in the persistent store (typically a SQLite database).
Consider a scenario that you want to store UIColor to the database using SwiftData. UIColor is a complex object and can be stored using transformable type. The implementation of the model is shown below:
@Model
class Room {
    var name: String
    @Attribute(.transformable(by: UIColorValueTransformer.self)) var color: UIColor

    init(name: String, color: UIColor) {
        self.name = name
        self.color = color
    }
}
The color property is using the @Attribute, which is indicating that it is a transformable type and will be using UIColorValueTransformer to convert the UIColor to data and vice versa. This conversion is needed to persist UIColor to the database. The implementation of the UIColorValueTransformer is shown below:
class UIColorValueTransformer: ValueTransformer {

    // return data
    override func transformedValue(_ value: Any?) -> Any? {
        guard let color = value as? UIColor else { return nil }
        do {
            let data = try NSKeyedArchiver.archivedData(withRootObject: color, requiringSecureCoding: true)
            return data
        } catch {
            return nil
        }
    }

    // return UIColor
    override func reverseTransformedValue(_ value: Any?) -> Any? {
        guard let data = value as? Data else { return nil }

        do {
            let color = try NSKeyedUnarchiver.unarchivedObject(ofClass: UIColor.self, from: data)
            return color
        } catch {
            return nil
        }
    }

}
After you have implemented UIColorValueTransformer you need to register it for your application. This can be done in the App file as shown below:
@main
struct RoomsAppApp: App {

    init() {
        ValueTransformer.setValueTransformer(UIColorValueTransformer(), forName: NSValueTransformerName("UIColorValueTransformer"))
    }

    var body: some Scene {
        WindowGroup {
            ContentView()
                .modelContainer(for: [Room.self])
        }
    }
}
Now, you can persist color for your Room as shown below:
 Button(action: {
                let room = Room(name: name, color: UIColor(color))
                context.insert(room)
                name = ""
            }, label: {
                Text("Save")
                    .frame(maxWidth: .infinity)
            }).buttonStyle(.borderedProminent)
                .padding([.top], 20)
And also display the colors in the user interface as implemented below:
 List(rooms) { room in
                HStack {
                    Text(room.name)
                    Spacer()
                    Rectangle()
                        .fill(Color(uiColor: room.color))
                        .frame(width: 50, height: 50)
                        .clipShape(RoundedRectangle(cornerRadius: 10.0, style: .continuous))
                }
            }
Please keep in mind that saving a complex object to the database can have an impact on performance. It’s essential to make a judgment call based on your application’s specific requirements and performance considerations.
Saving Binary Data
SwiftData allows to easily persist binary data into either the persistent store or external storage. Let’s create a simple model to represent a Furniture model.
@Model
class Furniture {

    // we will take a look at attributes later
    var photo: Data?

    init(photo: Data? = nil) {
        self.photo = photo
    }

}
Binary data is represented by photo property in Furniture model.
The saveFurniture function is implemented below, which resizes the image and then persist it to the database using the model context.
 private func saveFurniture(with imageData: Data) {

        guard let uiImage = UIImage(data: imageData) else {
            print("Failed to create UIImage from data.")
            return
        }

        let resizedImage = uiImage.resizeTo(to: CGSize(width: 200, height: 200))
        guard let resizedImageData = resizedImage.pngData() else {
            print("Failed to convert UIImage to data.")
            return
        }

        let furniture = Furniture(photo: resizedImageData)
        context.insert(furniture)
    }
If you look into the SQLite3 database, you will notice that the actual binary data is stored within the database.
1|1|1|?PNG
This might be a reasonable solution for cases when binary data is small but it can cause performance concerns for large size data.
Luckily, SwiftData provides an easy way to persist the data on external storage. This can be activated by simply adding the externalStorage attribute on photo property.
import Foundation
import SwiftData

@Model
class Furniture {

    @Attribute(.externalStorage)
    var photo: Data?

    init(photo: Data? = nil) {
        self.photo = photo
    }

}
Once the externalStorage is decorated on the property, SwiftData will decide when to persist binary data within the database vs when you persist in external storage. You can look into the SQLite database and see that instead of storing the image SwiftData stored a reference to the image.
2|1|1|B88E3B59-5922-4442-8782-16E66820604E
SwiftData looks at the file size and then decides the final location of the binary data. If the file size is up to 128 KB then SwiftData stores it right within the database. Anything over 128 KB is stored in external storage.
In this section, you learned how SwiftData can be used to store binary data into the database.
Xcode Previews
Xcode previews plays a vital role in the development of SwiftUI applications, offering a significant advantage in rapidly iterating over designs and visually validating logic.
In the talk Build programmatic UI with Xcode Previews, Apple engineer mentioned that previews are like tests. They help you to quickly iterate over your user interface design and even UI logic.
My experience with previews has been the same. I use it extensively for iterating over the app design and user interface logic. If the UI logic is more complicated then those parts can be separated out into independent data structs, where they can be tested individually using XCTest framework.
Xcode previews are great for incrementally testing your UI and the logic contained in the UI, but they are not a replacement for different types of tests for your application. You may still need to write domain level unit tests, integration tests and end-to-end tests.I opted for the word may instead of will because not all applications necessarily require testing. The need for testing varies depending on the type of application being developed and whether the effort invested in writing tests yields the desired outcome.
One way to use previews in SwiftData is by implementing a custom ModelContainer. This technique was shown in WWDC video titled Build an app with SwiftData. The main idea is to create a model container just for the purpose of rendering Xcode previews. The model container can be in-memory containing fake data. The implementation is shown below:
import Foundation
import SwiftData

@MainActor
let previewContainer: ModelContainer = {

    do {
        let container = try ModelContainer(for: Budget.self, ModelConfiguration(inMemory: true))
        SampleData.budgets.enumerated().forEach { index, budget in
            container.mainContext.insert(budget)
            let transaction = Transaction(note: "Note \(index + 1)", amount: (Double(index) * 10), date: Date())
            budget.addTransaction(transaction)
        }

        return container

    } catch {
        fatalError("Failed to create container.")
    }
}()

struct SampleData {
    static let budgets: [Budget] = {
        return (1...5).map { Budget(name: "Budget \($0)", limit: 100 * Double($0)) }
    }()
}
In the above code, we have not only created fake budget objects but also added some fake transactions to each budget item. You can even get more creative and populate fake data through a JSON file.
It is not mandatory that your model container for previews is always in-memory. You can always use an actual persistent model container too. This way your data will be available between preview refreshes.
Finally, you can use the previewContainer in your view as shown in the implementation below:
struct BudgetDetailContainerView: View {
    @Query private var budgets: [Budget]

    var body: some View {
        NavigationStack {
            BudgetDetailScreen(budget: budgets[0])
        }
    }
}

#Preview { @MainActor in
    BudgetDetailContainerView()
        .modelContainer(previewContainer)
}
Please note that the above code will cause a warning Converting function value of type '@MainActor () -> any View' to '() -> any View' loses global actor 'MainActor'. At this point, it is not clear that if this is a bug or expected behavior.
#Preview is a new macro introduced in SwiftUI, which automatically writes the necessary code to generate a preview for the view. These kind of macros are also known as freestanding macros.
Although using #Preview macro is the preferred choice, you can still use the PreviewProvider to create macros for your application. This is shown below:
struct BudgetDetailContainer_Previews: PreviewProvider {
    static var previews: some View {
        BudgetDetailContainerView()
            .modelContainer(previewContainer)

    }
}
Migrations
As your application grows, your database schema also changes. It is important to keep track of these changes so you can revert back to the old schema, if needed. This also allows a new member on the team to quickly setup their environment. All they need to do is run database migrations and their system will be up to date with the current database schema.
Think of migrations as the change history of the database structure/schema
Any changes to the database schema must be represented by a migration. These changes includes but are not limited to:
- Adding or removing constraints to a column
- Renaming an existing column
- Changing the data type of the column
SwiftData allows you to perform migrations by defining different schema versions. Consider an example where you have a Budget model defined below:
@Model
final class Budget {

    var name: String
    var limit: Double

    @Relationship(deleteRule: .cascade)
    var transactions: [Transaction] = []

    init(name: String, limit: Double) {
        self.name = name
        self.limit = limit
    }
}
The Budget model currently does not have a unique constraints on the name. This means you can have duplicate budget names added to your application. What if we want to update our schema to support unique name constraints. We can’t just update our Budget model and add the @Attribute(.unique) macro for the name property. The main reason is that we may have existing budget records in the database with the duplicated names and if we try to add the unique constraints then the database will throw an error since the unique constraints will be activated because of the existing duplicate records.
SwiftData supports two types of schema migrations, lightweight and custom. Lightweight migrations do not require any custom code. Specifying delete rules for the relationships and providing originalName are examples of lightweight migrations. Custom migrations are needed when you must run some additional code with your migration.
Since this operation requires the change to the schema as well as updating the data, we must write a custom migration to perform this action. A custom migration will take care of any existing duplicate budget records in the database to ensure data integrity.
Migrations in SwiftData are created using VersionedSchema protocol. You can create different versions for your schema by conforming to VersionedSchema protocol. Below, you can see the implementation of our original schema.
enum SpendTrackerSchemaV1: VersionedSchema {

      static var versionIdentifier: String? = "Initial version of the model"

    static var models: [any PersistentModel.Type] {
        [Budget.self]
    }

    @Model
    final class Budget {

        var name: String
        var limit: Double

        @Relationship(.cascade)
        var transactions: [Transaction] = []

        init(name: String, limit: Double) {
            self.name = name
            self.limit = limit
        }

    }
}
The versionIdentifier is used to specify the purpose of the migration. The models property is used to indicate, which models will be part of this schema. And finally, we have the complete implementation of the Budget model.
As you can see in the above implementation, we do not have a unique constraint on the name property. This is because in our original implementation, we did not have the unique constraint on the name property. These model/schema changes came later and that is the reason we need to implement a version 2 of the schema.
In the implementation below we have the V2 of the schema, which includes the unique attribute on the name property.
enum SpendTrackerSchemaV2: VersionedSchema {

    static var versionIdentifier: String? = "Adding unique constraint to the name property"

    static var models: [any PersistentModel.Type] {
        [Budget.self]
    }

    @Model
    final class Budget {

        @Attribute(.unique) var name: String
        var limit: Double

        @Relationship(deleteRule: .cascade)
        var transactions: [Transaction] = []

        init(name: String, limit: Double) {
            self.name = name
            self.limit = limit
        }

    }
}
Once, you have implemented the new version of the schema. The next step is to work on a migration plan using SchemaMigrationPlan protocol. SchemaMigrationPlan provides an interface for describing the evolution of a schema and how to migrate between specific versions.
A custom migration is created using the custom function on the MigrationStage enum. This function supports the willMigrate and didMigrate closures, which are fired during different lifetime events of the migration. In our case, we will be using willMigrate to update the current budget records to make sure the existing names are unique.
 static let migrateV1toV2 = MigrationStage.custom(fromVersion: SpendTrackerSchemaV1.self, toVersion: SpendTrackerSchemaV2.self, willMigrate: { context in

        guard let budgets = try? context.fetch(FetchDescriptor<Budget>()) else { return }

        var duplicates = Set<Budget>()
        var uniqueSet = Set<String>()

        for budget in budgets {
            if !uniqueSet.insert(budget.name).inserted {
                duplicates.insert(budget)
            }
        }

        // now change the names for duplicates
        for budget in duplicates {
            let budgetToBeUpdated = budgets.first(where: { $0.id == budget.id } )!
            budgetToBeUpdated.name = budgetToBeUpdated.name + " \(generateUniqueRandomNumber())"
        }

        // calling save is important
        try? context.save()


    }, didMigrate: nil)
In the above willMigrate implementation, we first find all the duplicate budgets based on their names. Once we find all the duplicated names, we go through them and update their name property to make it unique. Finally we persist the information to the database by calling context.save() function.
Don’t run your app yet!
Remember that our models are defined in versioned schema file and not in the Budget.swift file. This means if you have already defined Budget class in Budget.swift file, you need to remove it or you will get duplicate declaration error.
So, what should we put in Budget.swift file? Once technique you can use is to create a typealias, which represents the current model version.
Open your Budget.swift file and make a typealias to point to the correct Budget model version.
typealias Budget = SpendTrackerSchemaV2.Budget
This means that in your code you can still refer to the Budget class by using Budget instead of using SpendTrackerSchemaV2.Budget.
The tip to use
typealiaswas shared by Pol Piella in his article Configuring SwiftData in a SwiftUI app.
Finally, you need to update your SpendTrackerApp file to use the migration plan. This is shown below:
@main
struct SpendTrackerApp: App {

    let container: ModelContainer

    init() {
        do {
            container = try ModelContainer(for: [Budget.self], migrationPlan: SpendTrackerMigrationPlan.self, ModelConfiguration(for: [Budget.self]))
        } catch {
            fatalError("Could not initialize the container.")
        }
    }

    var body: some Scene {
        WindowGroup {
            NavigationStack {
                BudgetListScreen()
            }
        }
        .modelContainer(container)
    }
}
Now if you run the app, the migration is going to run and add the unique constraint to the name property. Not only that but your existing duplicate budget names will be updated to satisfy the unique constraints.
Architecture
Architecture has always been a topic of hot debate, specially in the SwiftUI community. There are couple of reasons behind the confusion. First, Apple has never advocated openly about a particular architecture to follow when building SwiftUI applications. The primary rationale behind this is that, unlike UIKit applications that typically adhered to the MVC (Model-View-Controller) architecture by default, SwiftUI offers greater flexibility in terms of architectural choices.
While Apple has not explicitly recommended a particular architecture for building SwiftUI or SwiftData applications, we can acquire valuable insights into the architectural patterns used by Apple through their sample code and WWDC videos.
During Platforms State of the Union 2023, Darin Adler said “the most natural way to write your code is also the best.”. This was again mentioned by Josh Shaffer (Engineering director with the UIKit and SwiftUI team at Apple) in the Under the Radar podcast episode 270.
This can mean different things to different people but for me it simply meant that let SwiftUI be SwiftUI. Instead of fighting the framework, try to work with it.
Since 2019, I have used many different architectural patterns when building SwiftUI applications. This included MVVM, Container pattern, Redux, MV pattern and Active Record Pattern. Apple has a sample SwiftData application called Backyard Birds: Building an app with SwiftData and widgets, which uses a variation of Active Record Pattern.
I say variation of Active Record Pattern because Apple puts all the logic in their models but still uses the model context for persistence operations like save and delete. This technique allows you to easily work with Xcode Previews for SwiftData applications since you can easily inject a model container for the previews. I covered working with Xcode previews earlier in this article.
Apple introduced @FetchRequest for Core Data and @Query for SwiftData. These property wrappers are optimized for working with SwiftUI framework. But sometimes in a quest to satisfy a certain architecture, we ignore SwiftUI built-in features and try to reinvent the wheel. I have seen a lot of developers ignoring the above mentioned property wrappers and manually implementing NSFetchedResultsController for their SwiftUI applications. I have done the same, I even have a video on it titled Core Data MVVM in SwiftUI App Using NSFetchedResultsController.
Ultimately, my efforts resulted in more lines of code, contributing to an increased burden and liability. The key takeaway from this experience is to embrace SwiftUI as it was intended, avoiding unnecessary complications. Remember that the simplest and most natural approach often yields the best results.
If you are interested in further reading about SwiftUI architecture then I have written several articles on this topic. This includes Building Large-Scale Apps with SwiftUI: A Guide to Modular Architecture and Active Record Pattern for Building SwiftUI Apps with Core Data.
SwiftData Syncing Using CloudKit
SwiftData provides seamless integration with CloudKit, which enables you to sync your data with iCloud. For the most part, you don’t have to write any additional code to make the syncing work.
At the time of this writing SwiftData only supported syncing with private database associated with the user. This means shared and public databases are not supported.
Basic SwiftData syncing with iCloud is supported by default. You just have to add CloudKit capabilities and make sure that your models are conforming to the requirements of CloudKit syncing protocols.
The first step is to add CloudKit capabilities to your project. This can be done using the Signing & Capabilities tab as shown in the screenshot below:
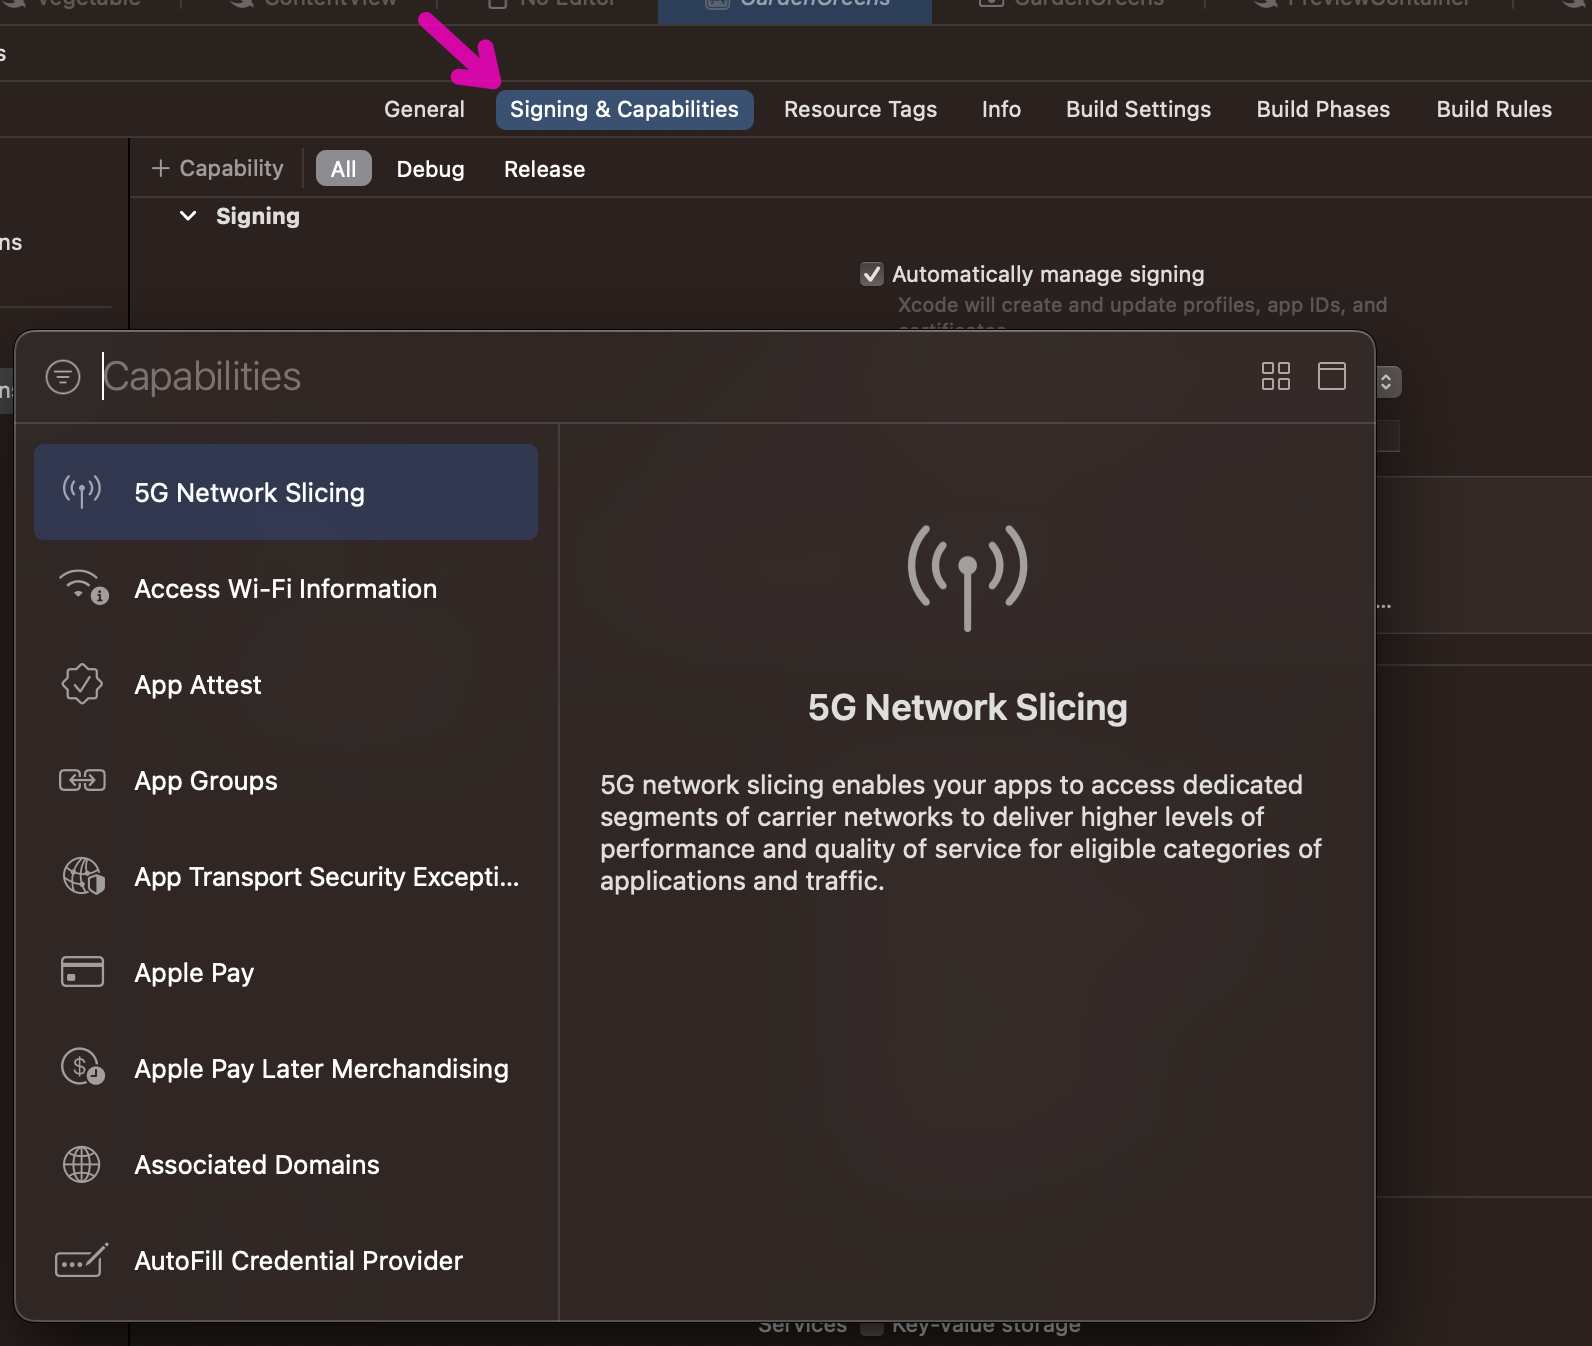
In iCloud capability make sure to select CloudKit under Services option and either select or add a unique container.

You can also click on CloudKit Console to navigate to it. There is a possibility that your new container may display error messages on the console. Don’t worry just give it more time and those errors will go away in the CloudKit console.
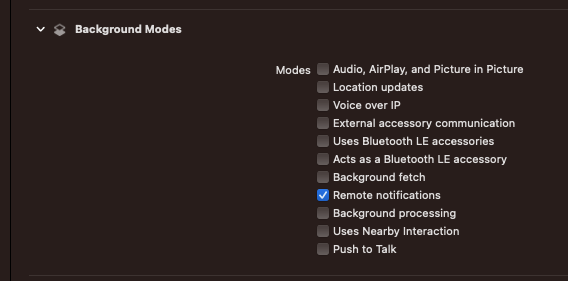
Next, add Background Modes capability to your project and make sure that Remote notifications is checked. Remote notifications are sent from the cloud to trigger updates on your device.
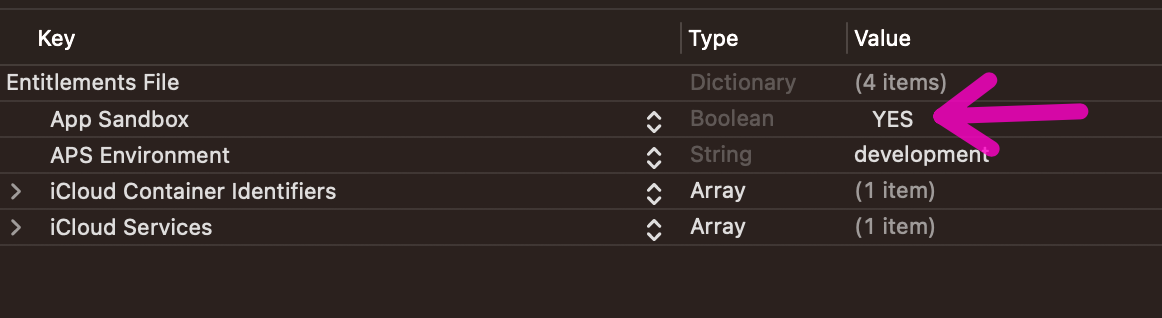
Next, open the entitlements file which was created due to the addition of the CloudKit capability. Add a new entry in the entitlements file for App Sandbox. This is shown below:
Now we are done with CloudKit configuration. Let’s move our focus to the actual code. SwiftData requires that your model properties have either a default value or should be optional. In the code below we have provided a default value or empty string to the name property and updated our notes relationship to optional.
@Model
class Vegetable {

    var name: String = ""
    @Relationship(deleteRule: .cascade) var notes: [Note]?

    init(name: String) {
        self.name = name
    }
}
You are also not allowed to use @Attribute(.unique) for SwiftData apps that sync using CloudKit.
And finally the most important thing to remember is to use the @Query macro for all fetching operations. @Query macro does a lot behind the scenes and this also includes tracking the state of the objects in the container and also seamless syncing between different devices.
This means that instead of using the following code:
 List(vegetable.notes ?? []) { note in
    Text(note.text)
}
You should use the following:
@Query private var notes: [Note]

private var notesByVegetable: [Note] {
    notes.filter { $0.vegetable!.id == vegetable.id }
}

List(notesByVegetable) { note in
    Text(note.text)
}
The @Query macro has been fine-tuned for optimal performance within SwiftUI applications, and I strongly recommend its adoption over any alternative custom solutions you may consider building.
To experience live syncing between multiple devices you need to run it on a real device. Since syncing depends on remote notifications, it will not work as expected on simulator and/or Xcode previews.
If you are interested then you can also watch a video on this topic. The video is titled SwiftData CloudKit Sync - The Complete Guide and while you are there go ahead and subscribe to my YouTube channel too.
Testing
Testing plays a crucial role in software development, serving as a cornerstone of confidence. When dealing with a straightforward domain, I may opt for minimal or even zero tests. However, when tackling a complex business domain, I rely on the assistance of tests to ensure accuracy and reliability.
In software development, domain is considered the most important part of the application. This is where all the rules and business logic is implemented. By testing the domain you get the best return on your investment.
Recently, I worked on a small app for my Udemy course. The app allowed the user to keep track of their budget and expenses related to each budget. You can download the app here.
One of the requirements of the app was that a user cannot add the budget category with the same name twice. SwiftData provides the @Attribute(.unique), which can be used to prevent duplicate entries. Unfortunately @Attribute(.unique) does not work as expected. First, the property marked with @Attribute(.unique) attribute will perform an upsert (Update an existing record) instead of indicating that the insert failed. Secondly, if you are editing an item using @Bindable and assign a non-unique name to a property marked with unique attribute then your app will simply crash.
I believe it is a bug for the app to crash when the unique constraints are violated. Hopefully this will be fixed in the future release.
The way to solve this problem is to implement the exists function on your own which checks whether the budget category already exists in the database or not. If the title already exists then a titleAlreadyExist error is thrown. The complete implementation is shown below:
@Model
class BudgetCategory {

    @Attribute(.unique) var title: String = ""
    var amount: Decimal = 0.0
    @Relationship(deleteRule: .cascade) var transactions: [Transaction] = []

    init(title: String, amount: Decimal) {
        self.title = title
        self.amount = amount
    }

    // exists function to check if title already exist or not
    private func exists(context: ModelContext, title: String) -> Bool {

        let predicate = #Predicate<BudgetCategory> { $0.title == title }
        let descriptor = FetchDescriptor(predicate: predicate)

        do {
            let result = try context.fetch(descriptor)
            return !result.isEmpty ? true: false
        } catch {
            return false
        }
    }

    func save(context: ModelContext) throws {

        // find if the budget category with the same name already exists
        if !exists(context: context, title: self.title) {
            // save it
            context.insert(self)
        } else {
            // do something else
            throw BudgetCategoryError.titleAlreadyExist
        }
    }
}
So, how do we write unit test associated with the above behavior. One good thing about the above implementation is that all the code is in the model and not in the view. This allows us to easily write unit tests for the logical parts of your application also known as the domain model. Below you can find the implementation of a test, which checks that the exception is thrown when a budget category with the same name is added twice.
 @MainActor
    func testThrowtitleDuplicateExceptionWhenInsertingDuplicateBudgetCategoryTitle() throws {

        // A budget category with the same name was added in the setup

        let newBudgetCategory = BudgetCategory(title: "Travel", amount: 300)

        XCTAssertThrowsError(try newBudgetCategory.save(context: context), "No exception was thrown.") { error in
            let thrownError = error as? BudgetCategoryError
            XCTAssertNotNil(thrownError)
            XCTAssertEqual(BudgetCategoryError.titleAlreadyExist, thrownError)
        }

        context.insert(newBudgetCategory)
    }
Budget category with the same exact name was added in the setup function. Setup is invoked before each test is run.
The above test uses MockContainer, which stores the data in-memory. This means data is wiped out for the next test.
@MainActor
var mockContainer: ModelContainer {
    do {
        let container = try ModelContainer(for: BudgetCategory.self, configurations: ModelConfiguration(isStoredInMemoryOnly: true))
        print("returning a new container")
        return container
    } catch {
        fatalError("Failed to create container.")
    }
}
You don’t have to use in-memory database for testing. You can persist test data to an actual storage (SQLite by default). Just make sure to remove the data before the next test runs. This will ensure that your tests are not passing or failing based on the data persisted by the previous tests.
Here is another test that calculates the remaining amount for a budget category.
 @MainActor
    func testCalculateRemainingForBudgetCategory() {

        let transactions = [Transaction(title: "Milk", amount: 10, quantity: 1), Transaction(title: "Bread", amount: 2.5, quantity: 2), Transaction(title: "Eggs", amount: 4.75, quantity: 4)]

        for transaction in transactions {
            self.budgetCategory.addTransaction(context: context, transaction: transaction)
        }

        XCTAssertEqual(266, budgetCategory.remaining)
    }
Unit testing becomes increasingly important as the complexity of the domain increases.
Unit tests focuses on a small parts of your application. They do serve a very important purpose, which includes understanding a complex domain. But the best method against regression is end-to-end testing.
End-to-End testing ensures that the app works as expected when it will be used in production. You can write end-to-end tests in SwiftUI using the built-in UITest framework. I opt for few long happy paths and few edge cases per story. For instance we can write the following long happy path test.
“As a user I should be able to add category and then add a transaction and then finally remove that transaction”
It is important to note that your end-to-end test are as close to production environment as possible. This means instead of writing to an in-memory database, you should persist information in a real database. Just make sure to delete all the data once the test is finished.
A common technique is to pass launch arguments through the test and then read those arguments in the actual application. In the implementation below, we are passing UITEST as a launch argument.
final class SpendSmartUITests: XCTestCase {

    private var app = XCUIApplication()

    override func setUpWithError() throws {
        continueAfterFailure = false
        app.launchArguments = ["UITEST"]
        app.launch()
    }
}
Next, we read the value of the launch argument in our actual application and take appropriate action. In this case we create a model container and remove all the data from database.
struct ModelContainerFactory {

    @MainActor static func create() -> ModelContainer {

        var container: ModelContainer!

        let configuration = ModelConfiguration(for: BudgetCategory.self, isStoredInMemoryOnly: false)
        container = try! ModelContainer(for: BudgetCategory.self, configurations: configuration)

        if ProcessInfo.processInfo.arguments.contains("UITEST") {

            try! container.mainContext.delete(model: BudgetCategory.self)
        }

        return container
    }
}

@main
struct SpendSmartApp: App {

    var container: ModelContainer

    init() {
        container = ModelContainerFactory.create()
    }

    var body: some Scene {
        WindowGroup {
            NavigationStack {
                BudgetListScreen()
            }.withMessageWrapper()
        }.modelContainer(container)
    }
}
I personally don’t like the idea of accessing launch arguments as it leaks testing details into the main app. Unfortunately, I have not found a better solution.
Here is the complete implementation of UITest.
 func test_AddBudgetCategoryAndThenAddAndRemoveTransactionsToThatBudget() {

        var budgetListScreen = BudgetListScreen(app: app)
        var budgetDetailScreen = BudgetListDetailScreen(app: app)

        budgetListScreen.addBudgetCategoryButton.tap()

        budgetListScreen.titleTextField.tap()
        budgetListScreen.titleTextField.typeText("Travel")

        budgetListScreen.amountTextField.tap()
        budgetListScreen.amountTextField.typeText("100")

        budgetListScreen.saveBudgetCategoryButton.tap()
        XCTAssertTrue(app.collectionViews.staticTexts["Travel"].exists)

        // take the user to budget detail screen
        budgetDetailScreen.budgetCategoryList.staticTexts["Travel"].tap()

        budgetDetailScreen.transactionTitleTextField.tap()
        budgetDetailScreen.transactionTitleTextField.typeText("Airfare")

        budgetDetailScreen.transactionAmountTextField.tap()
        budgetDetailScreen.transactionAmountTextField.typeText("48")

        budgetDetailScreen.transactionQuantityTextField.tap()
        budgetDetailScreen.transactionQuantityTextField.tap()

        budgetDetailScreen.addTransactionButton.tap()

        XCTAssertEqual("Spent: $48.00", budgetDetailScreen.spentText.label)
        XCTAssertEqual("Remaining: $52.00", budgetDetailScreen.remainingText.label)

        XCTAssertTrue(app.staticTexts["Airfare (1)"].exists)

        // deleting the transaction
        let transactionList = app.collectionViews
        transactionList.children(matching: .cell).element(boundBy: 10).children(matching: .other).element(boundBy: 1).children(matching: .other).element.swipeLeft()
        transactionList.buttons["Delete"].tap()

        // check if the row is gone
        XCTAssertFalse(app.staticTexts["Airfare (1)"].exists)

        XCTAssertEqual("Spent: $0.00", budgetDetailScreen.spentText.label)
        XCTAssertEqual("Remaining: $100.00", budgetDetailScreen.remainingText.label)
    }
As you can see the end-to-end test is pretty detailed. This is perfectly fine because the purpose of such tests is to verify the complete behavior of a user story. When working on apps with a complicated flow, make sure to implement quality end-to-end tests.
There is much more to be said about testing. Testing is a vast and complicated topic. I have written few articles on my views on testing. You can read it here. If you are interested to learn more about testing then check out the book, Unit Testing Principles, Practices and Patterns by Vladimir Khorikov.
In the end, focus on writing tests for the most important parts of your application. In most cases, it is the domain. This will give you the best return on your investment.
SwiftData with UIKit
SwiftData is primarily designed to work with SwiftUI, but it can be integrated with the UIKit framework. Apple discusses these steps these in the article Preserving your app’s model data across launches.
You will start by setting up the model container for your app. This should be done at the start of your application. The implementation of the container property is shown below:
@main
class AppDelegate: UIResponder, UIApplicationDelegate {

    // other code

    lazy var container: ModelContainer = {
        //let configuration = ModelConfiguration(inMemory: true)
        let container = try! ModelContainer(for: TodoItem.self)
        return container
    }()
}
Once the container has been initialized, you can use it in your view controllers, just like you have for SwiftUI applications. Once thing to notice is that when working with SwiftData for your UIKit apps, you don’t have access to the @Query property wrapper. This means you need to call the fetch function, which is part of the context to manually fetch the records. This is shown in the implementation below:
 private func populateTodoItems() {

        guard let appDelegate = UIApplication.shared.delegate as? AppDelegate else { return }
        let context = appDelegate.container.mainContext

        let fetchDescriptor: FetchDescriptor<TodoItem> = FetchDescriptor()

        do {
            self.todoItems = try context.fetch(fetchDescriptor)
            tableView.reloadData()
        } catch {
            print(error)
        }
    }
There is no equivalent of
NSFetchedResultsControllerin SwiftData. This also indicates Apple’s intention that SwiftData is primarily created to work with SwiftUI and not with UIKit. Having said that you can, if you want still use SwiftData with UIKit.
Common Issues and Limitations of SwiftData Framework
In this section, I will discuss some of the common issues and limitations of the SwiftData framework. Hopefully, these problems will be addressed in the future release of SwiftData.
Predicates Based on Relationships
Consider a scenario, where you have an app with BudgetCategory and Transaction models. The relationship between budget category and transaction is one to many. One budget category can have multiple transactions and multiple transactions can belong to a single budget category.
If we want to construct a predicate to fetch all transactions based on budget category’s title then we may implement something like the following:
// THIS WILL NOT COMPILE
_transactions = Query(filter: #Predicate<Transaction> { $0.budgetCategory!.title == budgetCategory.title })
Unfortunately, this will not compile and throw the following error:
Cannot convert value of type 'PredicateExpressions.Equal<PredicateExpressions.KeyPath<PredicateExpressions.ForcedUnwrap<PredicateExpressions.KeyPath<PredicateExpressions.Variable<Transaction>, BudgetCategory?>, BudgetCategory>, String>, PredicateExpressions.KeyPath<PredicateExpressions.Value<BudgetCategory>, String>>' to closure result type 'any StandardPredicateExpression<Bool>'
However, you can write the same predicate by moving the budgetCategory.title into a variable and then performing the comparison.
// THIS WORKS
let budgetTitle = budgetCategory.title
        _transactions = Query(filter: #Predicate<Transaction> {
            $0.budgetCategory?.title == budgetTitle
})
I am not certain if this is the expected behavior or not. I find it quite strange that we have to move the value into a separate variable to include it into the predicate.
Predicate with Enums
SwiftData currently does not support using enums in predicates (at least not in a straight-forward way). Let’s take a look at a small example. I have an enum called PaymentType implemented below:
enum PaymentType: Int, Codable {
    case credit
    case debit
    case check
    case cash
}

extension PaymentType {
    var title: String {
        switch self {
            case .credit:
                return "Credit"
            case .debit:
                return "Debit"
            case .check:
                return "Check"
            case .cash:
                return "Cash"
        }
    }
}
This enum is used in the Transaction model as shown below:
@Model
class Transaction {

    var title: String
    var amount: Decimal
    var quantity: Int
    var budgetCategory: BudgetCategory?
    var paymentType: PaymentType?
Now, if you want to construct a predicate based on the payment type, you may try the following approaches.
// THIS WILL NOT COMPILE
 _transactions = Query(filter: #Predicate<Transaction> { $0.paymentType == PaymentType.debit })

// THIS WILL NOT COMPILE
 _transactions = Query(filter: #Predicate<Transaction> { $0.paymentType?.rawValue == PaymentType.debit.rawValue })

// THIS WILL COMPILE BUT THROW A RUNTIME EXCEPTION
_transactions = Query(filter: #Predicate<Transaction> { $0.paymentType?.rawValue == 1 })

// THIS WILL COMPILE BUT THROW A RUNTIME EXCEPTION
 let paymentTypeId = PaymentType.debit.rawValue
        _transactions = Query(filter: #Predicate<Transaction> { $0.paymentType?.rawValue == paymentTypeId })


// THIS WILL COMPILE. SwiftDataError WARNINGS ON OUTPUT WINDOW. NO RESULTS RETURNED
 let paymentTypeId = PaymentType.debit.rawValue
        _transactions = Query(filter: #Predicate<Transaction> { $0.paymentType!.rawValue == paymentTypeId })
Basically, non of the approaches mentioned above produced the desired output. Even if you change paymentType from optional to non-optional it will not work. The only way I have found to make it work is to perform the predicate on a property that is not an enum and expose enum as a computed property. This is shown below:
@Model
class Transaction {

    var title: String
    var amount: Decimal
    var quantity: Int
    var budgetCategory: BudgetCategory?
    var paymentTypeId: Int

    var paymentType: PaymentType? {
        PaymentType(rawValue: paymentTypeId)
    }

    // other code
}
Now, you can implement the predicate as follows:
 let paymentTypeId = PaymentType.debit.rawValue
        _transactions = Query(filter: #Predicate<Transaction> { $0.paymentTypeId == paymentTypeId })
Basically, we are not even using enum in the predicate. We ended up using paymentTypeId, which is an integer property. I hope this issue is fixed in the later release of SwiftData.
Unique Attribute Crashing the App When Used With @Bindable
This is a weird one!
If you put a unique attribute on a property and then update the property to a value that already exists then your app will crash. Let’s see this in action. First, we will create a property on BudgetCategory model and mark is with unique attribute.
@Model
class BudgetCategory {
    @Attribute(.unique) var title: String = ""

    // other code...
}
Next, you need to pass an instance of BudgetCategory to the detail screen as a @Bindable.
struct BudgetDetailScreen: View {
    @Bindable var budgetCategory: BudgetCategory
}
And finally, you can bind budgetCategory.title directly to the TextField.
TextField("Title", text: $budgetCategory.title)
Now, as soon as you write a title in the TextField that already exist, the whole app will crash. This is definitely not the expected behavior and I was assume that this is a bug.
Unique constraint cannot be used when iCloud is enabled. For this example, iCloud is NOT enabled.
That’s it for now! If I find more issues, I will make sure to add it to this section.
Resources
- SwiftData official documentation
- SwiftData WWDC Videos
- SwiftData Udemy Course: SwiftData - Declarative Data Persistence for SwiftUI
- Building Large-Scale Apps with SwiftUI: A Guide to Modular Architecture
- Active Record Pattern for Building SwiftUI Apps with Core Data
Conclusion
SwiftData is a highly anticipated and welcomed addition to the iOS framework, offering seamless integration with SwiftUI and a reliable migration path for Core Data applications. This exceptional framework not only effortlessly aligns with the powerful capabilities of SwiftUI but also provides a smooth transition for developers with existing Core Data projects. By leveraging the intuitive nature of SwiftUI and the versatility of SwiftData, developers can effectively manage data and create remarkable iOS applications with ease. The inclusion of SwiftData in the iOS framework represents a significant advancement, empowering developers to streamline their workflows and deliver exceptional user experiences.
If you have enjoyed this article and want to support my work then check out my course on SwiftData on Udemy. I also have courses on SwiftUI, Vapor, Machine Learning and even Full Stack iOS Development. You can find list of all of my courses here.
If you are interested in a video course on SwiftData then check out SwiftData Bootcamp - A Comprehensive Guide to Building Data-Driven Applications