AzamSharp
Active Record Pattern for Building SwiftUI Apps with Core Data
Lately, I have been talking a lot about different architectural patterns that can be used to build SwiftUI applications. I discussed MV pattern for building client/server applications and Container pattern for building hobby projects or projects where testing is not considered first class citizen.
Recently, I have been building Core Data applications and I wanted to try out Active Record Pattern and see how it feels. In this post, I will cover my experience with building SwiftUI apps using the Active Record Pattern.
What is Active Record Pattern?
The Active Record pattern is a design pattern used in software development for connecting a database to an object-oriented programming language. It is a pattern in which an object that represents a database table or view is essentially a direct mapping to a single row of the table or view. Active Record objects typically have methods for retrieving and manipulating the data stored in the database, and they can also include validation logic for enforcing business rules on the data. The Active Record pattern is often used in web application development frameworks such as Ruby on Rails and Laravel.
Why Active Record Pattern?
Active Record Pattern is ideal for building apps that exhibit an ORM (Object Relational Mapping) behavior. iOS apps that uses Core Data reflects that behavior and are good candidates to use the Active Record Pattern.
I also have past experience with several different ORM frameworks including NHibernate, Light Speed, Entity Framework, Sequelize etc and I think Core Data will fit nicely with the Active Record Pattern.
Core Data is not an ORM, it is a framework that provides an object-oriented way to manage data in a persistent store, such as a SQLite database and others.
In this article, we will look at how to implement a simple Reminders App using SwiftUI and Core Data. The Reminders App will allow the user to add a list as well as adding reminders to an existing list.
Persisting and Fetching MyList
The first thing we need to implement is a common base class or a protocol with extensions that will contain all the common functions/properties used by all our Core Data models.
The implementation is shown below:
import Foundation
import CoreData

protocol Model {
    func save() throws
    func delete() throws
}

extension Model where Self: NSManagedObject {

    func save() throws {
        try CoreDataProvider.shared.viewContext.save()
    }

    func delete() throws {
        CoreDataProvider.shared.viewContext.delete(self)
        try save()
    }

    static var all: NSFetchRequest<Self> {
        let request = NSFetchRequest<Self>(entityName: String(describing: self))
        request.sortDescriptors = []
        return request
    }
}
In the above code, we have used a protocol extensions to add default implementations for the Model protocol. If there is a need to provide a custom implementation then those methods can be overridden in their respective concrete classes.
The main reason we used a protocol and not a base class is because we are using Core Data model classes in the form of extensions. If you plan to use a base class then you need to make sure that code generation option for your entity in Core Data model file is set to “manual/none” or “category/extension” instead of “class definition”.
Our MyList class is shown below:
import Foundation
import CoreData

extension MyList: Model {

}
Inside the view we can use the @FetchRequest property wrapper to retrieve all the MyList records. We have used the all property, which is declared inside our Model class.
struct ContentView: View {

    @FetchRequest(fetchRequest: MyList.all)
    private var myListResults: FetchedResults<MyList>

    @Environment(\.managedObjectContext) private var viewContext
    @State private var name: String = ""

    var body: some View {
        NavigationStack {
            VStack {
                TextField("Name", text: $name)
                    .textFieldStyle(.roundedBorder)
                    .onSubmit {

                    }
                List(myListResults) { myList in
                    NavigationLink {
                        MyListDetailView(myList: myList)
                    } label: {
                        Text(myList.name ?? "")
                    }
                }
            }
        }
    }
}
FetchedResults
instance conforms to RandomAccessCollection. This means you can access it like any other collection. FetchResults also has built-in tracking through ```NSManagedObjectContext```, which allows it to refresh automatically when the underlying object changes. This keeps your user interface fresh and up to date.
Make sure to inject NSManagedObjectContext through Environment for your Xcode Previews or else the previews will not work. This is implemented below:
struct ContentView_Previews: PreviewProvider {
    static var previews: some View {
        NavigationStack {
            ContentView()
                .environment(\.managedObjectContext, CoreDataProvider.shared.viewContext)
        }
    }
}
For your actual app, this injection is performed in the App file as shown below.
import SwiftUI

@main
struct RemindersAppApp: App {
    var body: some Scene {
        WindowGroup {
            ContentView()
                .environment(\.managedObjectContext, CoreDataProvider.shared.viewContext)
        }
    }
}
SwiftUI exposes several different property wrappers to work with Core Data. It is important that you make use of the built-in property wrappers instead of reinventing the wheel. These property wrappers are optimized to work with SwiftUI framework.
Adding a new MyList record is also pretty straight forward. This is shown in the implementation below:
  private func saveMyList() {
        // add a new list
        do {
            let myList = MyList(context: viewContext)
            myList.name = name
            try myList.save()
        } catch {
            print(error)
        }
    }

    var body: some View {
        NavigationStack {
            VStack {
                TextField("Name", text: $name)
                    .textFieldStyle(.roundedBorder)
                    .onSubmit {
                        if isFormValid {
                           saveMyList()
                        }
                    }
                List(myListResults) { myList in
                    Text(myList.name ?? "")
                }
            }
        }
    }
But how do you unit test the code above. To be honest, this code is quite simple and I would not even bother writing any unit test for it. I would simply use Xcode Previews to manually test it out. However, if you do plan to unit test the code then you can use third party libraries like ViewInspector or Axt to test the interface. Don’t use your View Models to test the user interface objects. Those tests are extremely brittle and will break when you refactor your View Model. Testing user interface through View Models is not testing the behavior, but testing the implementation. If you want to read more about how to write effective tests then check out my article Pragmatic Testing and Avoiding Common Pitfalls.
In the next section, we will take a look at configuring and consuming one to many relationship between MyList and Reminder.
Creating, Updating and Reading Reminders
The relationship between MyList and Reminder entities is one to many. The reason is that one list can have many reminders. This relationship needs to be configured in the Core Data model file. This is shown below:
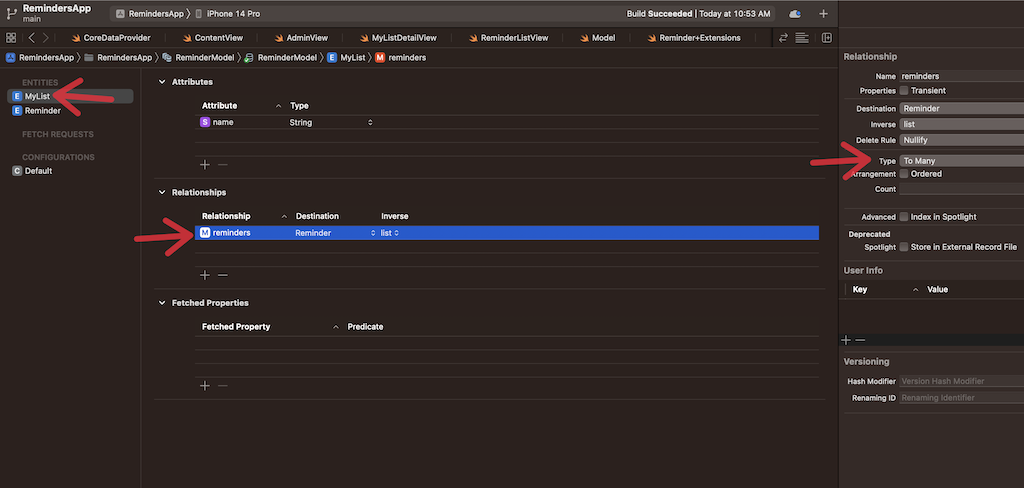
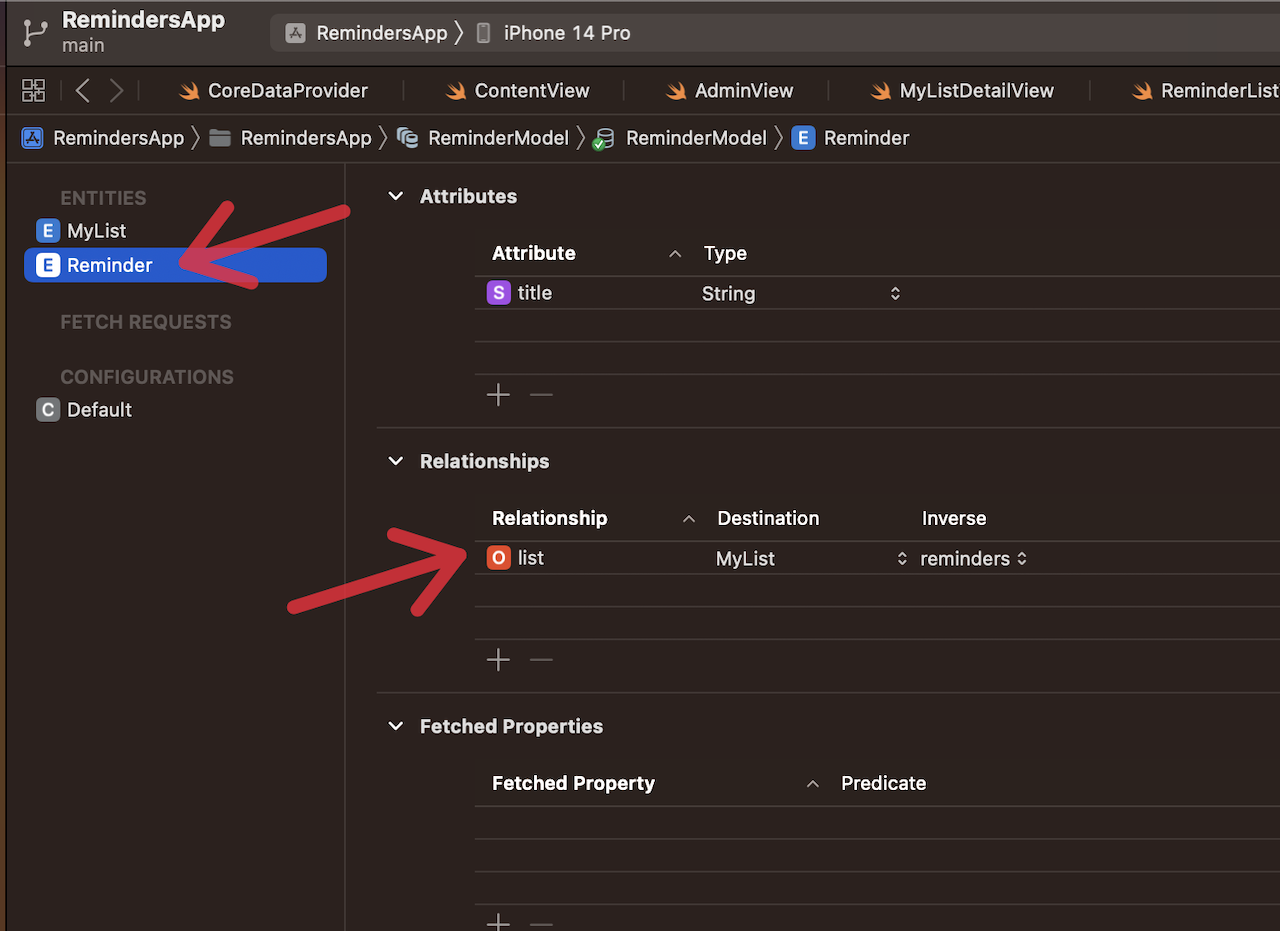
We have setup both sides of the relationship.
- A MyList can have many reminders
- A reminder can belong to a single MyList
When a user selects a MyList then they are navigated to the MyListDetailView screen. MyListDetailView acts as a container view. It allows the user to add a new reminder and also display all the reminders using the ReminderListView.
Container pattern is used commonly when building ReactJS application. If you want to learn about the container pattern then check out my article here.
MyListDetailView has a dependency on MyList instance. In the constructor we construct a FetchRequest, which is responsible for fetching all the reminders based on the MyList instance. Once again we are using the @FetchRequest property wrapper but initializing it inside the constructor since it is based on dynamic parameters.
struct MyListDetailView: View {

    let myList: MyList

    @Environment(\.managedObjectContext) private var viewContext

    @FetchRequest(sortDescriptors: [])
    private var reminderResults: FetchedResults<Reminder>

    init(myList: MyList) {
        self.myList = myList
        _reminderResults = FetchRequest(fetchRequest: Reminder.byList(myList: myList))
    }
The implementation of Reminder.byList function is shown below:
extension Reminder: Model {
    static func byList(myList: MyList) -> NSFetchRequest<Reminder> {
        let request = Reminder.fetchRequest()
        request.sortDescriptors = []
        request.predicate = NSPredicate(format: "list = %@", myList)
        return request
    }
}
You might be wondering that why we did not simply use the myList.reminders property. The reminders property is automatically generated when you setup the Core Data relationships. It is also of type NSSet instead of an array. This is not a big deal, since you can easily convert NSSet to an array. But after the conversion, it will loose tracking. This means if you change any property of a reminder then your user interface will not refresh. By using @FetchRequest property wrapper we maintain the tracking and automatically refresh the user interface based on any changes to the reminder entity. Keep in mind that byList function of Reminder entity will perform a new SQL query to be executed against the mySQL database. You can check out this article to debug Core Data.
ReminderListView is only responsible for displaying the reminders. The implementation is shown below:
import SwiftUI

struct ReminderListView: View {

    let reminders: FetchedResults<Reminder>

    var body: some View {
        List(reminders) { reminder in
            NavigationLink {
                ReminderDetailView(reminder: reminder)
            } label: {
                Text(reminder.title ?? "")
            }
        }
    }
}
One issue with passing FetchedResults
struct ReminderListViewContainer_Previews: PreviewProvider {

    struct ReminderListViewContainer: View {

        @FetchRequest(sortDescriptors: [])
        private var reminderResults: FetchedResults<Reminder>

        var body: some View {
            // ReminderListView is the view I want to preview
            ReminderListView(reminders: reminderResults)
        }
    }

    static var previews: some View {
        ReminderListViewContainer()
            .environment(\.managedObjectContext, CoreDataProvider.shared.persistentContainer.viewContext)
    }
}
ReminderListViewContainer is responsible for creating the @FetchRequest and then passing it down to the ReminderListView. This allows us to easily preview the views dependent on FetchedResults<T>.
Finally, let’s move to ReminderDetailView. ReminderDetailView is shown when the user taps on a particular reminder. ReminderDetailView is responsible for updating the reminder.
The complete implementation of ReminderDetailView is shown below:
struct ReminderDetailView: View {

    @Environment(\.dismiss) private var dismiss
    let reminder: Reminder
    @State private var title: String = ""

    var body: some View {
        VStack {
            TextField("", text: $title)
            Button("Update") {
                // validate the title property here ...
                reminder.title = title
                try? reminder.save()
                dismiss()
            }
        }.onAppear {
            title = reminder.title ?? ""
        }
    }
}
Since, the Reminder class conforms to the Model it has access to save and delete functions. After changing the title, we assign it to the reminder instance and call save on it.
The delete operation is also very similar. Here is the implementation of the deleting a reminder.
 Button("Delete") {
                do {
                    try reminder.delete()
                    dismiss()
                } catch {
                    print(error.localizedDescription)
                }
}
If we need some custom code to run during the save or delete operation for Reminder then we can always override any function exposed by the Model protocol.
You can download the source code here.
Conclusion
Active Record Pattern blends in nicely when building SwiftUI apps with Core Data. It allows you to cleanly separate the business logic from the user interface. My recommendation is that you try it out and see if it fits your needs.